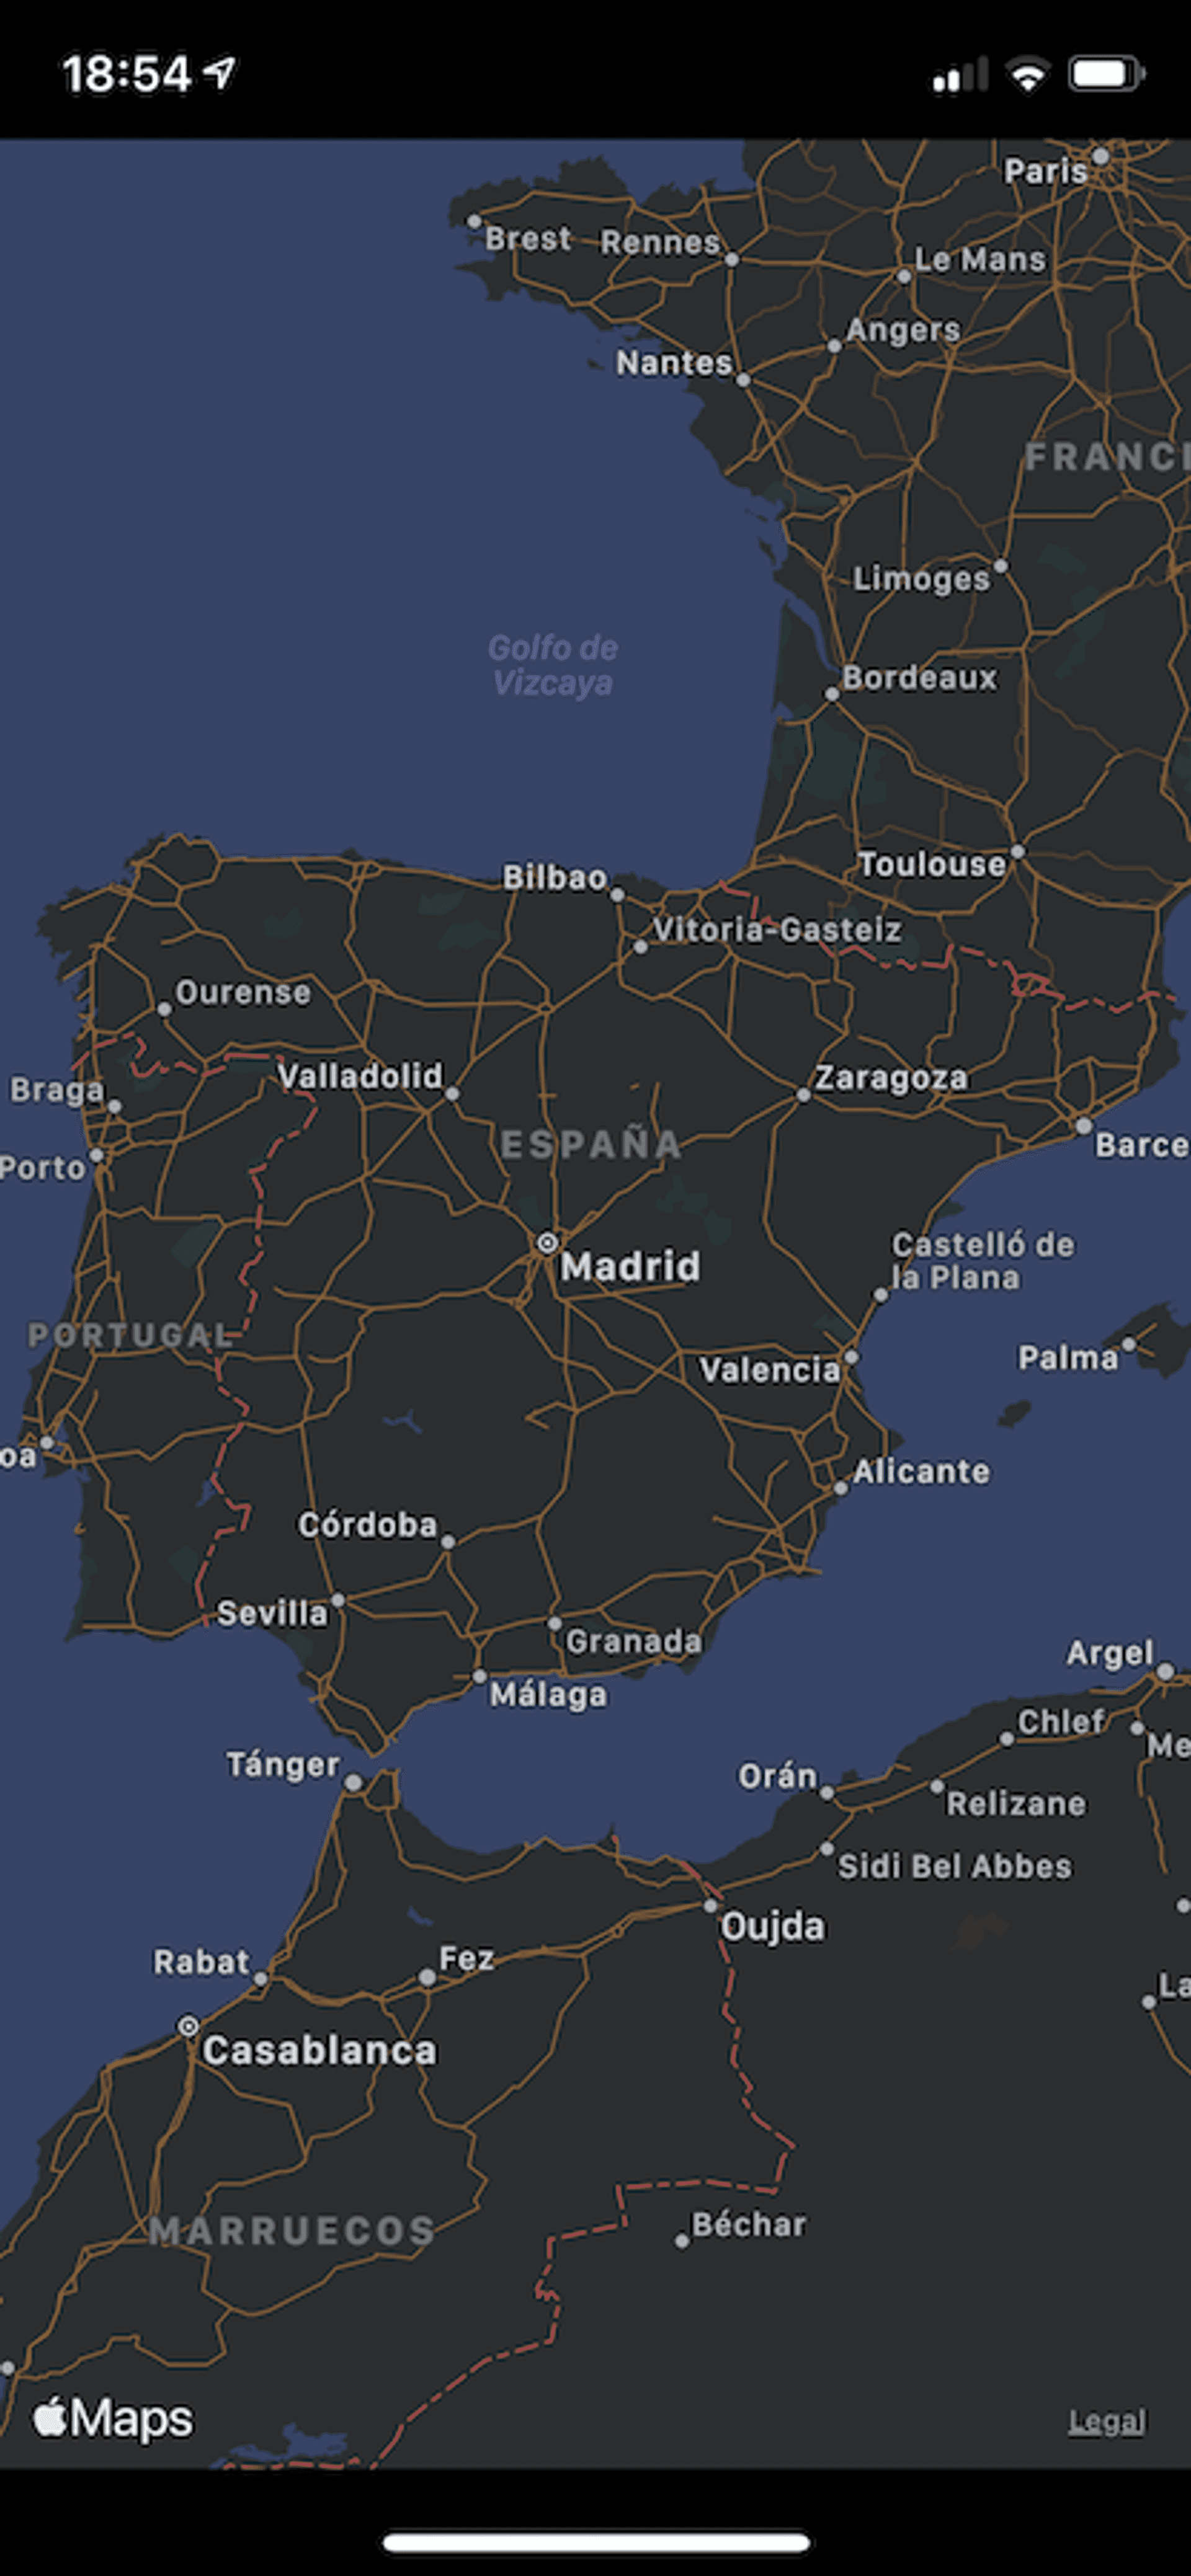
What’s Apple MapKit?
Have you noticed the number of applications that show us a map in which they place us, indicate interesting places nearby, mark routes …? In this article I will explain how to build a maps and routes application with MapKit.
But what is MapKit? MapKit is an Apple framework that bases its operation on the API and data from Apple Maps, so that you can easily add maps to the applications developed, in this case, for iOS.
A little of Swift
This project can be found in full on GitHub.
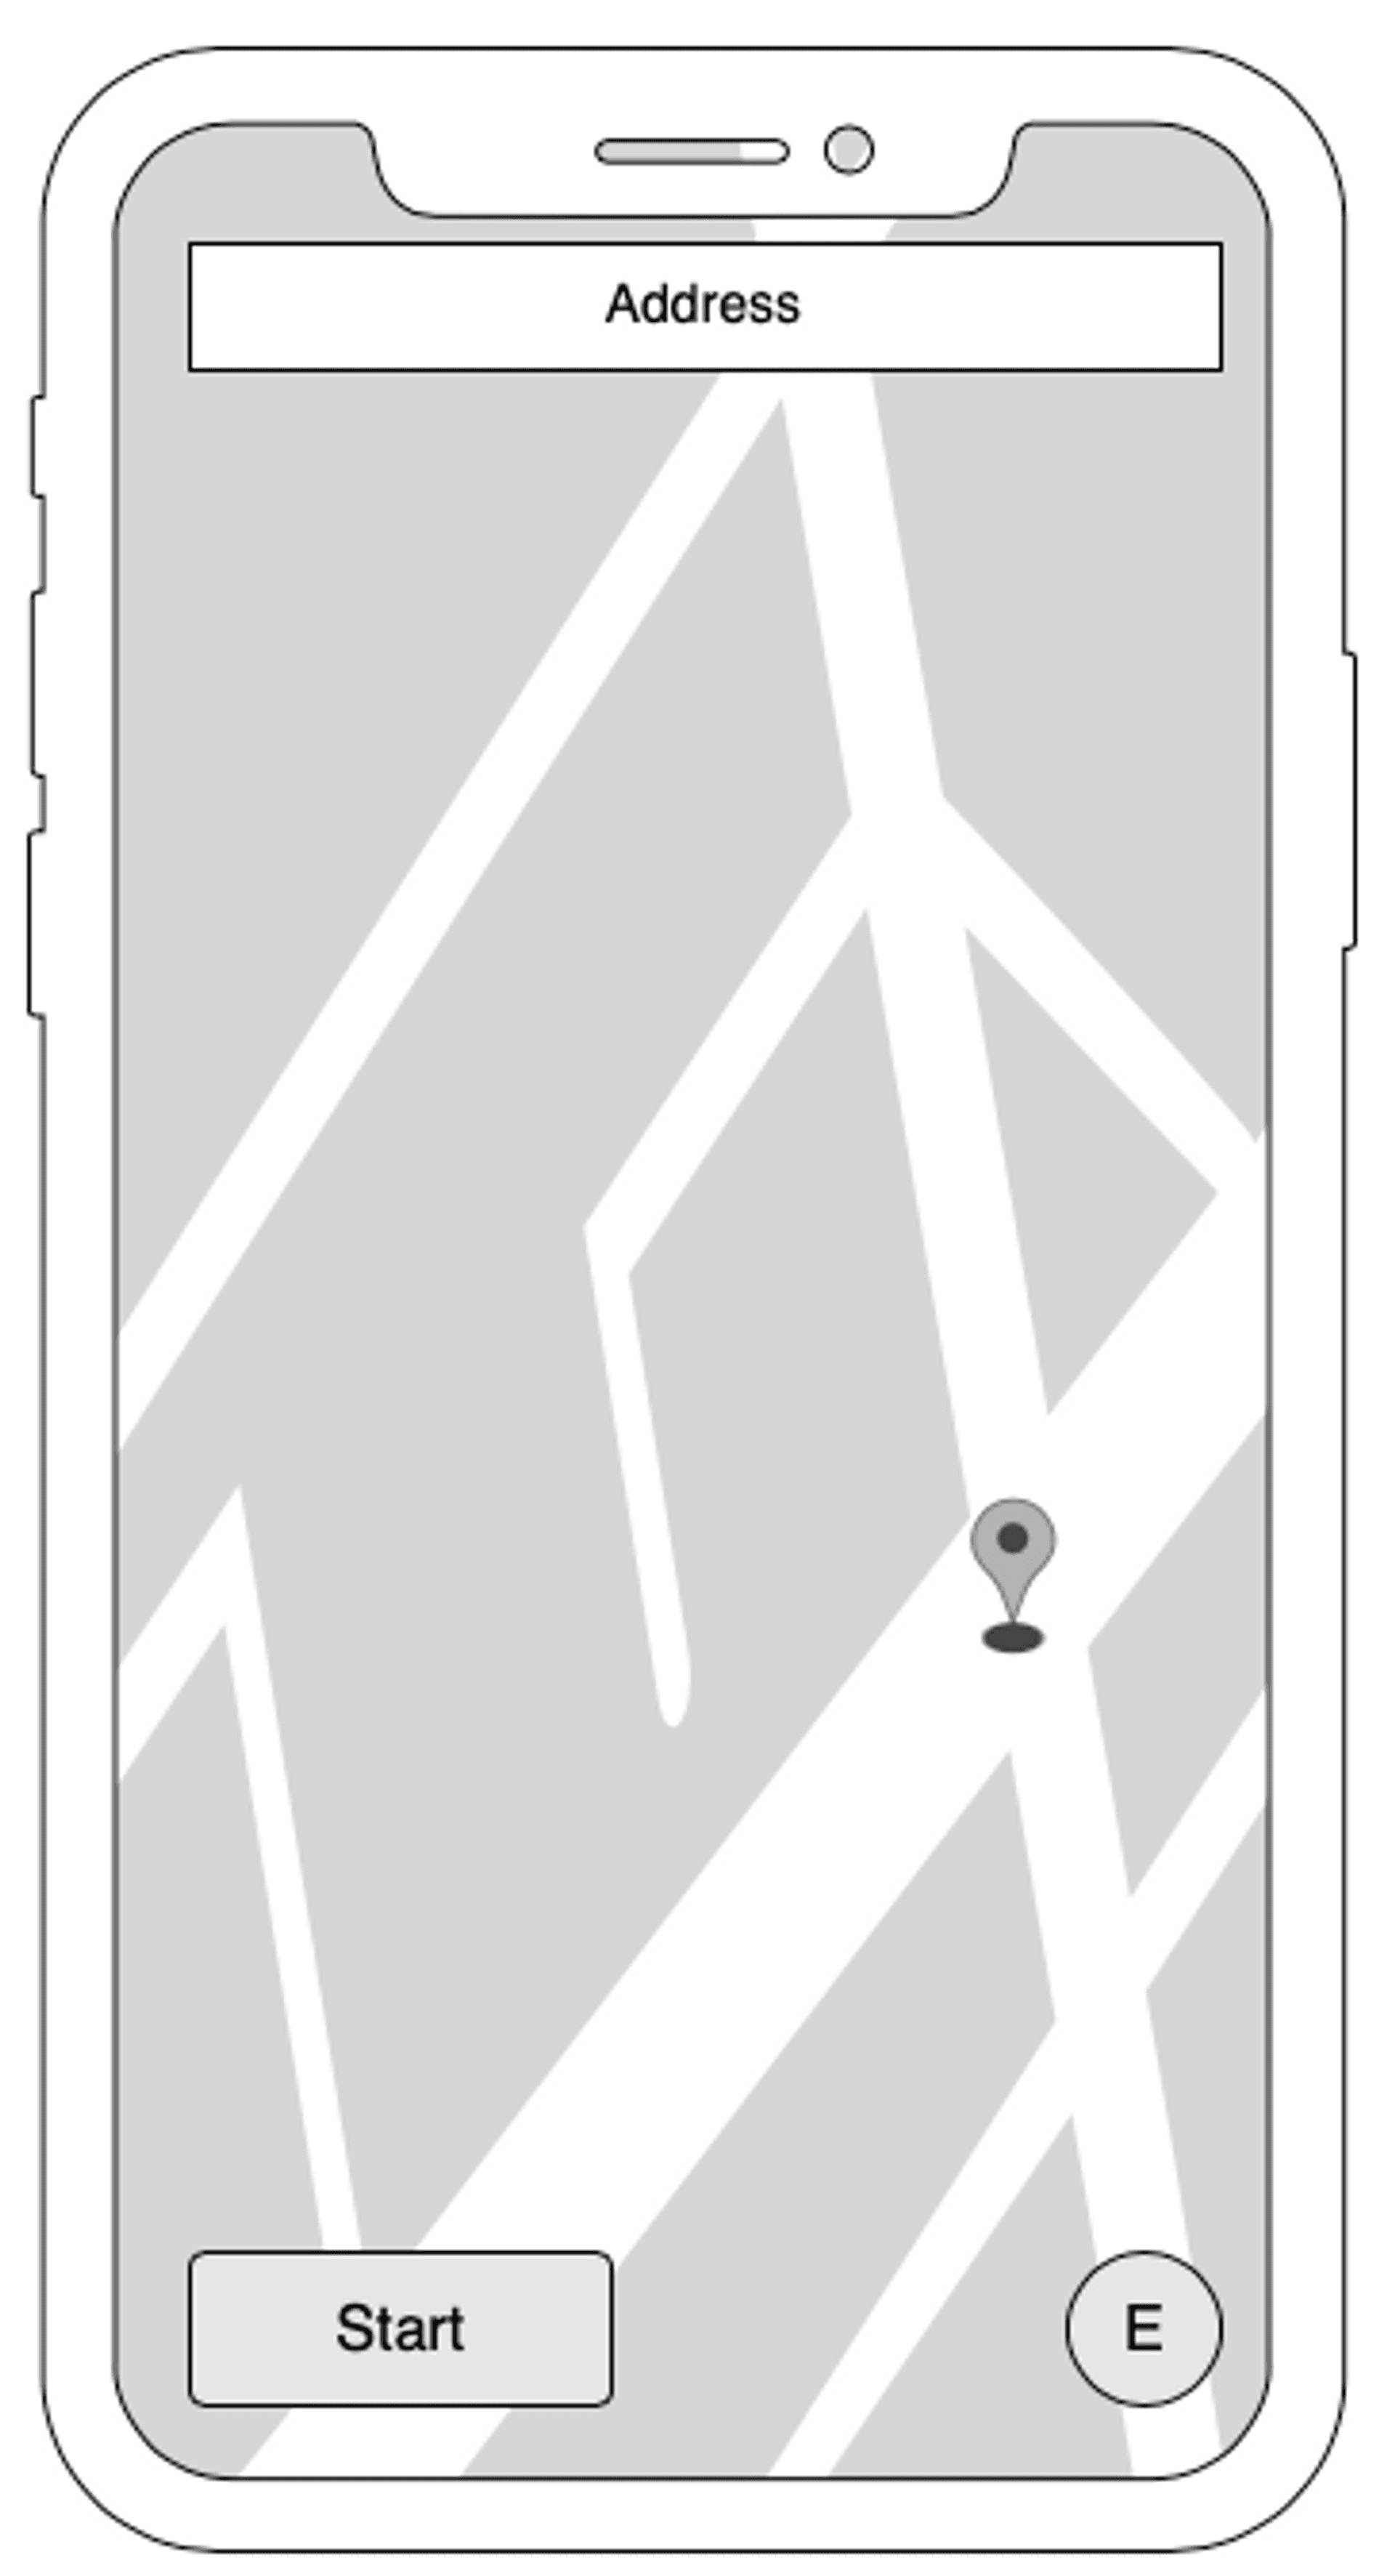
UI Desingn
This project will basically consist of an MKMapView component, which will be the one that shows us the map, to which we will be adding different components according to the functionalities that we want to add to the application. In addition, in this project, all this will be done through code, without using storyboards or .xib files.
Creation of the project
To work without storyboards when establishing a project in Xcode 11 we have to do some steps after creating it:
- Delete the file Main.storyboard.
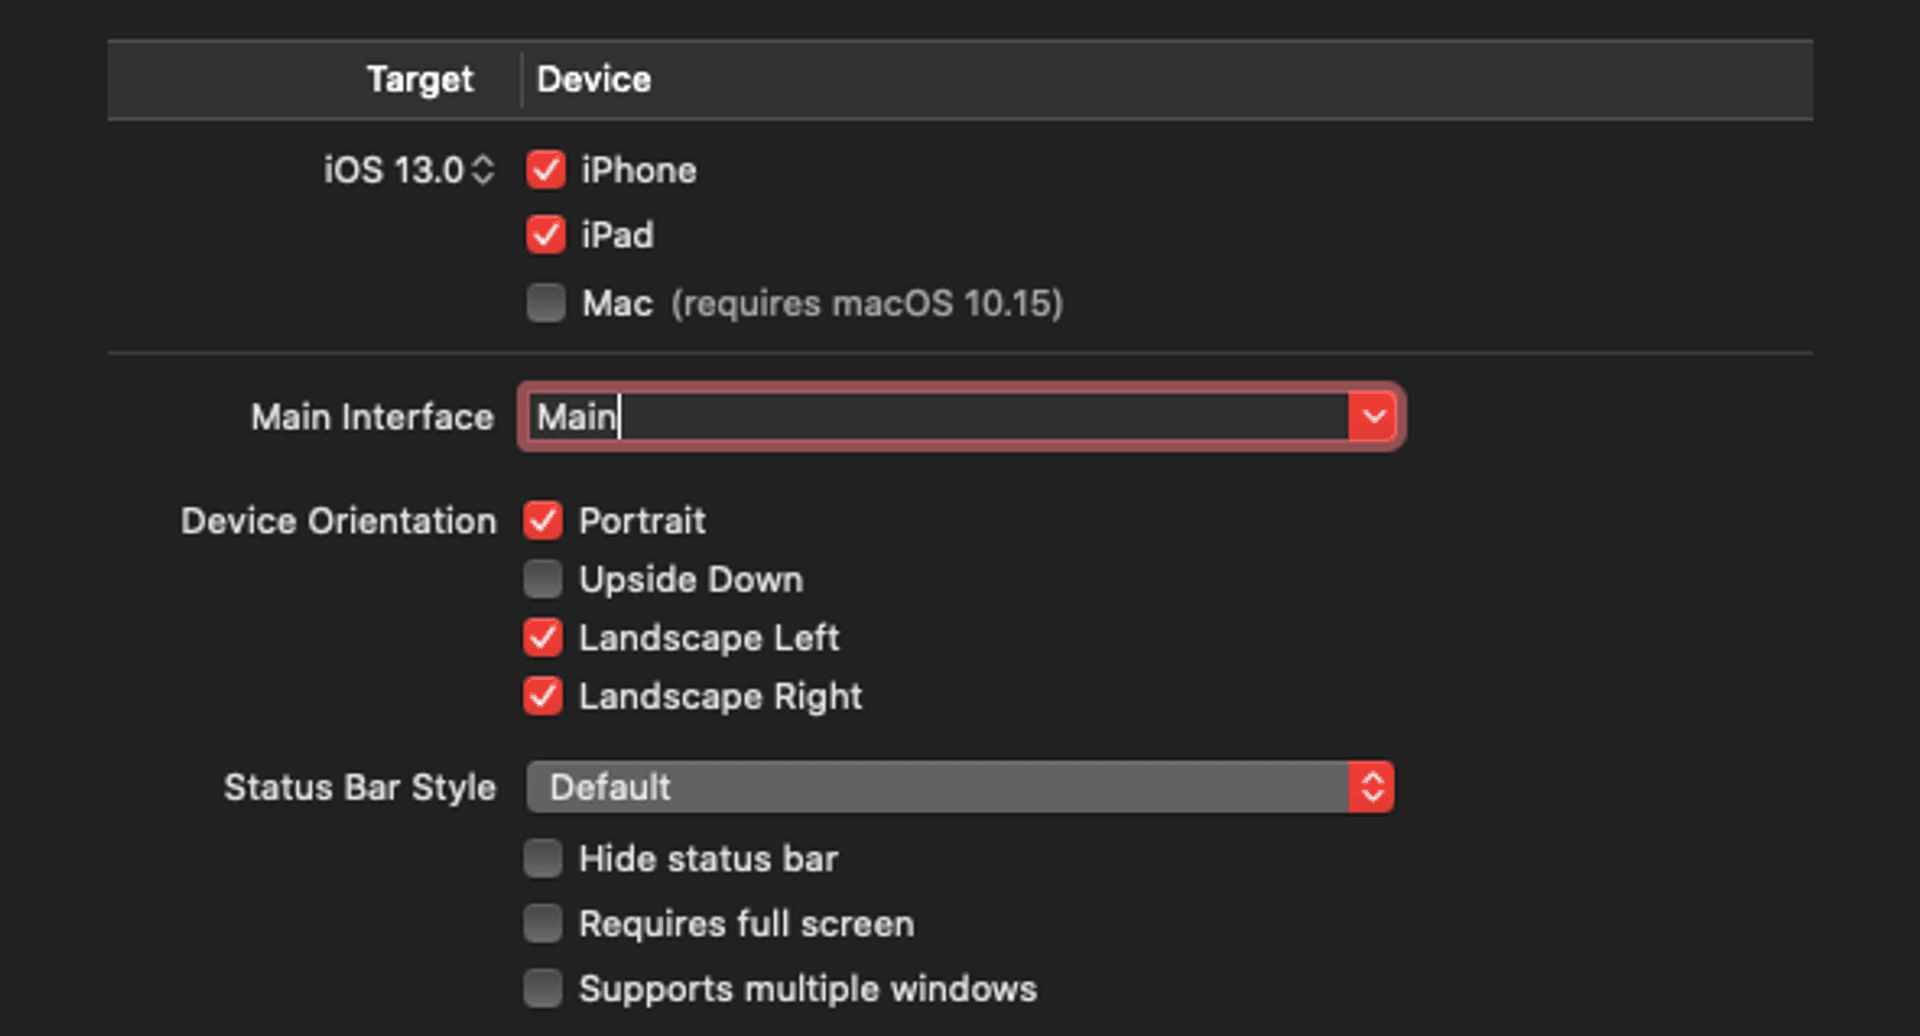
- In the General tab (TARGETS), we go to the Main interface selector and eliminate Main, leaving the field blank.
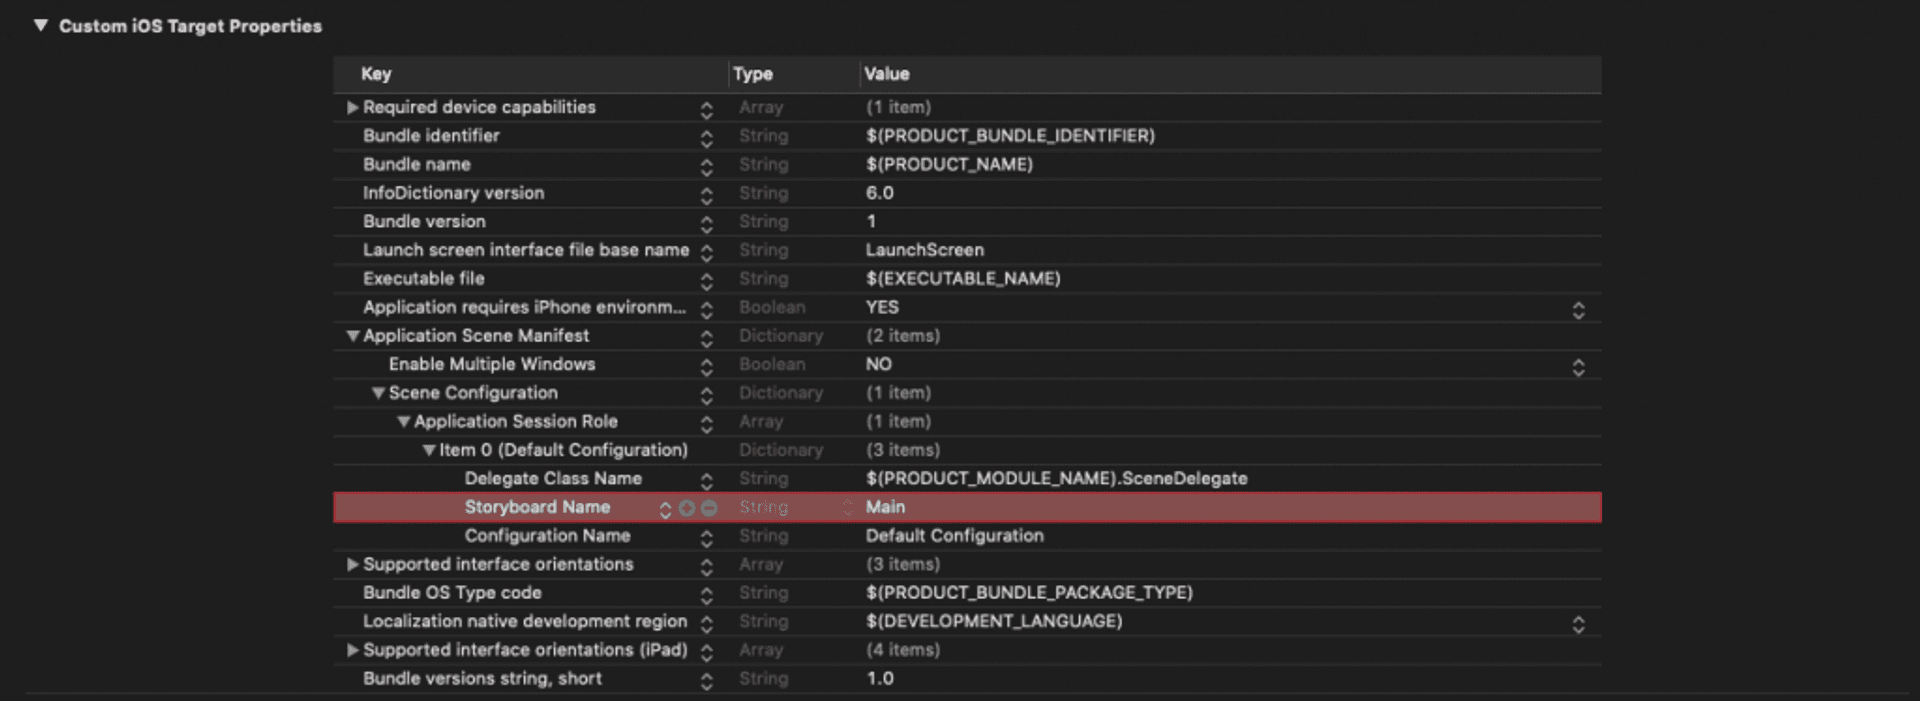
- Finally, in the Info tab (TARGETS) we go to Application Scene Manifest > Scene Configuration > Application Session Role > Item 0 (Default Configuration) and delete the Storyboard Name field.
Since we will no longer call the Main.storyboard to start the project, we go to the SceneDelegate.swift file, and in the function scene(_ scene: UIScene, willConnectTo session: UISceneSession, options connectionOptions: UIScene.ConnectionOptions) and replace its content with the following code:
guard let windowScene = (scene as? UIWindowScene) else { return }
window = UIWindow(frame: UIScreen.main.bounds)
let viewController = ViewController()
window?.rootViewController = viewController
window?.makeKeyAndVisible()
window?.windowScene = windowScene
Add a map to our application
To add a map to the screen, simply create an instance of MKMapView and add it to the screen view. To do this, in the ViewController class, first we have to import the MapKit library, then we create an instance of MKMapView and present it:
import UIKit
import MapKit

class ViewController: UIViewController {

    private let mapView = MKMapView(frame: .zero)

    override func viewDidLoad() {
        super.viewDidLoad()

        layoutUI()
    }


    private func layoutUI() {
        mapView.translatesAutoresizingMaskIntoConstraints = false
        view.addSubview(mapView)

        NSLayoutConstraint.activate([
            mapView.topAnchor.constraint(equalTo: view.safeAreaLayoutGuide.topAnchor),
            mapView.leadingAnchor.constraint(equalTo: view.safeAreaLayoutGuide.leadingAnchor),
            mapView.trailingAnchor.constraint(equalTo: view.safeAreaLayoutGuide.trailingAnchor),
            mapView.bottomAnchor.constraint(equalTo: view.safeAreaLayoutGuide.bottomAnchor)
        ])
    }
}
If we run the application we will be able to see an approximate map of where we are located on the screen.
For this map to show us exactly, we must use the CLLocationManager class, which, as Apple indicates, allows us to start and end the sending of location events to our application:
- Detect changes in the user’s position.
- See changes in compass direction.
- Monitor regions of interest.
- Detect the position of nearby beacons.
Permissions
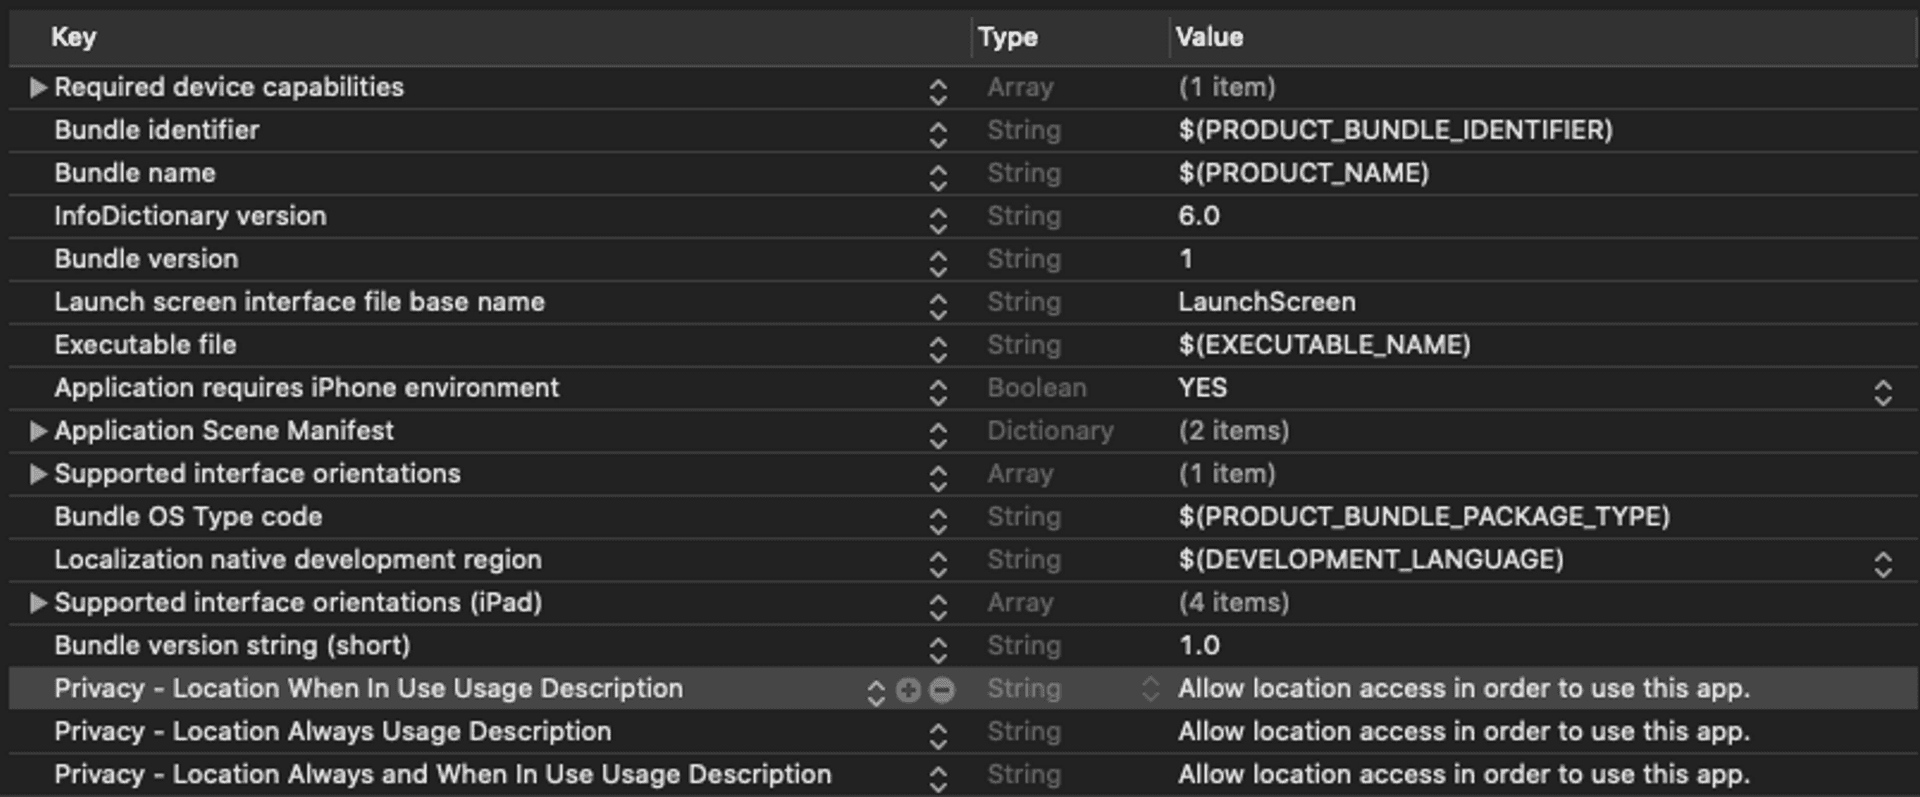
Keep in mind that in order to use the location functions, we must first ask the user for permission. To do this, we add in the Info.plist file, a series of parameters (as I also showed to use notifications):
- Privacy – Location Always and When In Use Usage Description
- Privacy – Location Always Usage Description
- Privacy – Location When In Use Usage Description
To which we give as value the message that we want to show the user to ask for permission (in this example, ‘Allow location access in order to use this app.’).
Once the Info.plist file has been modified, we are going to make the application check, first, if the location services are enabled and, later, if the user has given permission and what type of permission. What we do first is to instantiate the CLLocationManager class:
private let locationManager = CLLocationManager()And then, we create the checkLocationService method, in which we will check if the location services are enabled on the device and, if so, we will set the delegate for this class as indicated in the documentation and indicate with what precision we want the location work:
private func checkLocationServices() {
    guard CLLocationManager.locationServicesEnabled() else {
        // Here we must tell user how to turn on location on device
        return
    }

    locationManager.delegate = self
    locationManager.desiredAccuracy = kCLLocationAccuracyBest
}
We will call this function from the viewDidLoad method. At the same time that we set the delegate, we adopt a couple of methods of this delegate that will allow us to know if the permission given by the user on the use of the location changes (locationManager(:didChangeAuthorization:)) and when the location of the user (locationManager (:didUpdateLocations:)) (we do this in an extension of the ViewController class to have the code organized):
extension ViewController: CLLocationManagerDelegate {
    func locationManager(_ manager: CLLocationManager, didChangeAuthorization status: CLAuthorizationStatus) {

    }


    func locationManager(_ manager: CLLocationManager, didUpdateLocations locations: [CLLocation]) {

    }
}
Now we can continue to complete the ViewController class by adding the method that will see if the application has permission, and what type of permission, to use localization. In this method, what we do is call the authorizationStatus method of the CLLocationManager class and check what value we get:
private func checkAuthorizationForLocation() {
    switch CLLocationManager.authorizationStatus() {
    case .authorizedWhenInUse, .authorizedAlways:
        mapView.showsUserLocation = true
        locationManager.startUpdatingLocation()
        break
    case .denied:
        // Here we must tell user how to turn on location on device
        break
    case .notDetermined:
        locationManager.requestWhenInUseAuthorization()
    case .restricted:
            // Here we must tell user that the app is not authorize to use location services
        break
    @unknown default:
        break
    }
}
As can be seen, there are different possibilities regarding the authorization of the use of the location:
- authorizedWhenInUse. The user authorized the application to start location services while it is in use.
- authorizedAlways. The user authorized the application to start location services at any time.
- denied. The user has rejected the use of location services for the application or they are globally disabled in Settings.
- notDetermined. The user has not chosen whether the application can use location services.
- restricted. The app is not authorized to use location services.
This function, checkAuthorizationForLocation, we will call it at two points:
- In the checkLocationServices() method after setting the delegate, after entering the application.
- In the locationManager(_: didChangeAuthorization:) method, in case the user authorization changes while using the application.
private func checkLocationServices() {
    guard CLLocationManager.locationServicesEnabled() else {
            // Here we must tell user how to turn on location on device
        return
    }

    locationManager.delegate = self
    locationManager.desiredAccuracy = kCLLocationAccuracyBest

    checkAuthorizationForLocation()
}

func locationManager(_ manager: CLLocationManager, didChangeAuthorization status: CLAuthorizationStatus) {
    checkAuthorizationForLocation()
}
If we now run the application, we will see how an alert shows us asking for permission to use the location services.
Once we give the application permission to use the location services, what we have to do is tell it that it can now activate the tracking of the device’s position. To do this, within the checkAuthorizationForLocation() method and within the cases that allow its use, we add the following code:
case .authorizedWhenInUse, .authorizedAlways:
    mapView.showsUserLocation = true
    centerViewOnUser()
    locationManager.startUpdatingLocation()
    break
What we are doing here is saying that the MKMapView instance has to show the position of the user (mapView.showsUserLocation = true), to center the view on the user (method that we will create now) and to activate the location update.
Show our position on the map
The centerViewOnUser() method, what it does is determine from the user’s location, establishing a centered rectangular region is point. For this we use MKCoordinateRegion.
private let rangeInMeters: Double = 10000

private func centerViewOnUser() {
    guard let location = locationManager.location?.coordinate else { return }

    let coordinateRegion = MKCoordinateRegion.init(center: location,
                                                   latitudinalMeters: rangeInMeters,
                                                   longitudinalMeters: rangeInMeters)
    mapView.setRegion(coordinateRegion, animated: true)
}
Here, we first make sure we have the user’s position. Then we establish a region of 10 x 10 km centered on the user. Finally, we establish this region on the map. In this way, we obtain the following image on the device.
Finally, in order to update the user’s position on the map, in the method locationManager(_: didUpdateLocations:) we do something similar to what we have done to focus the view on the user:
func locationManager(_ manager: CLLocationManager, didUpdateLocations locations: [CLLocation]) {
    guard let location = locations.last else { return }
        let coordinateRegion = MKCoordinateRegion.init(center: location.coordinate,
                                                       latitudinalMeters: rangeInMeters,
                                                       longitudinalMeters: rangeInMeters)

    mapView.setRegion(coordinateRegion, animated: true)
}
But in this case, the location is obtained from the last value in the list of locations that the method returns.
The map that we see by default when turning on the application is the standard one. MapKit allows displaying different types of maps by changing the value of the mapType parameter of the MKMapView instance:
- standard. A street map showing the position of all roads and some road names.
- satellite. Satellite images of the area.
- hybrid. A satellite image of the area with road information and its name (in a layer above the map).
- satelliteFlyover. A satellite image of the area with data from the area (where available).
- hybridFlyover. A hybrid satellite image with data from the area (where available).
- muteStandard. A street map where our data is highlighted on the map details.
In this case, we will only use three types of maps: standard, satellite and hybrid.
The selection of the type of map that we want to show in the application will be done through a button with a drop-down menu, which can be downloaded as a Swift package (FABbutton). To do this we follow these steps:
- From the Xcode File > Swift Package > Add Package Dependecy … menu we add the FABButton component. The URL is: https://github.com/raulferrerdev/FABButton.git
- Next, we create an instance of the button and its configuration (the icons used are already included in the project):
private let mapTypeButton = FABView(buttonImage: UIImage(named: "earth")

override func viewDidLoad() {
    super.viewDidLoad()
    ...
    configureMapTypeButton()
    ...
}


private func configureMapTypeButton() {
    mapTypeButton.delegate = self

    mapTypeButton.addSecondaryButtonWith(image: UIImage(named: "map")!, labelTitle: "Standard", action: {
        self.mapView.mapType = .mutedStandard
    })

   mapTypeButton.addSecondaryButtonWith(image: UIImage(named: "satellite")!, labelTitle: "Satellite", action: {
       self.mapView.mapType = .satellite
   })

   mapTypeButton.addSecondaryButtonWith(image: UIImage(named: "hybrid")!, labelTitle: "Hybrid", action: {
       self.mapView.mapType = .hybrid
   })

   mapTypeButton.setFABButton()
}- As you can see, we have set the delegate for the FABView type, so we must make the ViewController class comply with this protocol. For that we add the following extension to the project:
extension ViewController: FABSecondaryButtonDelegate {
    func secondaryActionForButton(_ action: @escaping () -> ()) {
        action()
    }
}
Finally, in the layoutUI method we add the button to the view and indicate its position:
private func layoutUI() {
    ...
    view.addSubview(mapTypeButton)
    NSLayoutConstraint.activate([
        ....
        mapTypeButton.trailingAnchor.constraint(equalTo: view.trailingAnchor, constant: -5),
        mapTypeButton.bottomAnchor.constraint(equalTo: view.bottomAnchor, constant: -40),
        ...
   ])
}
If we run the application, we can see that we can change the type of map:
Show directions
Now, what we are going to do is show on the screen the address of a point on the map (the center) from its coordinates, which we will obtain using the CLLocation class. To do this we create a getCenterLocation function, to which we pass the instance of MKMapView that we have and it will return the coordinates of the central point:
func getCenterLocation(for mapView: MKMapView) -> CLLocation {
    let coordinates = mapView.centerCoordinate
    return CLLocation(latitude: coordinates.latitude, longitude: coordinates.longitude)
}
To know exactly what the center of the map is, we will place an icon in the center of the map. We will do this with a UIImageView element, with the image of a pin (which we will obtain from Apple’s SF Symbols library).
private let pointer = UIImageView(image: UIImage(systemName: "mappin"))

private func layoutUI() {
    ...
    pointer.translatesAutoresizingMaskIntoConstraints = false
    pointer.tintColor = .red
    ...
    view.addSubview(pointer)

    NSLayoutConstraint.activate([
        ...
        pointer.centerYAnchor.constraint(equalTo: mapView.centerYAnchor, constant: -14.5),
        pointer.centerXAnchor.constraint(equalTo: mapView.centerXAnchor),
        pointer.widthAnchor.constraint(equalToConstant: 27),
        pointer.heightAnchor.constraint(equalToConstant: 29)
    ])
}
So that the bottom of the pin is exactly in the center of the map, we move this icon up half of its height (-14.5px).
In addition, to show the address we will place a label at the top of the screen, as shown in the design. To do this, we create an instance of UILabel, configure it and place it on the screen:
private let addressLabel = UILabel(frame: .zero)

private func configureAddressLabel() {
    addressLabel.translatesAutoresizingMaskIntoConstraints = false
    addressLabel.font = .systemFont(ofSize: 18.0, weight: .medium)
    addressLabel.textColor = .darkText
    addressLabel.textAlignment = .center
    addressLabel.backgroundColor = .init(white: 1, alpha: 0.75)
    addressLabel.layer.cornerRadius = 5.0
    addressLabel.clipsToBounds = true
}

private func layoutUI() {
    ...
    view.addSubview(addressLabel)

    NSLayoutConstraint.activate([
        ...

        addressLabel.topAnchor.constraint(equalTo: view.safeAreaLayoutGuide.topAnchor, constant: 5),
        addressLabel.leadingAnchor.constraint(equalTo: view.safeAreaLayoutGuide.leadingAnchor, constant: 5),
        addressLabel.trailingAnchor.constraint(equalTo: view.safeAreaLayoutGuide.trailingAnchor, constant: -5),
        addressLabel.heightAnchor.constraint(equalToConstant: 40),
        ...
    ])
}
Obtaining the address
To obtain the address of a place from its coordinates, we will use the CLGeocoder class, which, as indicated by the Apple documentation, allows us to obtain a user-friendly representation of that location from the longitude and latitude of a point:
The CLGeododer class provides services for converting between a coordinate (specified as a latitude and longitude) and the user-friendly representation of that coordinate. A user-friendly representation of the coordinate typically consists of the street, city, state, and country information corresponding to the given location, but it may also contain a relevant point of interest, landmarks, or other identifying information Apple documentation (CLGeocoder)
In order to know the coordinates of the center point of the map, we will implement the MKMapView delegate and the method it collects each time we move the map.
private let geoCoder = CLGeocoder()
private var previousLocation: CLLocation?

extension ViewController: MKMapViewDelegate {
    func mapView(_ mapView: MKMapView, regionDidChangeAnimated animated: Bool) {
        let center = getCenterLocation(for: mapView)

        guard let previousLocation = self.previousLocation,
            center.distance(from: previousLocation) > 25 else { return }

        self.previousLocation = center

        geoCoder.reverseGeocodeLocation(center) { [weak self] (placemarks, error) in
            guard let self = self else { return }

            if let _ = error { // Show alert for the user
                return
            }

            guard let placemark = placemarks?.first else { // Show alert for the user
                return
            }

            let streetNumber = placemark.subThoroughfare ?? ""
            let streetName = placemark.thoroughfare ?? ""

            DispatchQueue.main.async {
                self.addressLabel.text = "\(streetNumber) \(streetName)"
            }
        }
    }
}
Within this method we do the following:
- First we get the coordinates of the center of the map (thanks to the getCenterLocation function, which we have seen previously).
- The next step is to know if there is a previous position (previousLocation, which we have instantiated at the beginning) and, in that case, check that the difference in the distance to the new position is greater, in this case, 25 m. If these conditions are met, the value of the new coordinates is assigned to the previousLocation variable.
- Next, we take an instance of the CLGeocoder function and call the reverseGeocodeLocation method, to which we pass the coordinates of the center of the screen.
- This function returns a block with two parameters:
typealias CLGeocodeCompletionHandler = ([CLPlacemark]?, Error?) -> Void- Of these two values, we check that no error occurred and that it returned a position. A CLPlacemark object stores data regarding a specific latitude and longitude (such as country, state, city and street address, POIs, and geographically related data).
- From this information we are interested in two parameters: thoroughfare (which is the street address associated with the indicated position) and subThoroughfare (which gives additional information about that address).
- Finally, and in the main thread, we add this information to the label.
Set routes
Now, what we have left to do in this project is to implement a route system. That is, starting from a point of origin and another of destination, establish the optimal routes for the path.
We can do this in a simple way thanks to MapKit. In this case we will use the MKDirections.Request class, which allows us to establish a request in which we indicate the point of origin, the destination, the type of transport, if we want to be shown alternative routes…
- var source: MKMapItem?. It is the starting point of the routes.
- var destination: MKMapItem?. It is the destination point of the routes.
- var transportType: MKDirectionsTransportType. It is the type of transport that applies to calculate the routes. It can be automobile, walking, transit or any.
- var requestsAlternateRoutes: Bool. Indicate if we want alternative routes, if they are available.
- var departureDate: Date?. It is the departure date of the trip.
- var arrivalDate: Date?. It is the arrival date of the trip.
What we do is create a method that will return an object of type MKDirections.Request:
func createRequest() -> MKDirections.Request? {
    guard let coordinate = locationManager.location?.coordinate else { return nil }
    let destinationCoordinate = getCenterLocation(for: mapView).coordinate
    let origin = MKPlacemark(coordinate: coordinate)
    let destination = MKPlacemark(coordinate: destinationCoordinate)
    let request = MKDirections.Request()
    request.source = MKMapItem(placemark: origin)
    request.destination = MKMapItem(placemark: destination)
    request.transportType = .automobile
    request.requestsAlternateRoutes = true

    return request
}
In this method, we first obtain the coordinates of the center point of the screen. Then we create MKPlacemark type objects with the origin (the point where we are) and destination coordinates. Finally, we create an instance of type MKDirections.Request with indicating the origin, destination, type of transport (automobile) and that we want alternative routes.
To draw the route, we have to do is start a top MKDirections object with the request that we have created. As indicated by Apple documentation, this object calculates directions and travel time information based on the route information you provide.
Therefore, we will create a method that from the creation of a request, gets an object of type MKDirections and represents the routes:
func drawRoutes() {
    guard let request = createRequest() else { return }
    let directions = MKDirections(request: request)

    directions.calculate { [unowned self] (response, error) in
        guard let response = response else { return }
        let routes = response.routes
        for route in routes {
            self.mapView.addOverlay(route.polyline)
            self.mapView.setVisibleMapRect(route.polyline.boundingMapRect, animated: true)
        }
    }
}
In this method, once the MKDirections object has been obtained, we use the method calculate(completionHandler: MKDirections.DirectionsHandler), which returns an object of type MKDirections.Response and a possible error:
typealias DirectionsHandler = (MKDirections.Response?, Error?) -> VoidThen we check that the answer is valid and take the routes parameter, which is an array of MKRoute type objects that represent the routes between the origin and destination points.
If we take a look at the Apple documentation, the MKRoute object presents a parameter called polyline, which contains the route plot. To represent this plot, what we have done is pass this parameter to the addOverlay(_ overlay: MKOverlay) method of the MKMapView object. Then we change the visible part of the map using the method setVisibleMapRect(_ mapRect: MKMapRect, animated animate: Bool).
In addition, we have to add a method of the MKMapViewDelegate protocol so that the routes are drawn (drawing them in green and 5px line width):
func mapView(_ mapView: MKMapView, rendererFor overlay: MKOverlay) -> MKOverlayRenderer {
    let renderer = MKPolylineRenderer(overlay: overlay as! MKPolyline)
    renderer.strokeColor = .green
    renderer.lineWidth = 5
    return renderer
}
Now, what we need is to add a button that allows us to start calculating the route. From the interface design that we have shown at the beginning, we add and configure a UIButton element, to which we will add as a target the drawRoutes() method:
private let startButton = UIButton(frame: .zero)

 override func viewDidLoad() {
    super.viewDidLoad()

    ...
    configureStartButton()
}

private func configureStartButton() {
    startButton.translatesAutoresizingMaskIntoConstraints = false
    startButton.setTitle("Start", for: .normal)
    startButton.backgroundColor = .systemRed
    startButton.setTitleColor(.white, for: .normal)
    startButton.titleLabel?.font = .systemFont(ofSize: 18.0, weight: .bold)
    startButton.layer.cornerRadius = 5.0
    startButton.clipsToBounds = true
    startButton.addTarget(self, action: #selector(drawRoutes), for: .touchUpInside)
}

private func layoutUI() {
	...
    view.addSubview(startButton)

    ...
    NSLayoutConstraint.activate([
        startButton.leadingAnchor.constraint(equalTo: view.safeAreaLayoutGuide.leadingAnchor, constant: 5),
        startButton.bottomAnchor.constraint(equalTo: view.bottomAnchor, constant: -40),
        startButton.widthAnchor.constraint(equalToConstant: 100),
        startButton.heightAnchor.constraint(equalToConstant: 40)
    ])
}

extension ViewController: MKMapViewDelegate {
    ...

    func mapView(_ mapView: MKMapView, rendererFor overlay: MKOverlay) -> MKOverlayRenderer {
        let renderer = MKPolylineRenderer(overlay: overlay as! MKPolyline)
        renderer.strokeColor = .green
        renderer.lineWidth = 5
        return renderer
    }
}
Conclusion
The Apple MapKit library allows you to easily develop an application that shows maps, shows our position on the map, shows us directions from a selected point on the map and the routes to get to that address.

