If we want to develop an application that allows data and files to be shared and synchronized between different devices, we will need to use a backend service that allows us to perform these tasks. In the case of devices with iOS, or macOS, we can use CloudKit. In this article we are going to see how a task application is developed with CloudKit.
What is CloudKit?
CloudKit is Apple’s storage service that allows your applications to save data and files remotely. Apple introduced CloudKit at WWDC 2014 as a new library that allowed communication with iCloud servers.
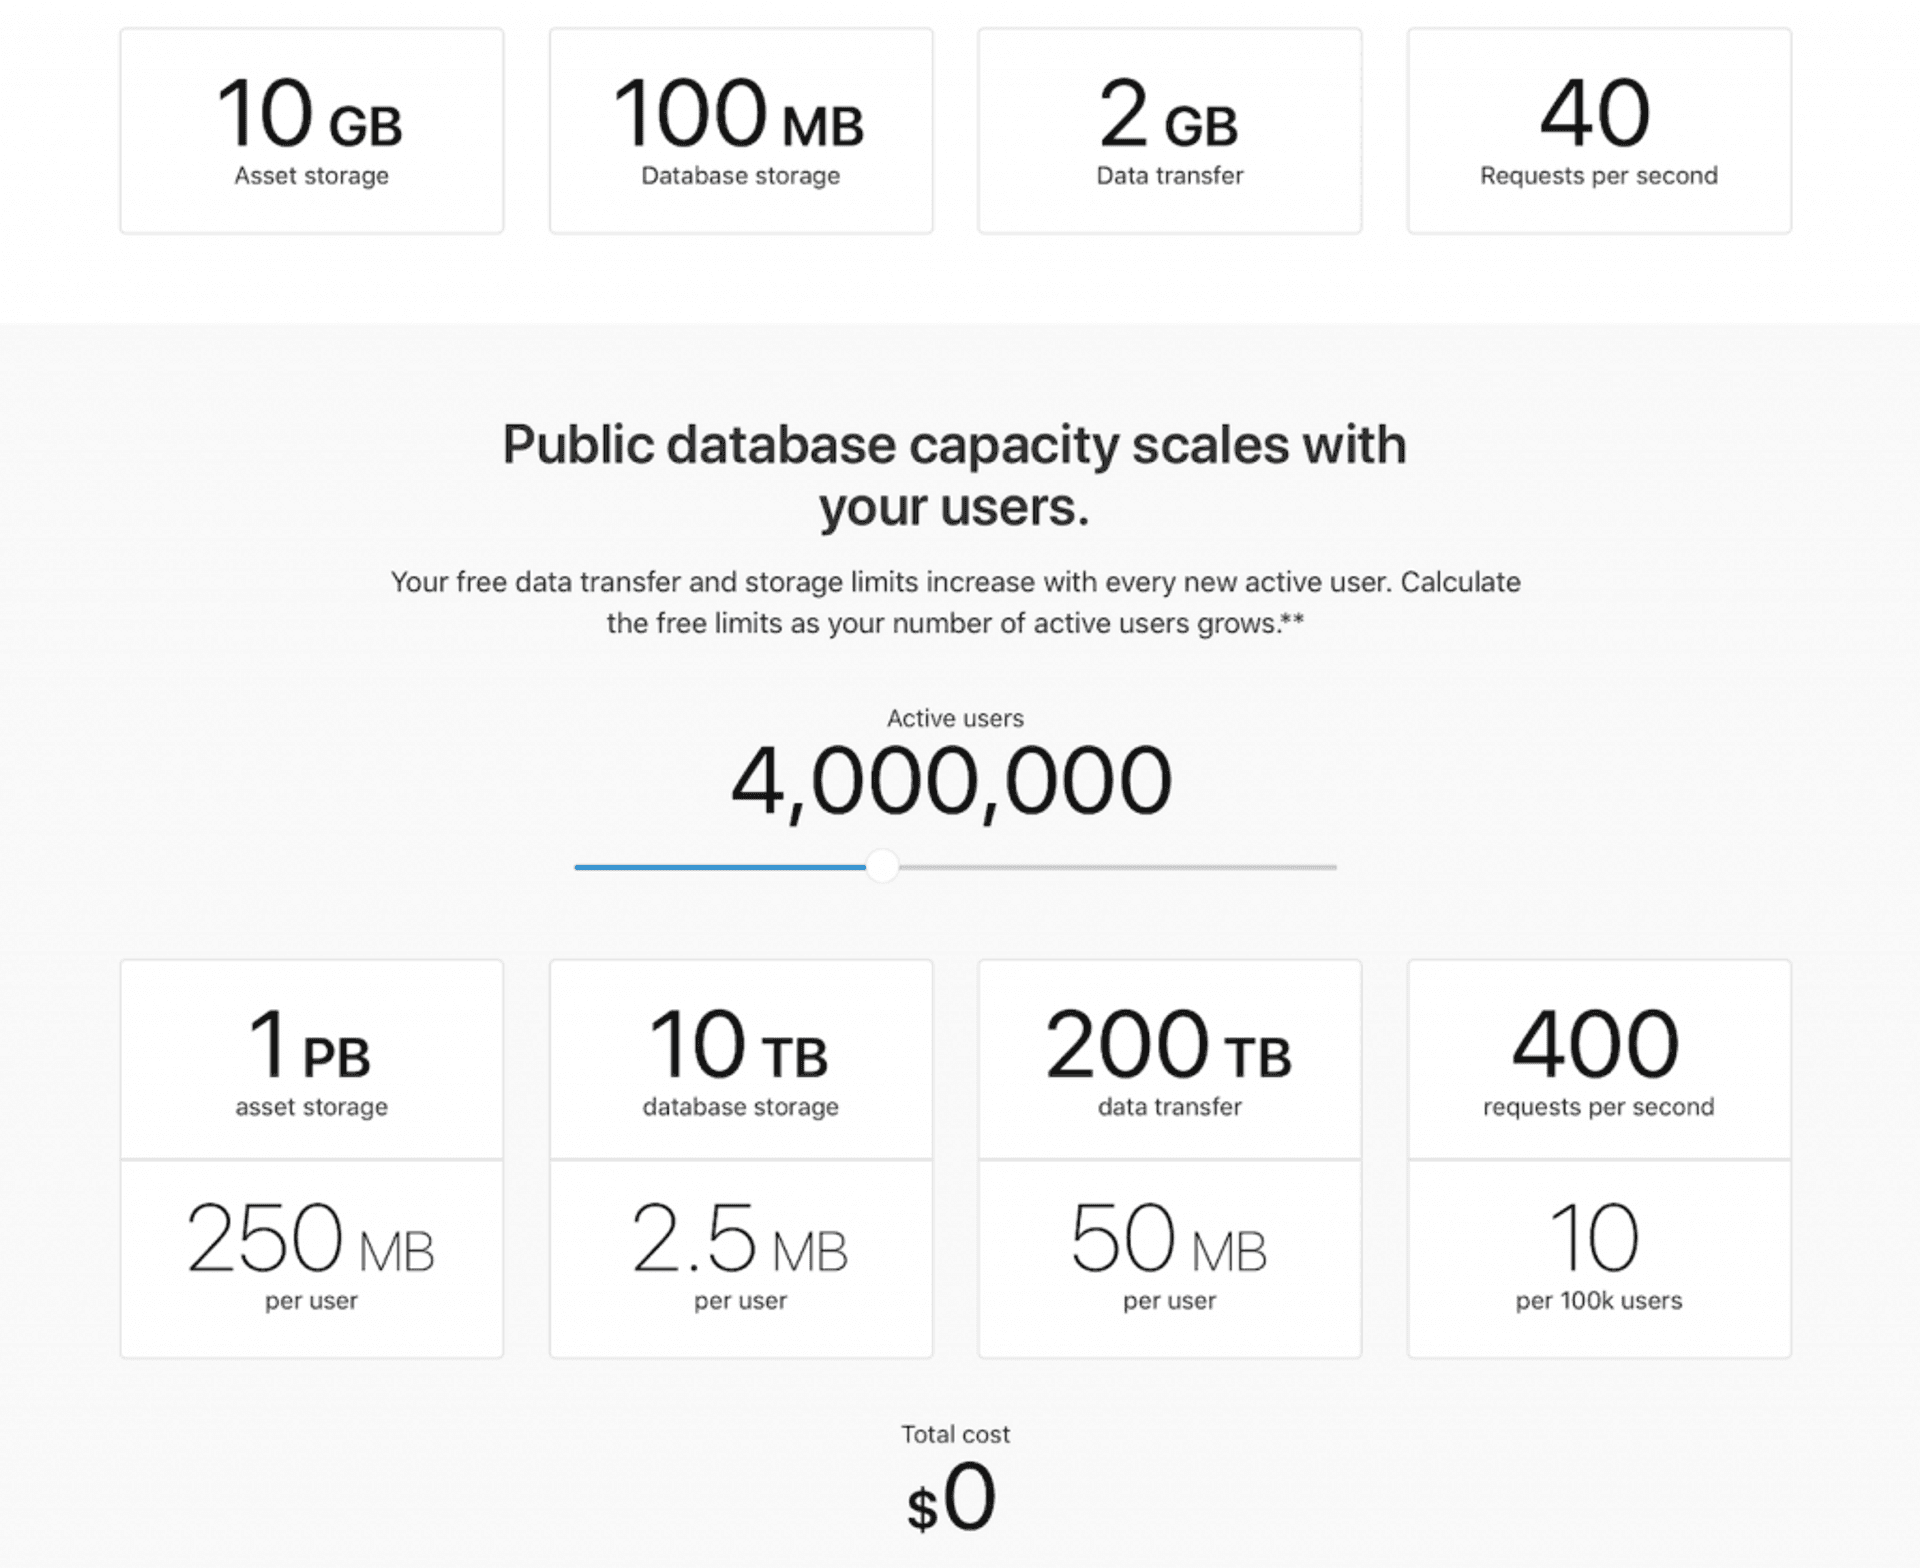
With CloudKit and Swift we can store any type of data and files for free up to 10 GB of file storage, 100 MB of database storage, 2 GB of data transfer and 40 requests per second. But we can achieve much greater capacity for free depending on the number of users added (1 PB of file storage, 10 TB of database, 200 TB of data transfer and 400 requests per second).
We can compare CloudKit with other BaaS (Backend as a Service) solutions, such as Firebase.
With CloudKit, Apple also offers:
- An API to communicate and transfer data between devices and iCloud.
- A desktop to manage data stored on Apple servers, measure user activity or bandwidth consumption.
# Using CloudKit
To use CloudKit we must bear in mind that:
- You must be registered in the iOS Developer Program to be able to use CloudKit.
- Since the data is not saved locally, but on Apple servers, an application that uses CloudKit is not useful without an Internet connection.
- User data is protected, as developers can only access their own databases and not private user data.
- Apple recommends notifying the user if an error occurs (such as finding an error in the saving process), so that they know that data may have been lost or has not been saved.
CloudKit databases
To start working with CloudKit we must bear in mind that, in the same way that each application has its own sandbox, similarly each application has a container in iCloud (if we have registered the application for it, as we will see later). CloudKit defines three types of databases:
- Private
- Public
- Shared
Private database
Each user of an application (if it has been registered to use iCloud) has a private database in an iCloud container, as long as the user is logged in to their iCloud account. Being private, developers cannot access the data stored in this database.
Public database
An iCloud container also contains a public database, but in this case its data can be read by all users of the application, even if they have not logged in with their iCloud account. Please note that since CloudKit logs always have an owner, only users who are logged into iCloud will be able to write data to the public database. ## Shared database
In the same way as in the private database, the shared database is only accessible if you are logged into iCloud. It is used to share records from a user’s private database with other users of the application. ## Concepts to consider
When working with CloudKit we have to take into account some concepts:
- Container. These are instances of the CKContainer class that, as we have seen, store user data. We can access the application’s default container (default) or those that we have created:
let defaultContainer = CKContainer.default()
let customContainer = CKContainer(identifier: "{YOUR_CONTAINER_IDENTIFIER}")- Database. As we have seen, in CloudKit we can find three databases: public, private and shared. They are represented by objects of type CKDatabase.
- Registry. They are objects of type CKRecord, and we can consider them as dictionaries in which the keys are the fields of the tables in the database.
- Zone. They are represented by objects of the CKZone type, and it is the place where the data is saved. In CloudKit, all databases have a default zone, but we can also create custom zones, although only in private databases.
# TodoList project
We are going to create a to-do list app, TodoList, which will be saved in iCloud. You can download this project from GitHub.
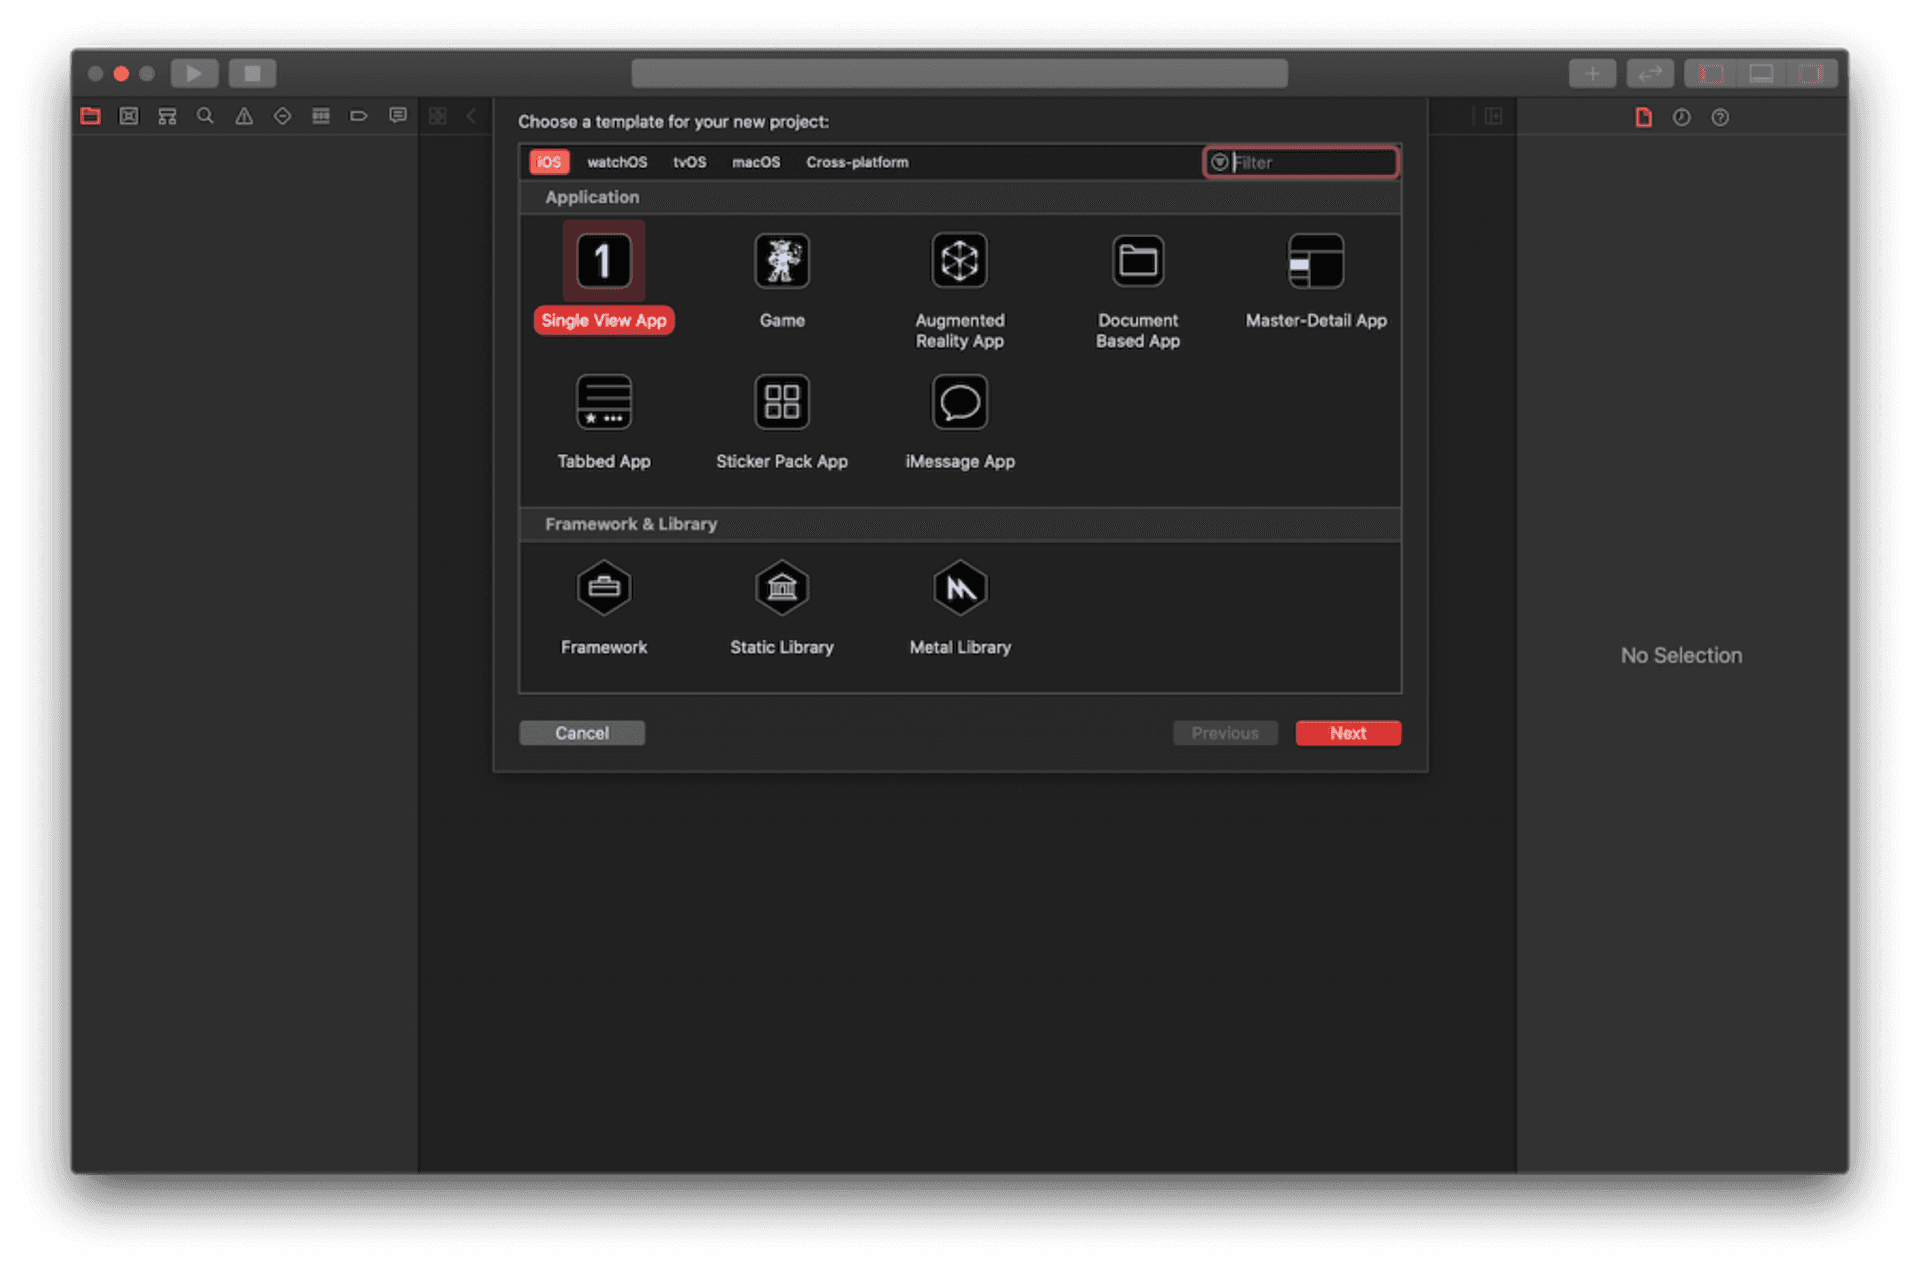
First of all we create a new project in Xcode with the Single View App template.
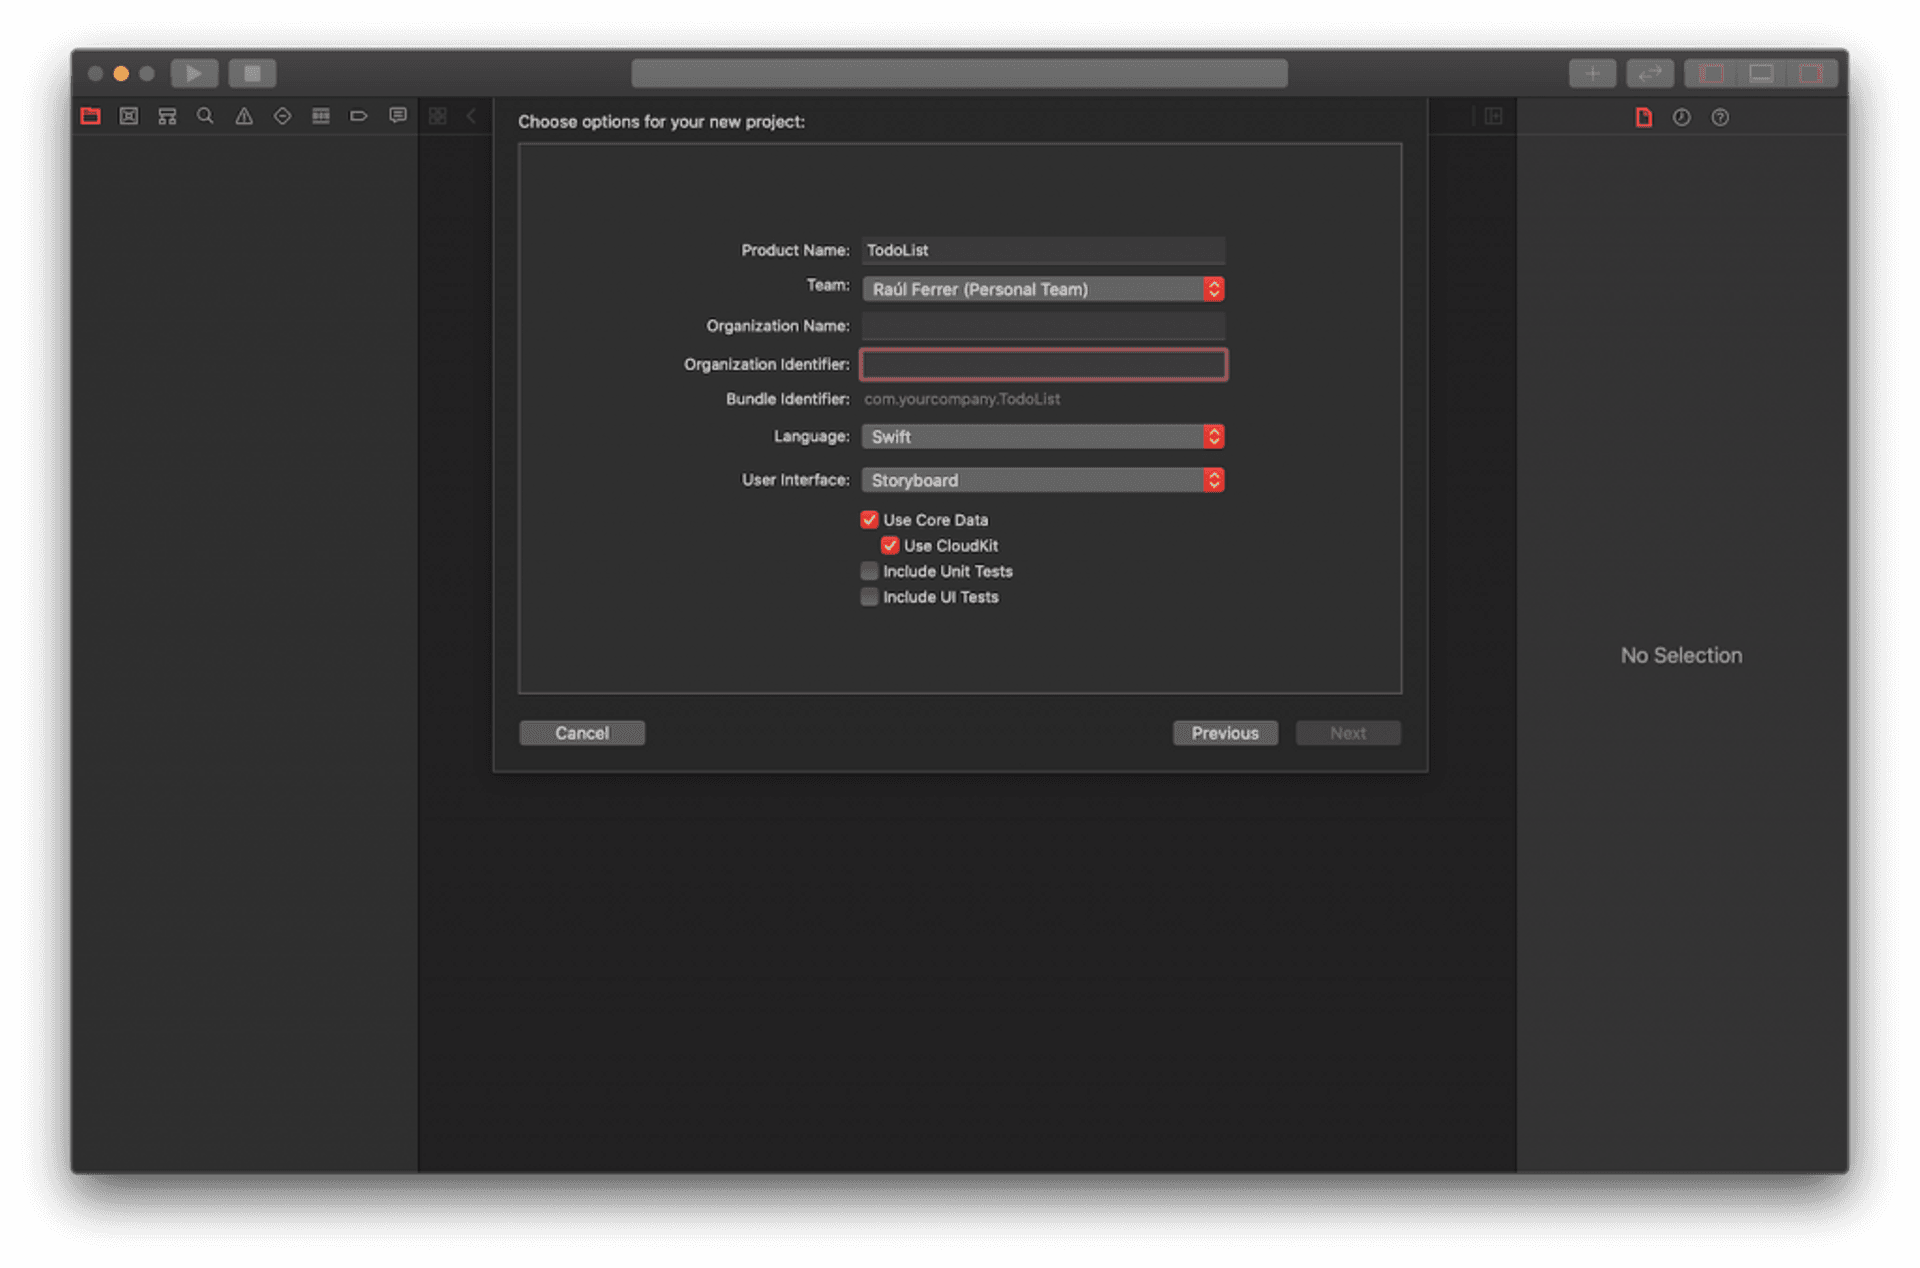
Next, we enter the project data and select the Use Core Data and Use CloudKit options.
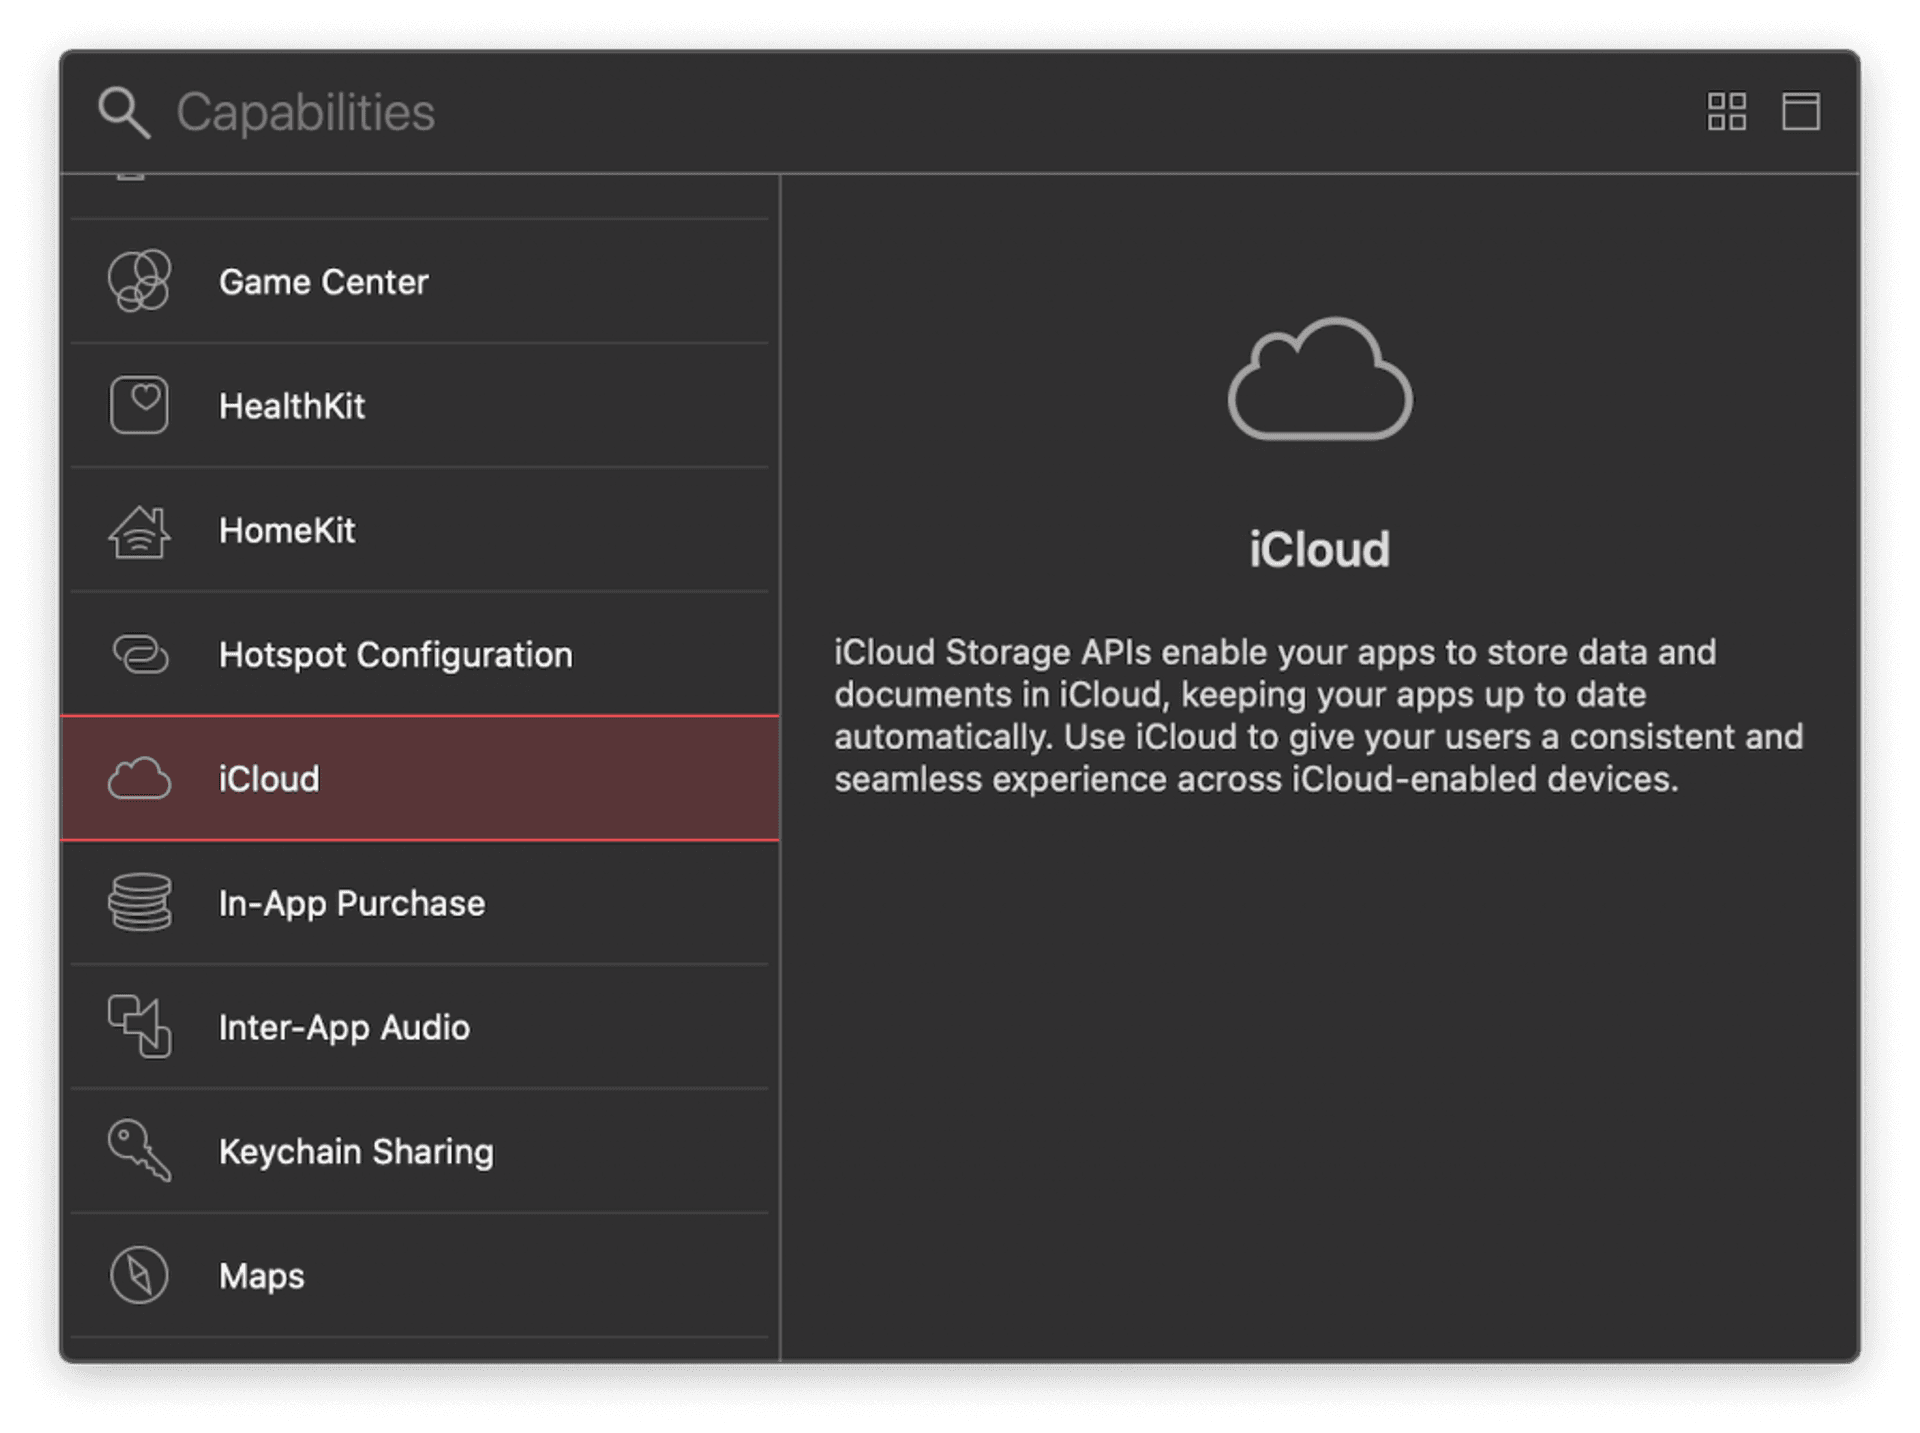
Now we must add the ability to the project to use iCloud. For this we select the application in Targets, then the Signing & Capabilities tab and, finally, the +Capability option. A menu will appear in which we will select the iCloud option.
## CloudKit Dashboard
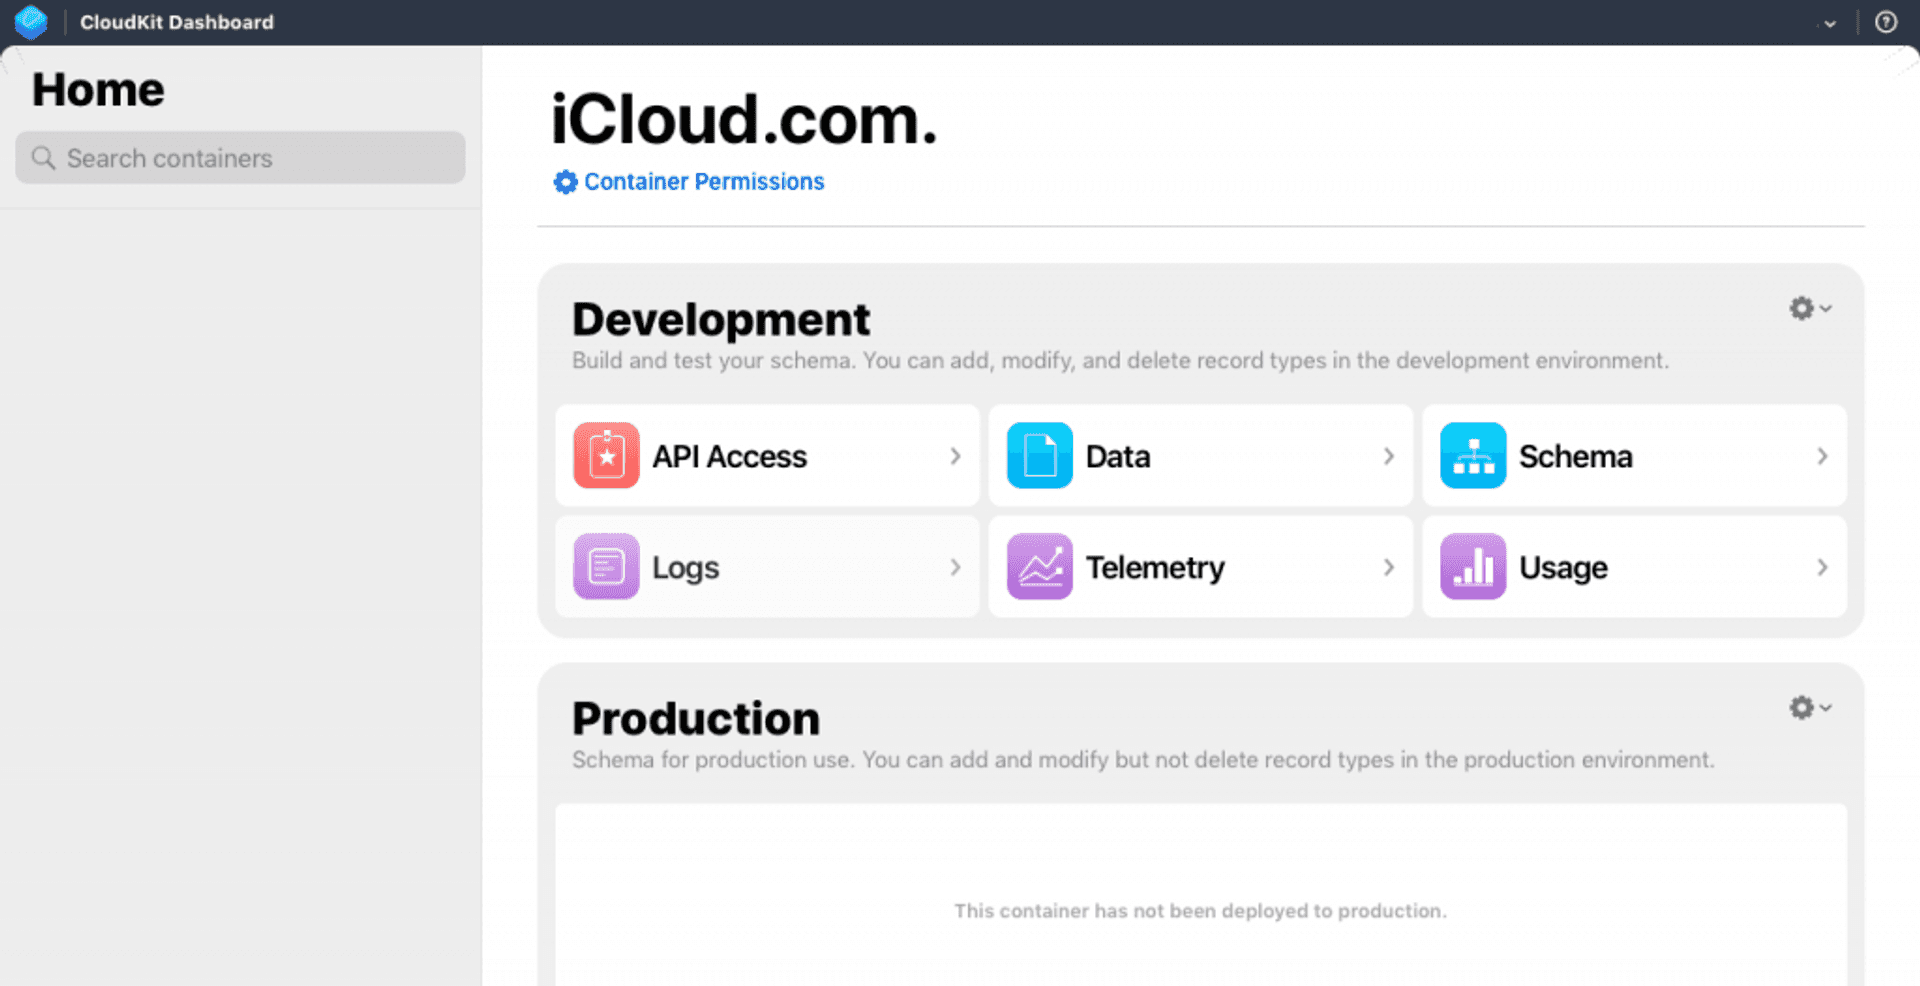
Now that we have created the project and the container, we have to create the records for the data that we will use in the application. We can do this from the CloudKit desktop, which will allow us to know how it works. For this we click on the CloudKit Dashboard button.
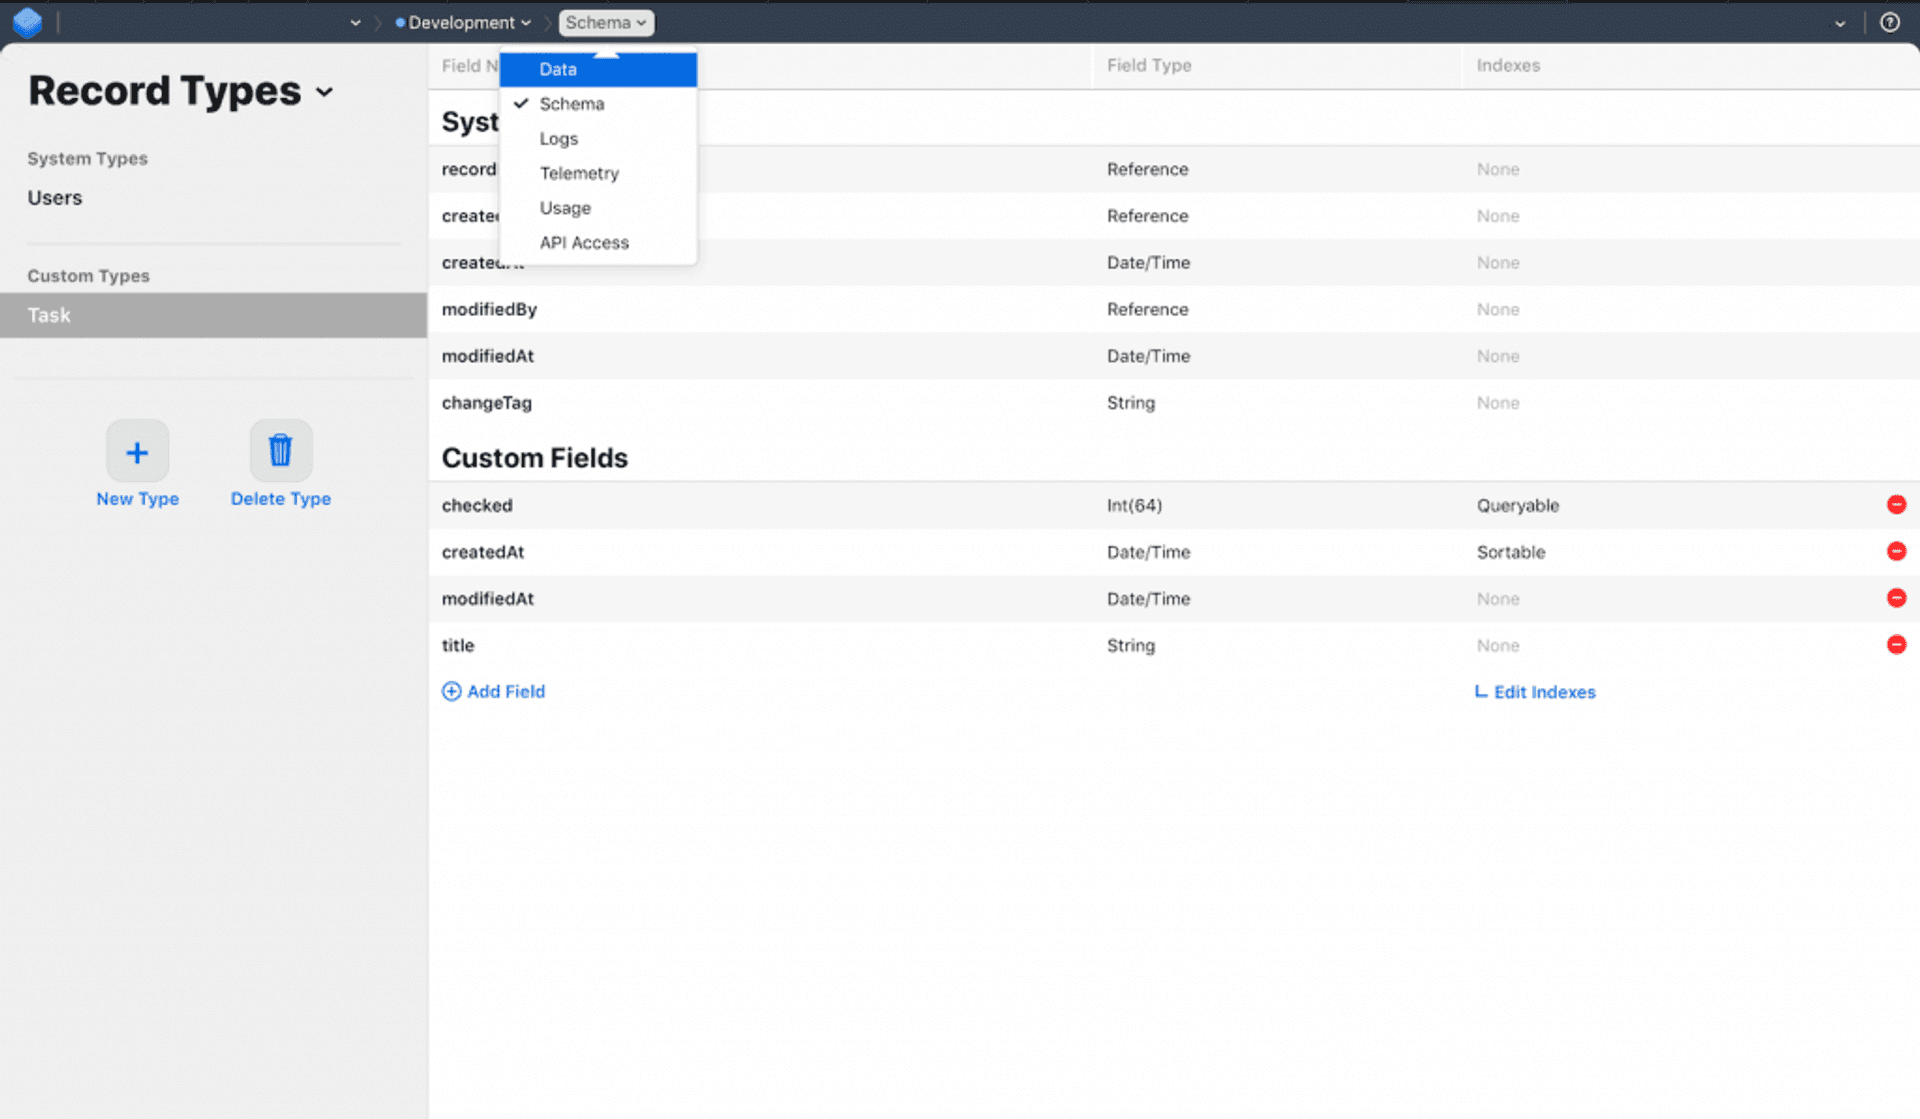
As seen in the image, the CloudKit desktop has six sections:
- API Access. Manages API tokens and server-to-server keys that allow calls to the web service.
- Data. Manages records and their types, indexes, subscriptions and security in public, private and shared databases.
- Schema. In this section we find the options for Registration types, Indexes, Security roles and Subscription types.
- Logs. Displays both historical and real-time data from server activity or notifications.
- Telemetry. Displays graphs of server-side usage and performance in using databases, as well as notification events.
- Usage. Displays information about active users, requests per second, or data storage.
Creating the database from the CloudKit Dashboard
As we have previously commented, we are going to create a simple application that will allow us to manage a list of tasks, which we will synchronize in iCloud. As this is a simple example, we will create a database with a table to save the tasks, with the following properties: title, creation date, modification date and whether it is done or not.
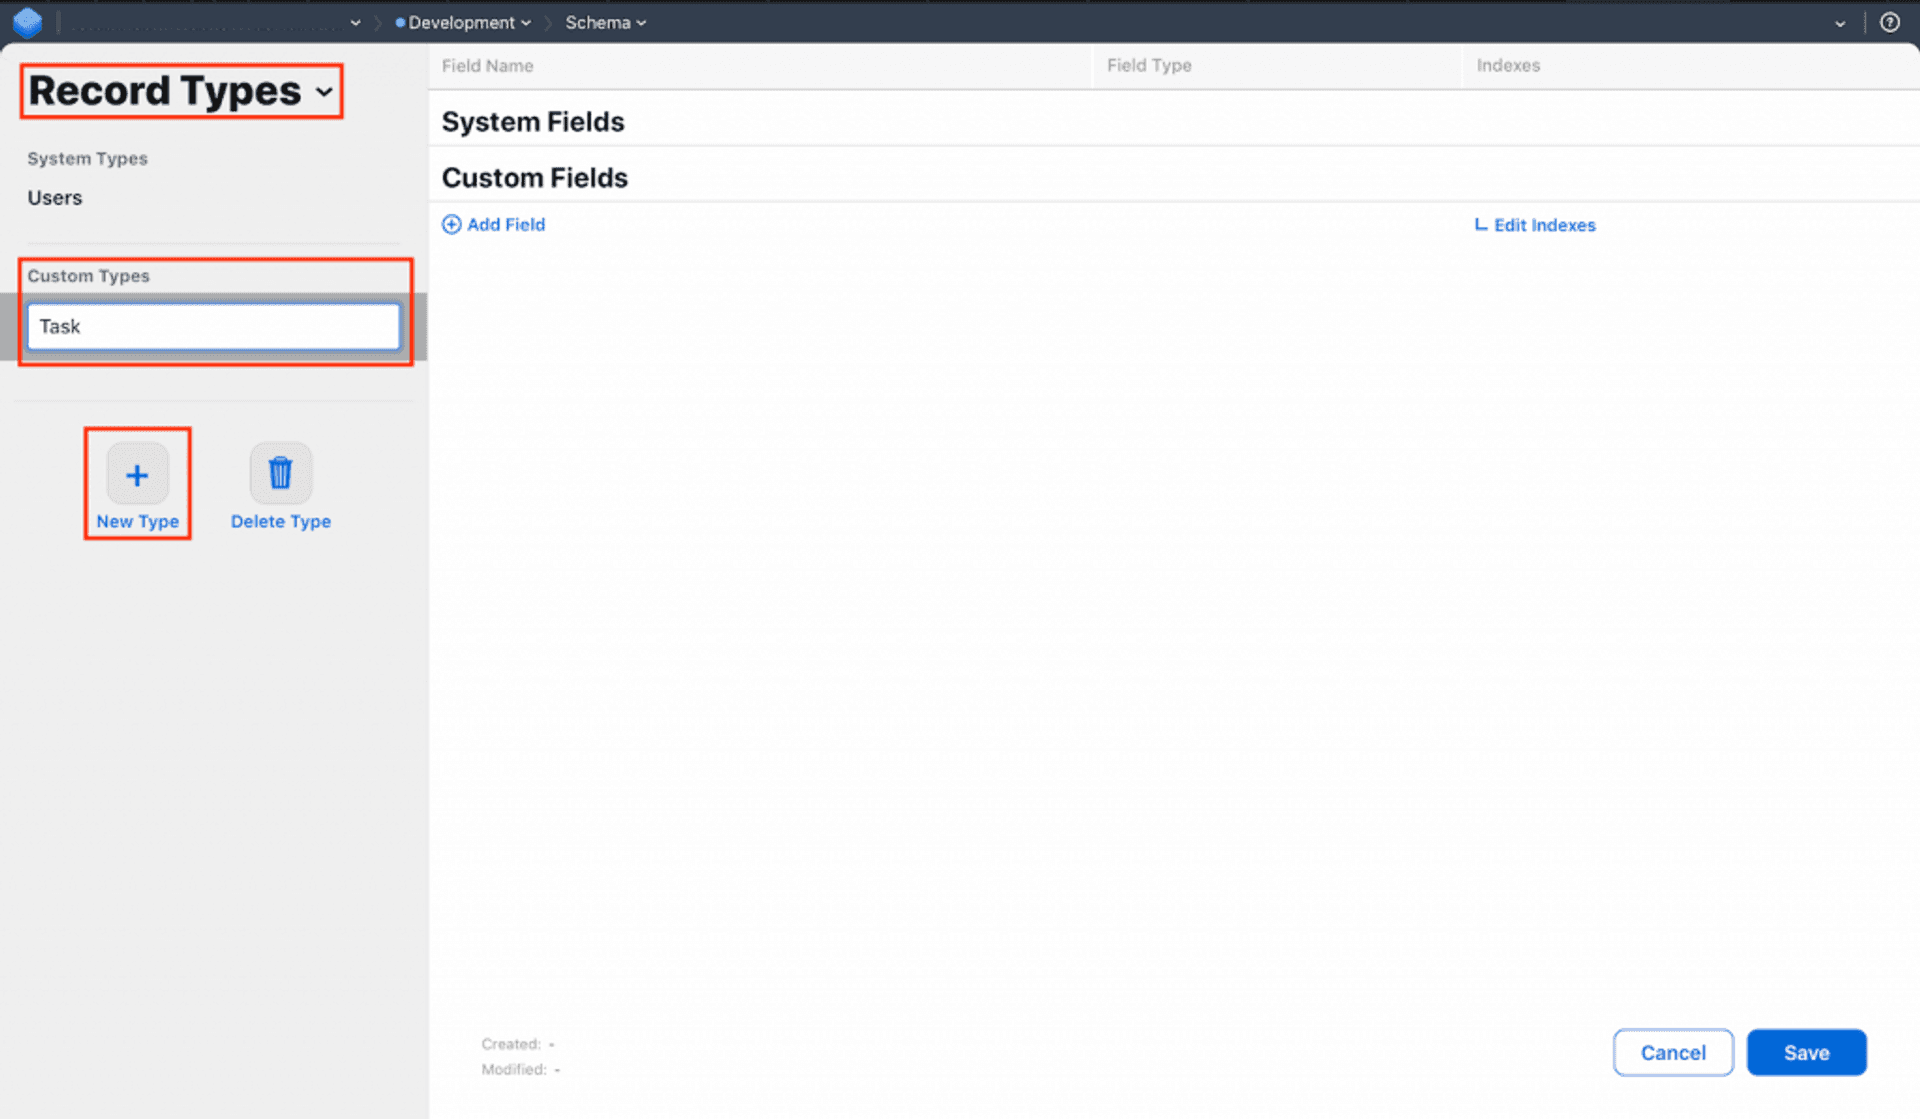
From the CloudKit Desktop, select Schema > Record Types > New Type, and give it the name of Task.
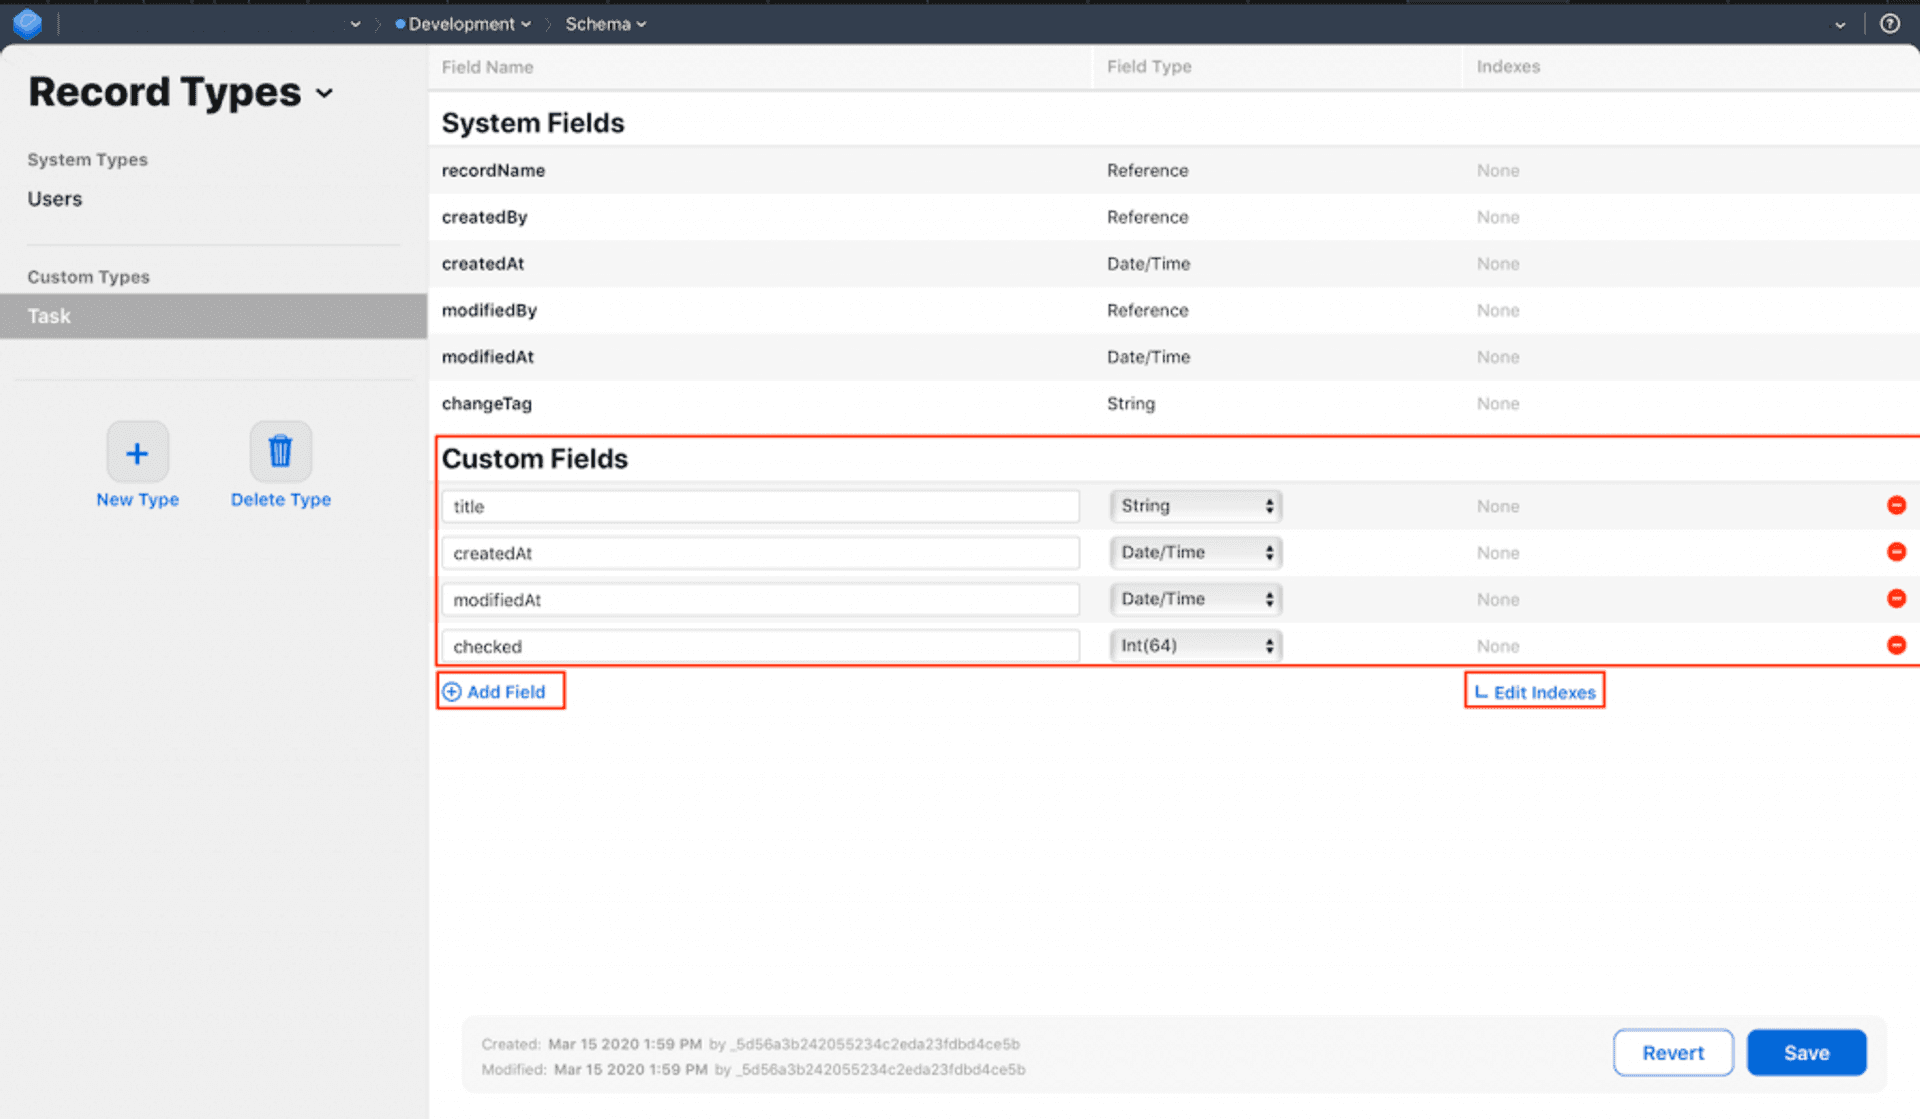
Once this type of record is created, we select it and start adding fields (after adding them, click on Save):
- title (of type String)
- createdAt (of type Date)
- modifiedAt (of type Date)
- checked (of type Int64, since there are no booleans)
The data can have any of the following basic types (you can also make arrays, List, of this data):
- Asset. It is a file associated with a record, although it is stored independently (it has a limit of 1 MB).
- Date/Time. A date and time data.
- Int(64). It is a 64-bit integer.
- Double. It is a double number.
- Bytes. This is a byte buffer that is stored in the registry itself.
- String. It is a text string.
- Location. It is for geographic location data.
- Reference. It is a reference to another table in order to create relationships between them.
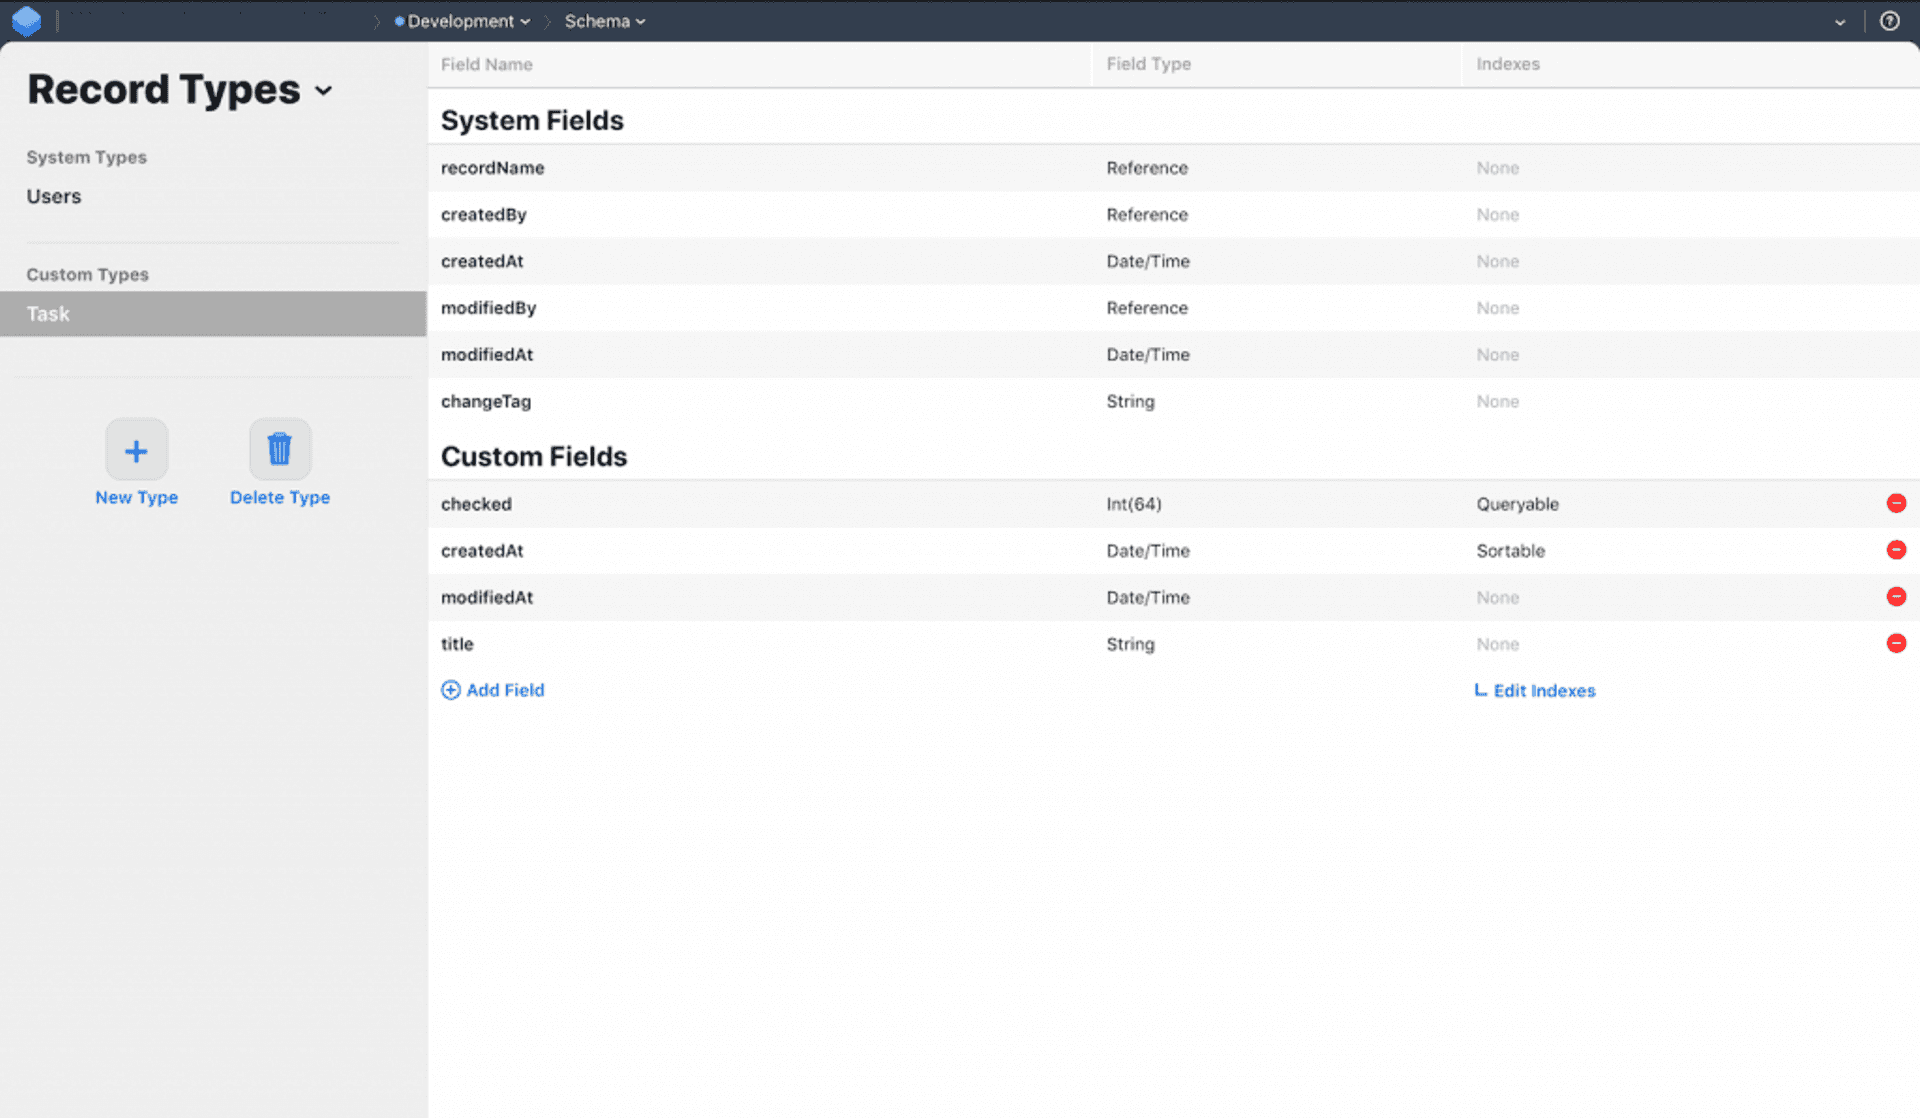
Finally, we select Edit Indexes and add three:
- createdAt of type SORTABLE (which will allow us to sort the results by creation date).
- checked of type QUERYABLE (to find out whether the tasks are marked complete or not).
- recordName of type QUERYABLE (to retrieve the records).
In this way we obtain the following image:
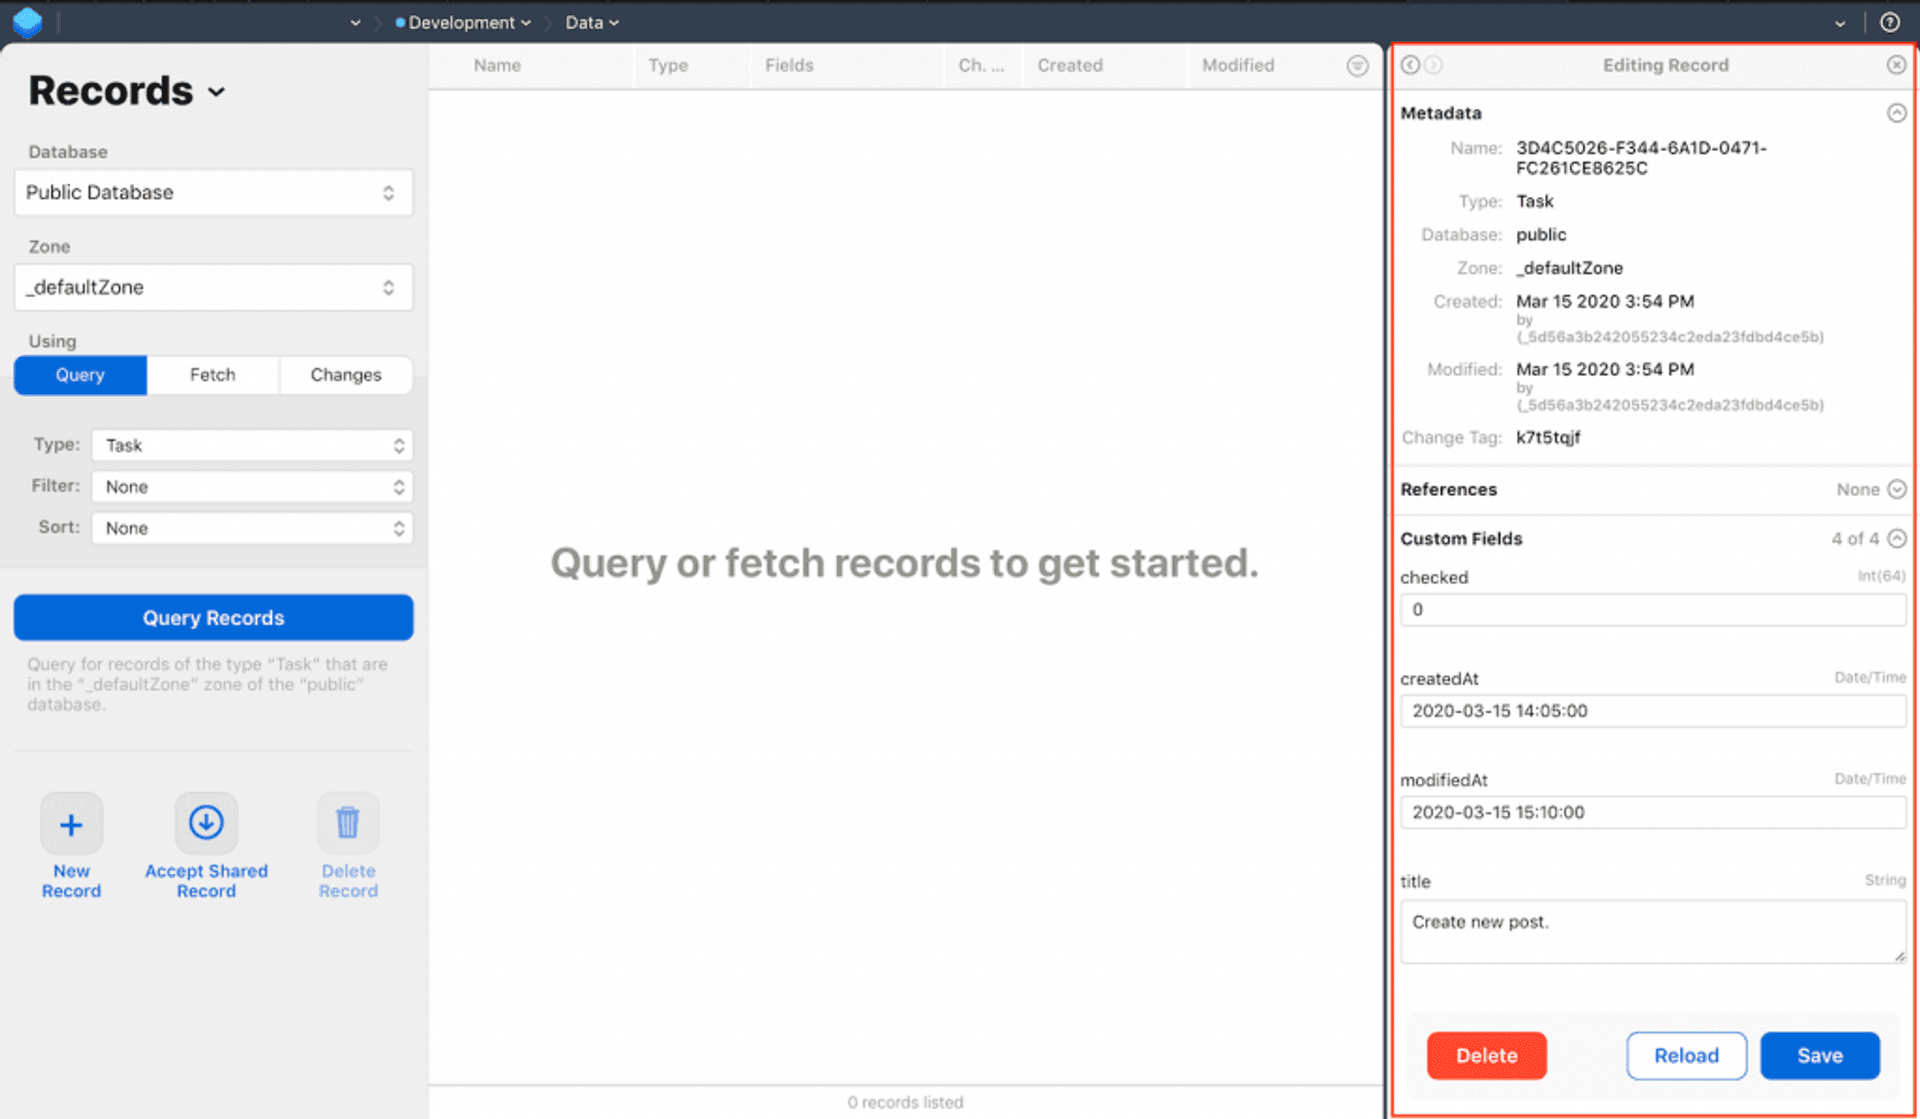
Adding sample data
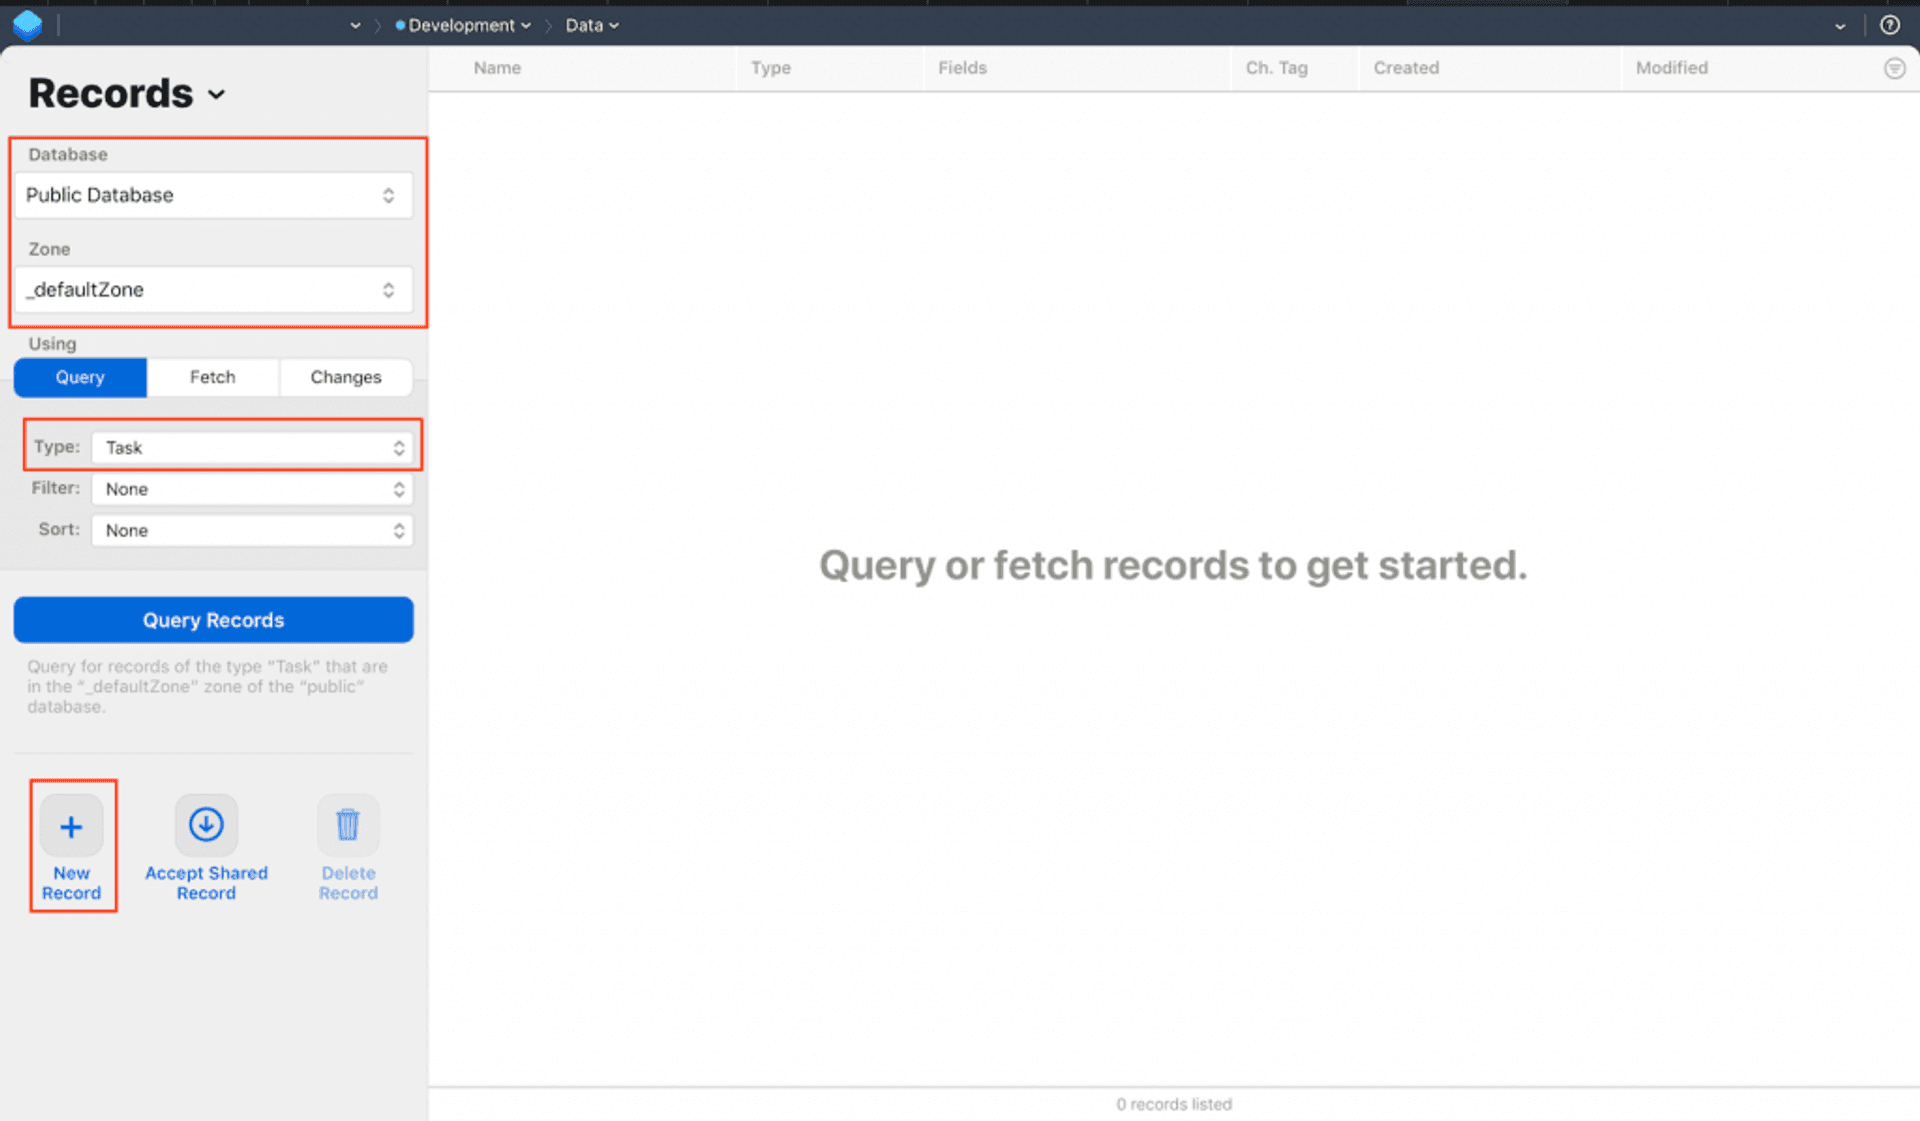
Once the Task table has been created, we can add some sample data from the CloudKit Desktop. To do this, from the drop-down menu we select the Data option.
Next, in the left panel we select from the Database menu we select Public Database and, in the Zone menu, we select _defaultZone (it is the one that contains the public records of the application). Then, in the Type menu we select Task (table name) and then we click the New Record button to add data.
A little Swift
Once we have entered a couple of sample records, we are going to start developing a simple application. This project can be found in full on GitHub. ## UI design
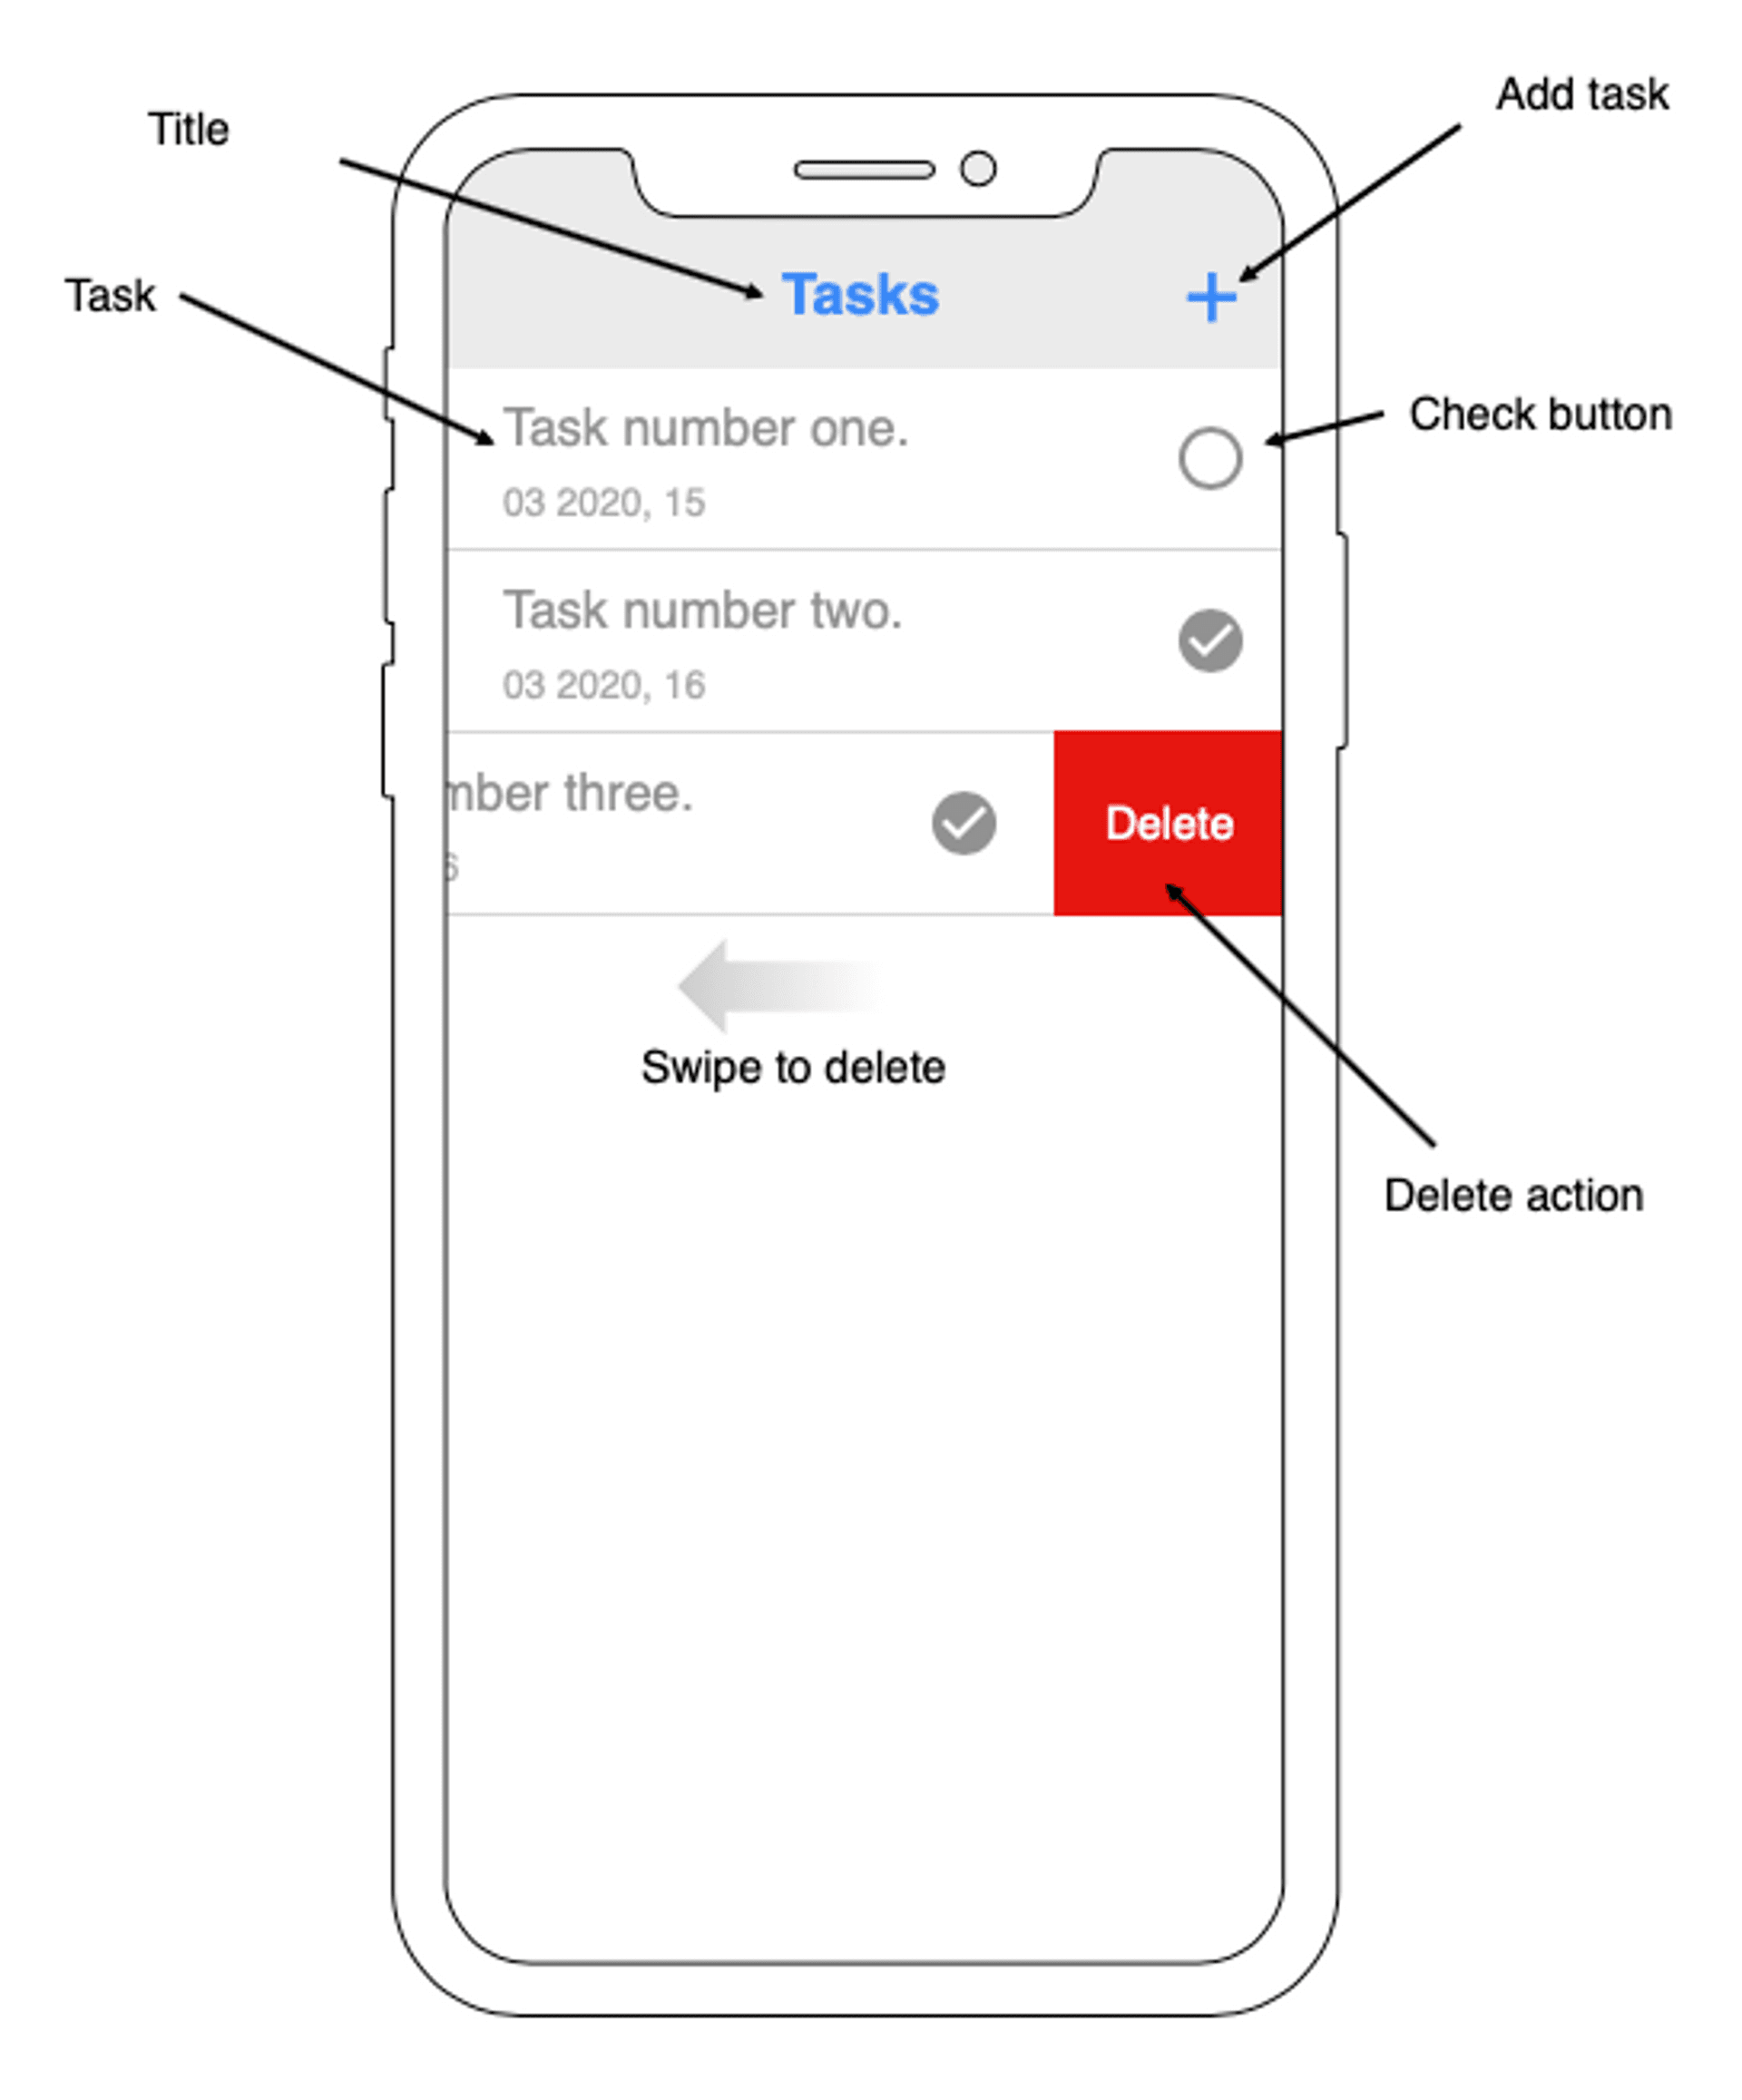
This project will basically consist of an UITableView component, which will be the one that shows the tasks. Each cell of this table will be a task with the title, the creation date and an icon to indicate if it has been done or not.
This table will be inside a UINavigationController component in the bar of which we will put the title and a button to add tasks. In this project, all this will be done through code, without using storyboards or .xib files.
Project creation
To work without storyboards when establishing a project in Xcode 11 we have to do some steps after creating it:
- We delete the file Main.storyboard.
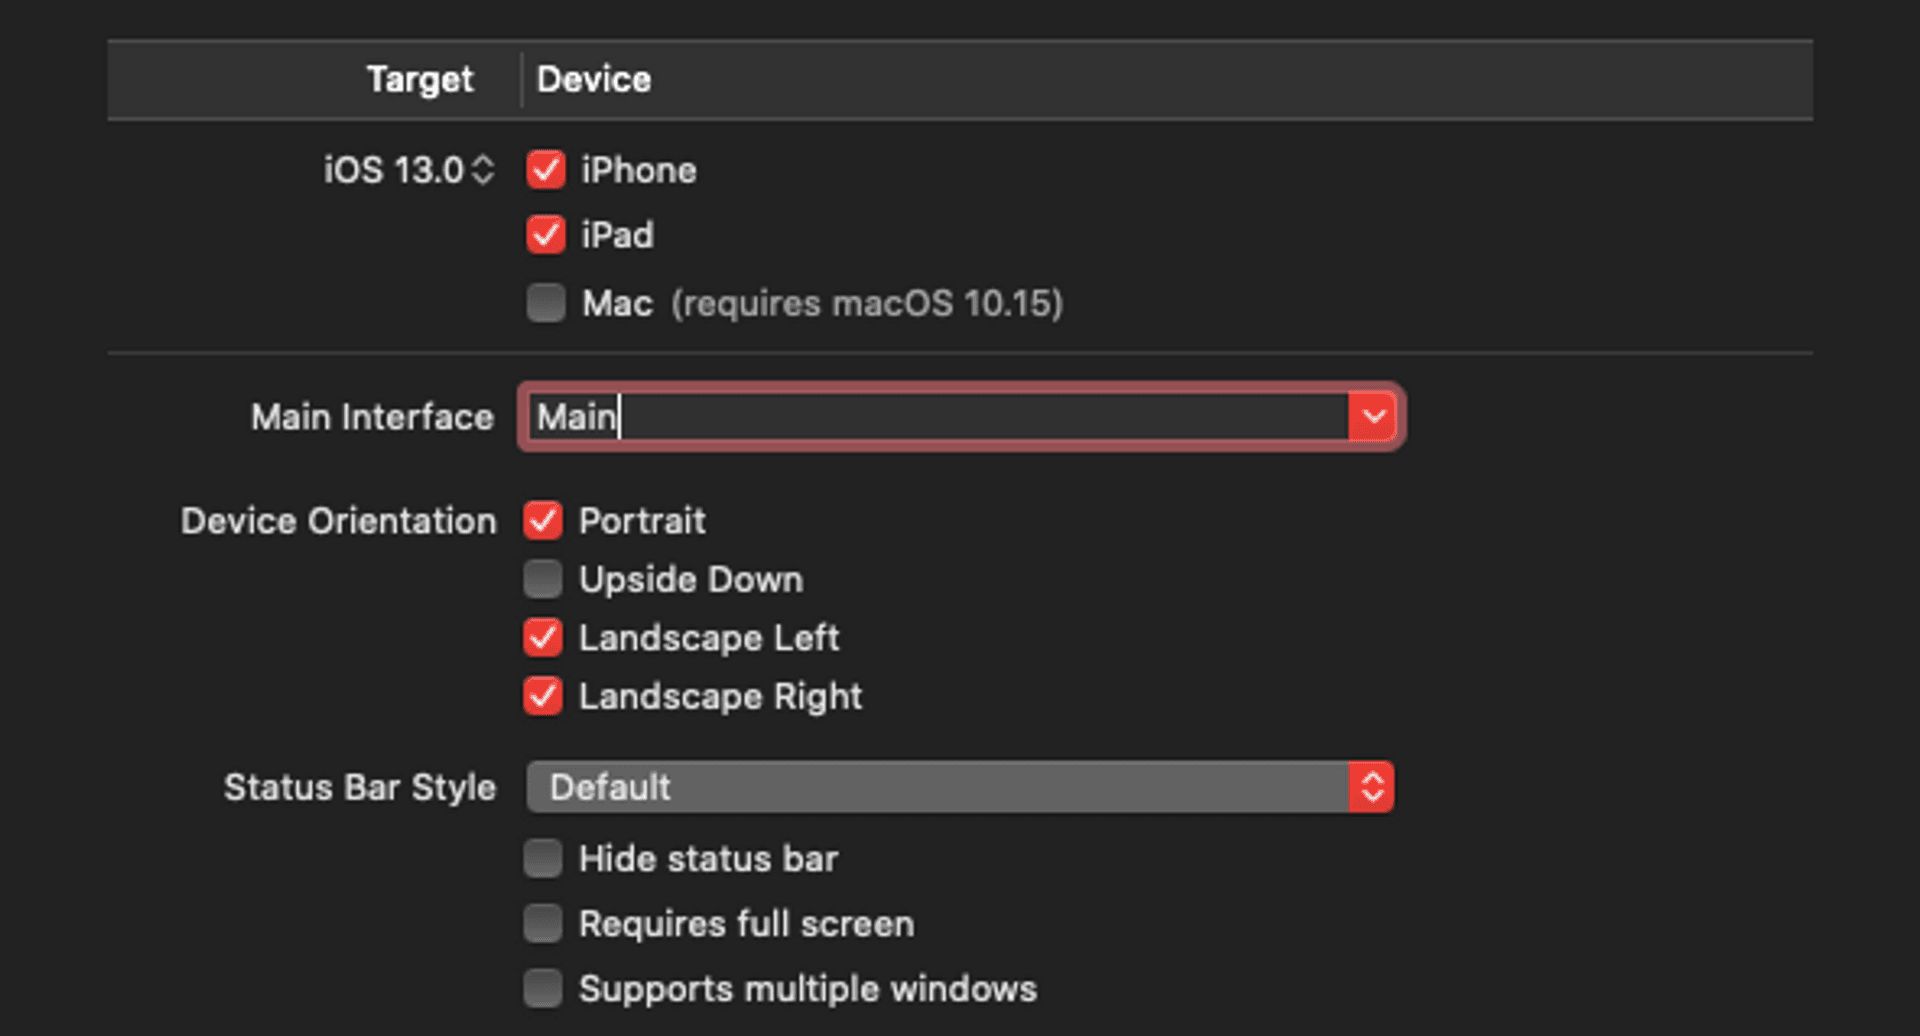
- In the General tab (TARGETS), we go to the Main interface selector and eliminate Main, leaving the field blank.
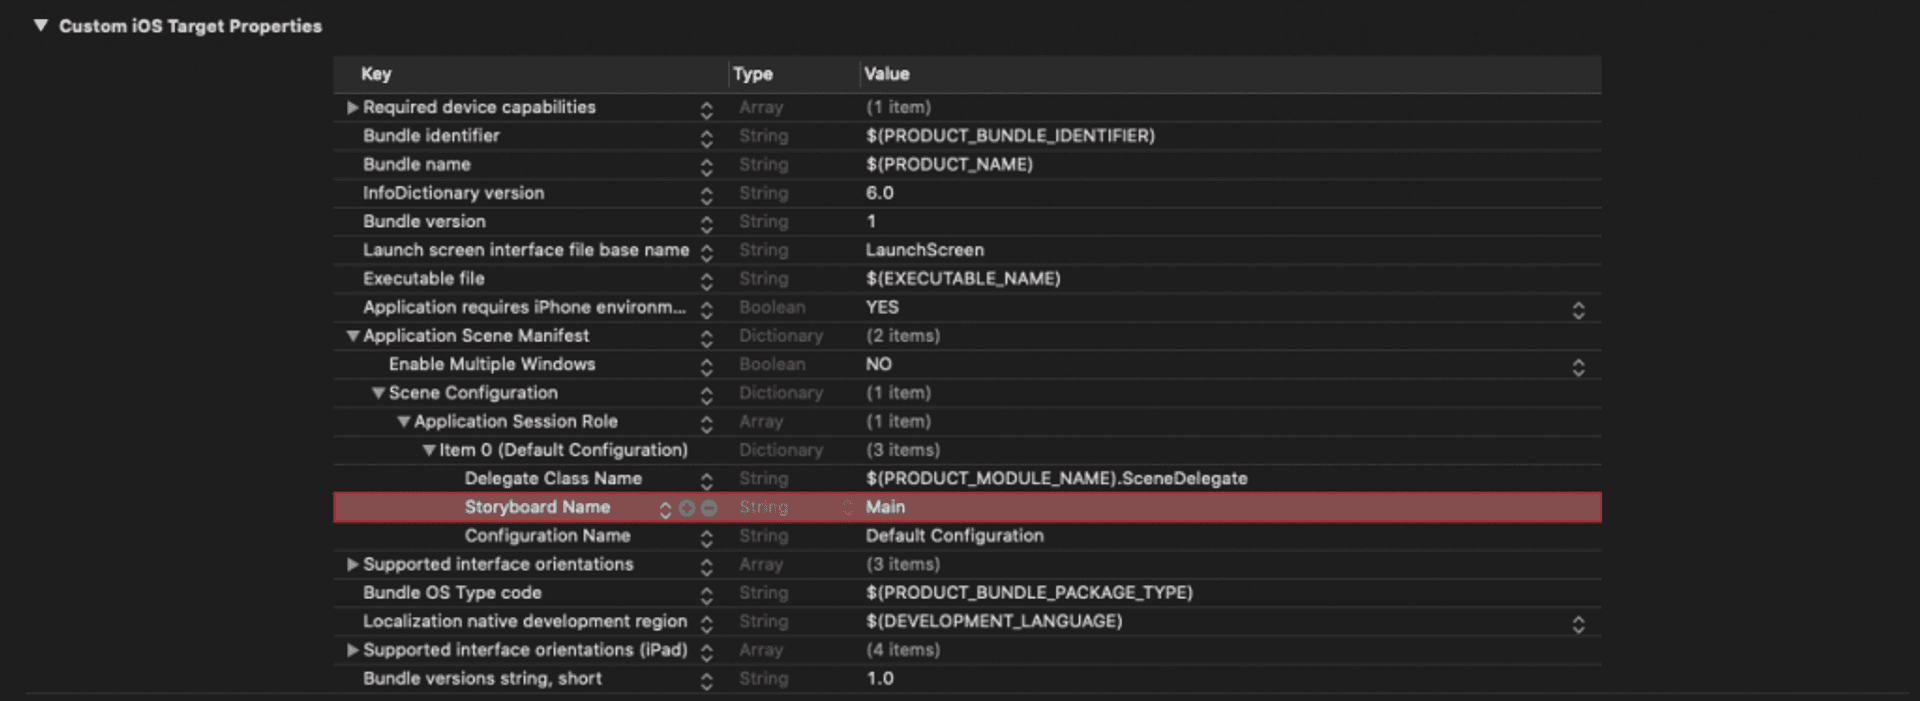
Finally, in the Info tab (TARGETS) we go to Application Scene Manifest > Scene Configuration > Application Session Role > Item 0 (Default Configuration) and delete the Storyboard Name field.
Since we will no longer call the Main.storyboard to start the project, we go to the SceneDelegate.swift file, and in the function scene(_ scene: UIScene, willConnectTo session: UISceneSession, options connectionOptions: UIScene.ConnectionOptions) and replace its content with the following code:
guard let windowScene = (scene as? UIWindowScene) else { return }
window = UIWindow(frame: UIScreen.main.bounds)
let viewController = ViewController()
let navigationController = UINavigationController()
navigationController.viewControllers = [viewController]
window?.rootViewController = navigationController
window?.makeKeyAndVisible()
window?.windowScene = windowScene
This code creates a UINavigationController and adds the ViewController controller to it. Then assign it as rootViewController.
Create the record manager
Next we create a manager that will perform the tasks related to CloudKit (retrieve records, save them …). We are going to call it CloudKitManager.swift. First, we will add the functionality to retrieve iCloud logs.
import Foundation
import CloudKit

enum FetchError {
    case fetchingError, noRecords, none
}

struct CloudKitManager {

    private let RecordType = "Task"

    func fetchTasks(completion: @escaping ([CKRecord]?, FetchError) -> Void) {
        let publicDatabase = CKContainer(identifier: "{YOUR_CONTAINER_IDENTIFIER}").publicCloudDatabase
        let query = CKQuery(recordType: RecordType, predicate: NSPredicate(value: true))
        query.sortDescriptors = [NSSortDescriptor(key: "createdAt", ascending: false)]

        publicDatabase.perform(query, inZoneWith: CKRecordZone.default().zoneID, completionHandler: { (records, error) -> Void in
            self.processQueryResponseWith(records: records, error: error as NSError?, completion: { fetchedRecords, fetchError in
                completion(fetchedRecords, fetchError)
            })
        })
    }


    private func processQueryResponseWith(records: [CKRecord]?, error: NSError?, completion: @escaping ([CKRecord]?, FetchError) -> Void) {
        guard error == nil else {
            completion(nil, .fetchingError)
            return
        }

        guard let records = records, records.count > 0 else {
            completion(nil, .noRecords)
            return
        }

        completion(records, .none)
    }
}
In fetchTasks(completion: @escaping ([CKRecord] ?, FetchError) -> Void), the first thing we do is retrieve the container (of type CKContainer) of our application from the identifier we have given it (iCloud.com… ) and then we get the public database, which is where we have previously created the demo records.
Then we create a search (query, of type CKQuery) in which we indicate the name of the table that we have created in iCloud (Tasks), and we add a sorting criterion for the records that are obtained: in this case, it will order the records based on creation date (createdAt) from newest to oldest (ascending: false).
Next, we execute the query in the public database according to the method:
publicDatabase.perform(<query: CKQuery, inZoneWith: CKRecordZone.ID?, completionHandler: ([CKRecord]?, Error?) -> Void>)
In this method we introduce the query that we have created, the zone identifier (which is the default zone, default, and that is the one that we have selected when creating the table in iCloud).
When executing the query, we get a couple of parameters in response: a list of records [CKRecord] and an error (both cases are conditional, since they can have the value nil).
This response is processed in the processQueryResponseWith method, in which we check if there has been an error when performing the query, if any records have been returned and what these records are. To facilitate the handling of errors, enum FetchError has been created, which collects possible errors.
Creation of the UITableView component
The UITableView component will be simple, the only thing we will customize is that the cells can have a variable height, to show task titles of up to three lines (TasksTableViewController.swift):
import UIKit
import CloudKit

class TasksTableViewController: UITableViewController {

    private var tasks = [CKRecord]()

    init() {
        super.init(style: .plain)
    }

    required init?(coder: NSCoder) {
        fatalError("init(coder:) has not been implemented")
    }


    override func viewDidLoad() {
        super.viewDidLoad()

        configureTableView()
    }


    private func configureTableView() {
        tableView.backgroundColor = .white
        tableView.separatorStyle = .singleLine
        tableView.register(TaskCell.self, forCellReuseIdentifier: TaskCell.reuseID)
        tableView.delegate = self
        tableView.dataSource = self
        tableView.bounces = false
        tableView.showsVerticalScrollIndicator = false
        tableView.rowHeight = 72
        tableView.estimatedRowHeight = UITableView.automaticDimension
        tableView.translatesAutoresizingMaskIntoConstraints = false
        tableView.contentInsetAdjustmentBehavior = .never
    }

    func set(tasks: [CKRecord]) {
        self.tasks = tasks
        tableView.reloadData()
    }
}


// MARK: - Table view data source
extension TasksTableViewController {

    override func numberOfSections(in tableView: UITableView) -> Int {
        return 1
    }


    override func tableView(_ tableView: UITableView, numberOfRowsInSection section: Int) -> Int {
        return tasks.count
    }


    override func tableView(_ tableView: UITableView, cellForRowAt indexPath: IndexPath) -> UITableViewCell {
        let cell = tableView.dequeueReusableCell(withIdentifier: TaskCell.reuseID, for: indexPath) as! TaskCell
        cell.set(record: tasks[indexPath.row])

        return cell
    }


    override func tableView(_ tableView: UITableView, heightForRowAt indexPath: IndexPath) -> CGFloat {
        return UITableView.automaticDimension
    }


    override func tableView(_ tableView: UITableView, estimatedHeightForRowAt indexPath: IndexPath) -> CGFloat {
        return UITableView.automaticDimension
    }


    override func tableView(_ tableView: UITableView, canEditRowAt indexPath: IndexPath) -> Bool {
        return true
    }
}
We also create a custom cell (TaskCell.swift):
import UIKit
import CloudKit

class TaskCell: UITableViewCell {

    static let reuseID = "TaskCell"

    private var record: CKRecord?
    private var taskTitleLabel = UILabel(frame: .zero)
    private var createdAtLabel = UILabel(frame: .zero)
    private var checkedButton = UIButton(frame: .zero)
    private var isChecked: Bool = false

    private let uncheckedIcon = UIImage(systemName: "circle")!

    private let checkedIcon = UIImage(systemName: "checkmark.circle")!
    weak var delegate: TaskCheckDelegate?

    override init(style: UITableViewCell.CellStyle, reuseIdentifier: String?) {
        super.init(style: style, reuseIdentifier: reuseIdentifier)
        configure()
    }


    required init?(coder: NSCoder) {
        fatalError("init(coder:) has not been implemented")
    }


    override func prepareForReuse() {
        self.record = nil
        self.isChecked = false
    }


    private func configure() {
        selectionStyle = .none

        configureTitleLabel()
        configureCreatedAtLabel()
        configureCheckedButton()
        layoutUI()
    }


    func set(record: CKRecord) {
        self.record = record

        taskTitleLabel.text = record.object(forKey: "title") as? String ?? ""
        if let createdDate = record.object(forKey: "createdAt") as? Date {
            createdAtLabel.text = createdDate.convertToMonthYearDayFormat()
        } else {
            createdAtLabel.text = ""
        }

        if let checked = record.object(forKey: "checked") as? Int64 {
            self.isChecked = checked == 0 ? false : true
            checkedButton.setBackgroundImage(self.isChecked ? checkedIcon : uncheckedIcon, for: .normal)
        } else {
            self.isChecked = false
            checkedButton.setBackgroundImage(uncheckedIcon, for: .normal)
        }
    }


    private func configureTitleLabel() {
        taskTitleLabel.translatesAutoresizingMaskIntoConstraints = false
        taskTitleLabel.font = .systemFont(ofSize: 16)
        taskTitleLabel.textColor = .systemGray2
        taskTitleLabel.textAlignment = .left
        taskTitleLabel.numberOfLines = 3
        taskTitleLabel.lineBreakMode = .byTruncatingTail
    }


    private func configureCreatedAtLabel() {
        createdAtLabel.translatesAutoresizingMaskIntoConstraints = false
        createdAtLabel.font = .systemFont(ofSize: 12)
        createdAtLabel.textColor = .systemGray3
        createdAtLabel.textAlignment = .left
        createdAtLabel.numberOfLines = 1
    }


    private func configureCheckedButton() {
        checkedButton.translatesAutoresizingMaskIntoConstraints = false
        checkedButton.setBackgroundImage(uncheckedIcon, for: .normal)
        checkedButton.tintColor = .systemGray
        checkedButton.addTarget(self, action: #selector(toggleChecked), for: .touchUpInside)
    }


    private func layoutUI() {
        contentView.addSubview(taskTitleLabel)
        contentView.addSubview(createdAtLabel)
        contentView.addSubview(checkedButton)

        NSLayoutConstraint.activate([
            checkedButton.centerYAnchor.constraint(equalTo: contentView.centerYAnchor),
            checkedButton.trailingAnchor.constraint(equalTo: contentView.trailingAnchor, constant: -10),
            checkedButton.heightAnchor.constraint(equalToConstant: 20),
            checkedButton.widthAnchor.constraint(equalToConstant: 20),

            taskTitleLabel.topAnchor.constraint(equalTo: contentView.topAnchor, constant: 5),
            taskTitleLabel.leadingAnchor.constraint(equalTo: contentView.leadingAnchor, constant: 10),
            taskTitleLabel.trailingAnchor.constraint(equalTo: checkedButton.leadingAnchor, constant: -10),
            taskTitleLabel.bottomAnchor.constraint(equalTo: contentView.bottomAnchor, constant: -30),

            createdAtLabel.leadingAnchor.constraint(equalTo: contentView.leadingAnchor, constant: 10),
            createdAtLabel.trailingAnchor.constraint(equalTo: checkedButton.leadingAnchor, constant: 10),
            createdAtLabel.topAnchor.constraint(equalTo: taskTitleLabel.bottomAnchor, constant: 5)
        ])

        taskTitleLabel.setContentHuggingPriority(.required, for: .vertical)
    }


    @objc private func toggleChecked() {
        guard let record = record else { return }
        isChecked.toggle()
        checkedButton.setBackgroundImage(isChecked ? checkedIcon : uncheckedIcon, for: .normal)
        checkedButton.tintColor = isChecked ? .systemGreen : .systemGray
    }
}
In which the toggleChecked() method allows you to change, for now, the status of the completed task icon.
Now in the ViewController.swift class we can already show the table and execute the iCloud call.
import UIKit

class ViewController: UIViewController {

    private let tableView = TasksTableViewController()
    private let manager = CloudKitManager()

    override func viewDidLoad() {
        super.viewDidLoad()

        self.title = "Tasks"

        layoutUI()
        fetchRecords()
    }


    private func layoutUI() {
        view.addSubview(tableView.view)

        NSLayoutConstraint.activate([
            tableView.view.topAnchor.constraint(equalTo: view.safeAreaLayoutGuide.topAnchor),
            tableView.view.bottomAnchor.constraint(equalTo: view.bottomAnchor),
            tableView.view.centerXAnchor.constraint(equalTo: view.centerXAnchor),
            tableView.view.widthAnchor.constraint(equalTo: view.widthAnchor)
        ])
    }


    private func fetchRecords() {
        manager.fetchTasks(completion: { (records, error) in
            guard error == .none, let records = records else {
                // Deal with error
                return
            }

            DispatchQueue.main.async {
                self.tableView.set(tasks: records)
            }
        })
    }
}
Records deletion
To delete records we will enable the use of cell dragging so that the option to delete appears. We will achieve this by adding the following method to the TasksTableViewController class:
override func tableView(_ tableView: UITableView, commit editingStyle: UITableViewCell.EditingStyle, forRowAt indexPath: IndexPath) {
    if (editingStyle == .delete) {

    }
}
We also modified this class to inject an instance of CloudKitManager.
private var manager: CloudKitManager!

init(manager: CloudKitManager) {
    super.init(style: .plain)

    self.manager = manager
}
And in the ViewController class we change the instance of the Tasks*TableViewController class, since now we will inject the CloudKitManager instance:
private var tableView: TasksTableViewController!
private let manager = CloudKitManager()

override func viewDidLoad() {
    super.viewDidLoad()

    self.title = "Tasks"

    configureTableView()
    layoutUI()
    fetchRecords()
}


private func configureTableView() {
    tableView = TasksTableViewController(manager: manager)
}
In CloudKitManager we add these methods to delete records and add the deletingError case to the FetchError enum:
func deleteRecord(record: CKRecord) {
    let publicDatabase = CKContainer(identifier: "{YOUR_CONTAINER_IDENTIFIER}").publicCloudDatabase

    publicDatabase.delete(withRecordID: record.recordID) { (recordID, error) -> Void in
        guard let _ = error else {
          completionHandler(.none)
          return
        }

        completionHandler(.deletingError)
    }
}
And in the TasksTableViewController class we modify the last method:
override func tableView(_ tableView: UITableView, commit editingStyle: UITableViewCell.EditingStyle, forRowAt indexPath: IndexPath) {
    if (editingStyle == .delete) {
        manager.deleteRecord(record: tasks[indexPath.row], completionHandler: { error in
            guard error == .none else {
                // Deal with error
                return
            }

            self.tasks.remove(at: indexPath.row)

            DispatchQueue.main.async {
                self.tableView.deleteRows(at: [indexPath], with: .right)
            }
        })
    }
}
Now we can test the deletion of tasks.
Adding a task
In order to create a task, we will create a UIViewController to which we will navigate by clicking on a ‘+’ button in the navigation bar. This new UIViewController, which we will call AddTaskController, will simply be made up of an UITextField component, in which we will introduce the task text, and a UIButton component, to add it.
import UIKit
import CloudKit

protocol TasksDelegate: class {
    func addedTask(_ task: CKRecord?, error: FetchError)
}

class AddTaskController: UIViewController {

    private let textField = UITextField(frame: .zero)
    private let addButton = UIButton(frame: .zero)

    private var manager: CloudKitManager!

    weak var delegate: TasksDelegate?

    init(manager: CloudKitManager) {
        super.init(nibName: nil, bundle: nil)

        self.manager = manager
    }


    required init?(coder: NSCoder) {
        fatalError("init(coder:) has not been implemented")
    }


    override func viewDidLoad() {
        super.viewDidLoad()

        view.backgroundColor = .white

        configureTextField()
        configureAddButton()
        layoutUI()
    }


    private func configureTextField() {
        textField.translatesAutoresizingMaskIntoConstraints = false
        textField.placeholder = "Add a task"
        textField.borderStyle = UITextField.BorderStyle.line
        textField.textColor = .systemGray2
        textField.font = .systemFont(ofSize: 16)
        textField.contentVerticalAlignment = .top
    }


    private func configureAddButton() {
        addButton.translatesAutoresizingMaskIntoConstraints = false
        addButton.setTitle("Add task", for: .normal)
        addButton.setTitleColor(.systemTeal, for: .normal)
        addButton.titleLabel?.font = .boldSystemFont(ofSize: 16)
        addButton.addTarget(self, action: #selector(addTask), for: .touchUpInside)
    }


    private func layoutUI() {
        view.addSubview(textField)
        view.addSubview(addButton)

        NSLayoutConstraint.activate([
            textField.topAnchor.constraint(equalTo: view.safeAreaLayoutGuide.topAnchor, constant: 20),
            textField.leadingAnchor.constraint(equalTo: view.leadingAnchor, constant: 10),
            textField.trailingAnchor.constraint(equalTo: view.trailingAnchor, constant: -10),
            textField.heightAnchor.constraint(equalToConstant: 300),

            addButton.topAnchor.constraint(equalTo: textField.bottomAnchor, constant: 40),
            addButton.centerXAnchor.constraint(equalTo: view.centerXAnchor),
            addButton.widthAnchor.constraint(equalToConstant: 200),
            addButton.heightAnchor.constraint(equalToConstant: 50)
        ])
    }


    @objc private func addTask() {
        guard let task = textField.text, !task.isEmpty else {
            delegate?.addedTask(nil, error: .addingError)
            self.navigationController?.popViewController(animated: false)
            return
        }

        manager.addTask(task, completionHandler: { (record, error) in
            self.delegate?.addedTask(record, error: .none)
            DispatchQueue.main.async {
                self.navigationController?.popViewController(animated: false)
            }
            return
        })
    }
}
In this code there are several important points:
- The init method injects a CloudKitManager instance, in order to manage the addition of a record.
- The method associated with the ‘Add task‘ button is called the addTask method of the CloudKitManager, which will manage the addition of new records. The code that is added for this case in CloudKitManager is (a new case, addingError, has also been added in the FetchError enum):
func addTask(_ task: String, completionHandler: @escaping (CKRecord?, FetchError) -> Void) {
    let publicDatabase = CKContainer(identifier: "{YOUR_CONTAINER_IDENTIFIER}").publicCloudDatabase
    let record = CKRecord(recordType: RecordType)

    record.setObject(task as __CKRecordObjCValue, forKey: "title")
    record.setObject(Date() as __CKRecordObjCValue, forKey: "createdAt")
    record.setObject(0 as __CKRecordObjCValue, forKey: "checked")

    publicDatabase.save(record, completionHandler: { (record, error) in
        guard let _ = error else {
            completionHandler(record, .none)
            return
        }

        completionHandler(nil, .addingError)
    })
}- Finally, a protocol has been created to pass the created record to the ViewController. Finally, the starting controller (ViewController) is navigated.
In order to call the AddTaskController class we add a button to the navigation bar. We do this using the UIBarButtonItem component, to which we associate the addTask method. In this method we instantiate the controller, define the delegate and push the new controller.
private func configureAddButton() {
    let addButton = UIBarButtonItem(barButtonSystemItem: .add, target: self, action: #selector(addTask))
    navigationItem.rightBarButtonItems = [addButton]
}

@objc private func addTask() {
    let controller = AddTaskController(manager: manager)
    controller.delegate = self
    navigationController?.pushViewController(controller, animated: false)
}
Since we have defined the delegate for the ViewController, we have to make the ViewController adopt the methods of this protocol. We do this using a ViewController extension (to organize the code):
extension ViewController: TasksDelegate {
    func addedTask(_ task: CKRecord?, error: FetchError) {
        guard error == .none, let task = task else {
            // Deal with error
            return
        }
        DispatchQueue.main.async {
            self.tableView.add(task: task)
        }
    }
}
In this implementation of the addedTask method, any possible error would be handled and, in the event that everything is correct, the created record is sent to a new add(task: CKRecord) method that we will create in the TasksTableViewController class:
func add(task: CKRecord) {
    self.tasks.insert(task, at: 0)
    tableView.reloadData()
}
What this method does is add the new record to the beginning of the list of records (it is the newest) and then reload the data from the table.
Update a task
We have already seen how to recover, delete or create records with CloudKit. Now we will see how to update a registry in CloudKit. For this we will use a simple case, the one that corresponds to completing a task and marking it as completed.
First of all we add a new method in CloudKitManager:
func updateTask(_ task: CKRecord, completionHandler: @escaping (CKRecord?, FetchError) -> Void) {
    let publicDatabase = CKContainer(identifier: "{YOUR_CONTAINER_IDENTIFIER}").publicCloudDatabase

    publicDatabase.save(task, completionHandler: { (record, error) in
        guard let _ = error else {
            completionHandler(record, .none)
            return
        }

        completionHandler(nil, .addingError)
    })
}
When passing an object that already exists and saving it in CloudKit, its values are updated. To call this method when we mark the task complete, we create a protocol that allows passing the modified record from the cell to the TasksTableViewController class:
protocol TaskCheckDelegate: class {
    func updateTask(_ record: CKRecord)
}
Now in the TasksTableViewController class we add the delegate to the cell:
override func tableView(_ tableView:UITableView, cellForRowAt indexPath: IndexPath) -> UITableViewCell {
    let cell = tableView.dequeueReusableCell(withIdentifier: TaskCell.reuseID, for: indexPath) as! TaskCell
    cell.set(record: tasks[indexPath.row])
    cell.delegate = self

    return cell
}
And then we make the TasksTableViewController class adopt the protocol:
extension TasksTableViewController: TaskCheckDelegate {
    func updateTask(_ record: CKRecord) {
        manager.updateTask(record, completionHandler: { (record, error) in
          // Deal with error if there is one
        })
    }
}
If we mark a record as complete and then turn off the app and reload it, we see that the record has been modified in iCloud. Record update.
Conclusion
We have seen how we can create an application that uses CloudKit to synchronize data with iCloud. In this application we have integrated the basic CRUD methods (Create, Read, Update, Delete) of a database. Remember that you can download the complete project from GitHub.

