In this post I am going to describe how to use it. In the last previous chapter of this course, we saw the new navigation component that is used as of iOS 16.0: NavigationStack. In this chapter we are going to see a second component, NavigationSplitView, which allows us to perform a navigation based on two and even three columns.
Navigation by columns
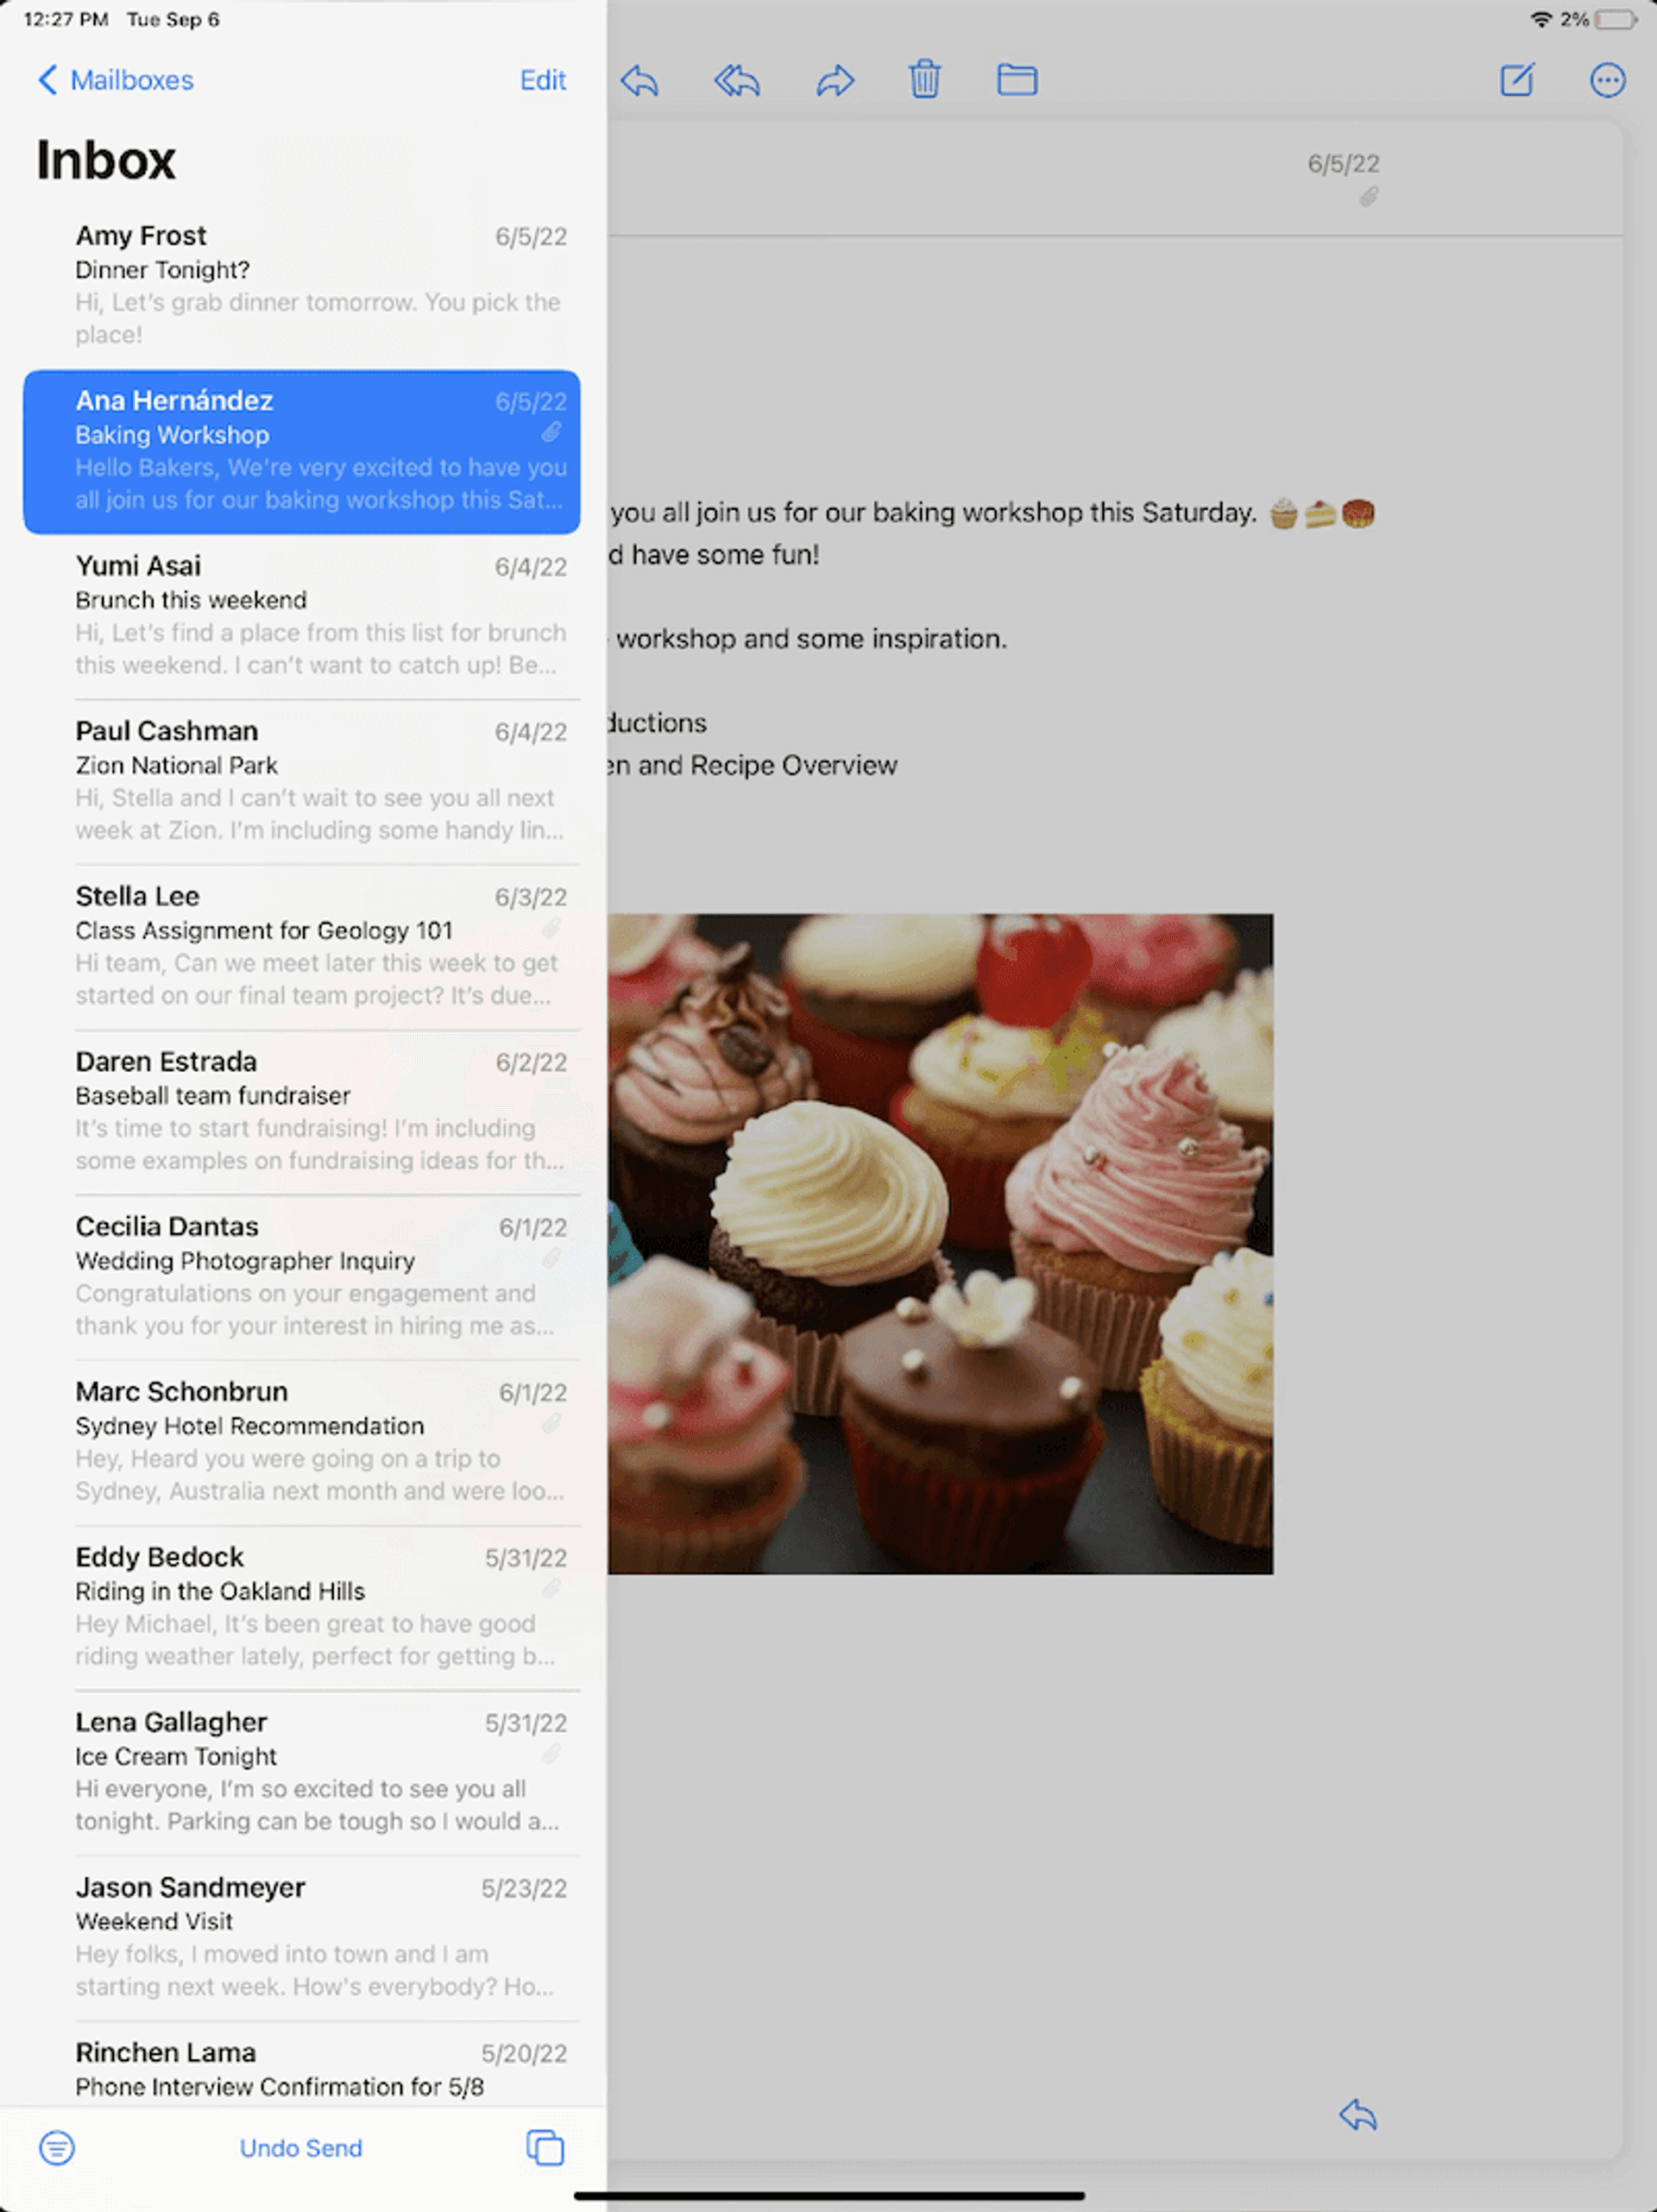
Column navigation surely sounds familiar to you. If you have entered the Mail application on an iPad, you will have seen how you can navigate through the different components: Inbox, received emails and details of an email on the same screen, all of which are displayed in different columns. This is what we are going to do now with the NavigationSplitView.
NavigationSplitView with 2 and 3 columns
The use of NavigationSplitView is based on a simple structure with a small difference between 2 and 3 columns.
2 Columns
The structure to display a 2-column navigation is as follows:
NavigationSplitView {
  // Shows the view with the components of the menu bar
} detail: {
  // Shows a the detailed view related to each one of the items in the menu
}
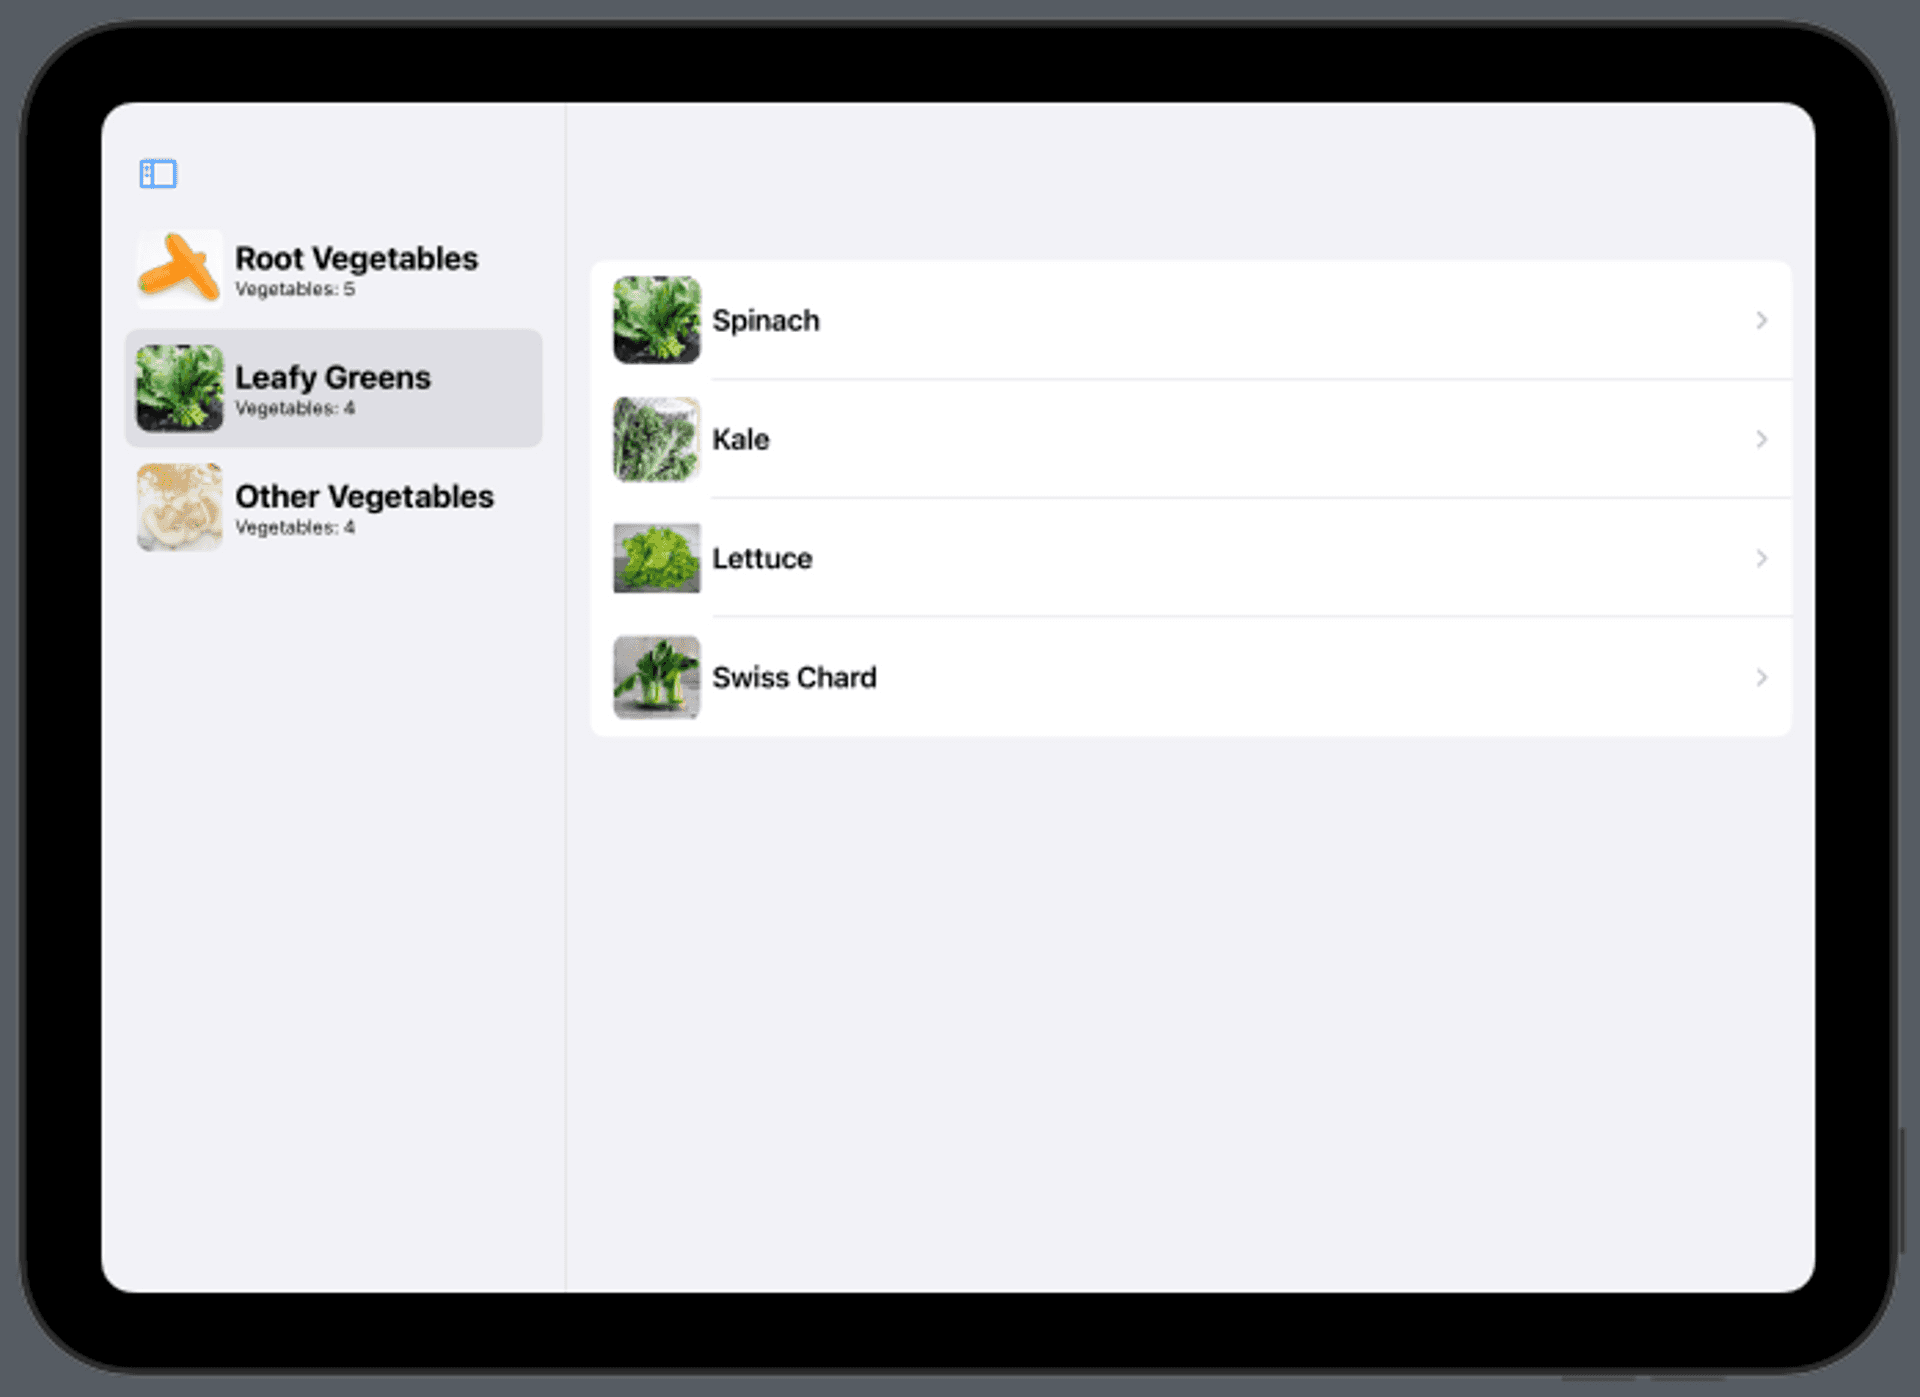
In the first part, it will be added to the view (usually a List component) with the items that will form the main menu (the one that appears on the left of the screen and that we can show and hide with the icon on the upper left of the navigation bar). The detail part will show the view that will contain information related to the item that we select in the main menu (it can be another list, as we will see later in an example).
3 Columns
To add a third column to the navigation, what we do is add a content component to the 2-column structure before the detail component:
NavigationSplitView {
  // Shows the view with the components of the menu bar
} content: {
  // Shows a secondary menu related to the item selected in the main menu
} detail: {
  // Shows a the detailed view related to each one of the items in the secondary menu
}
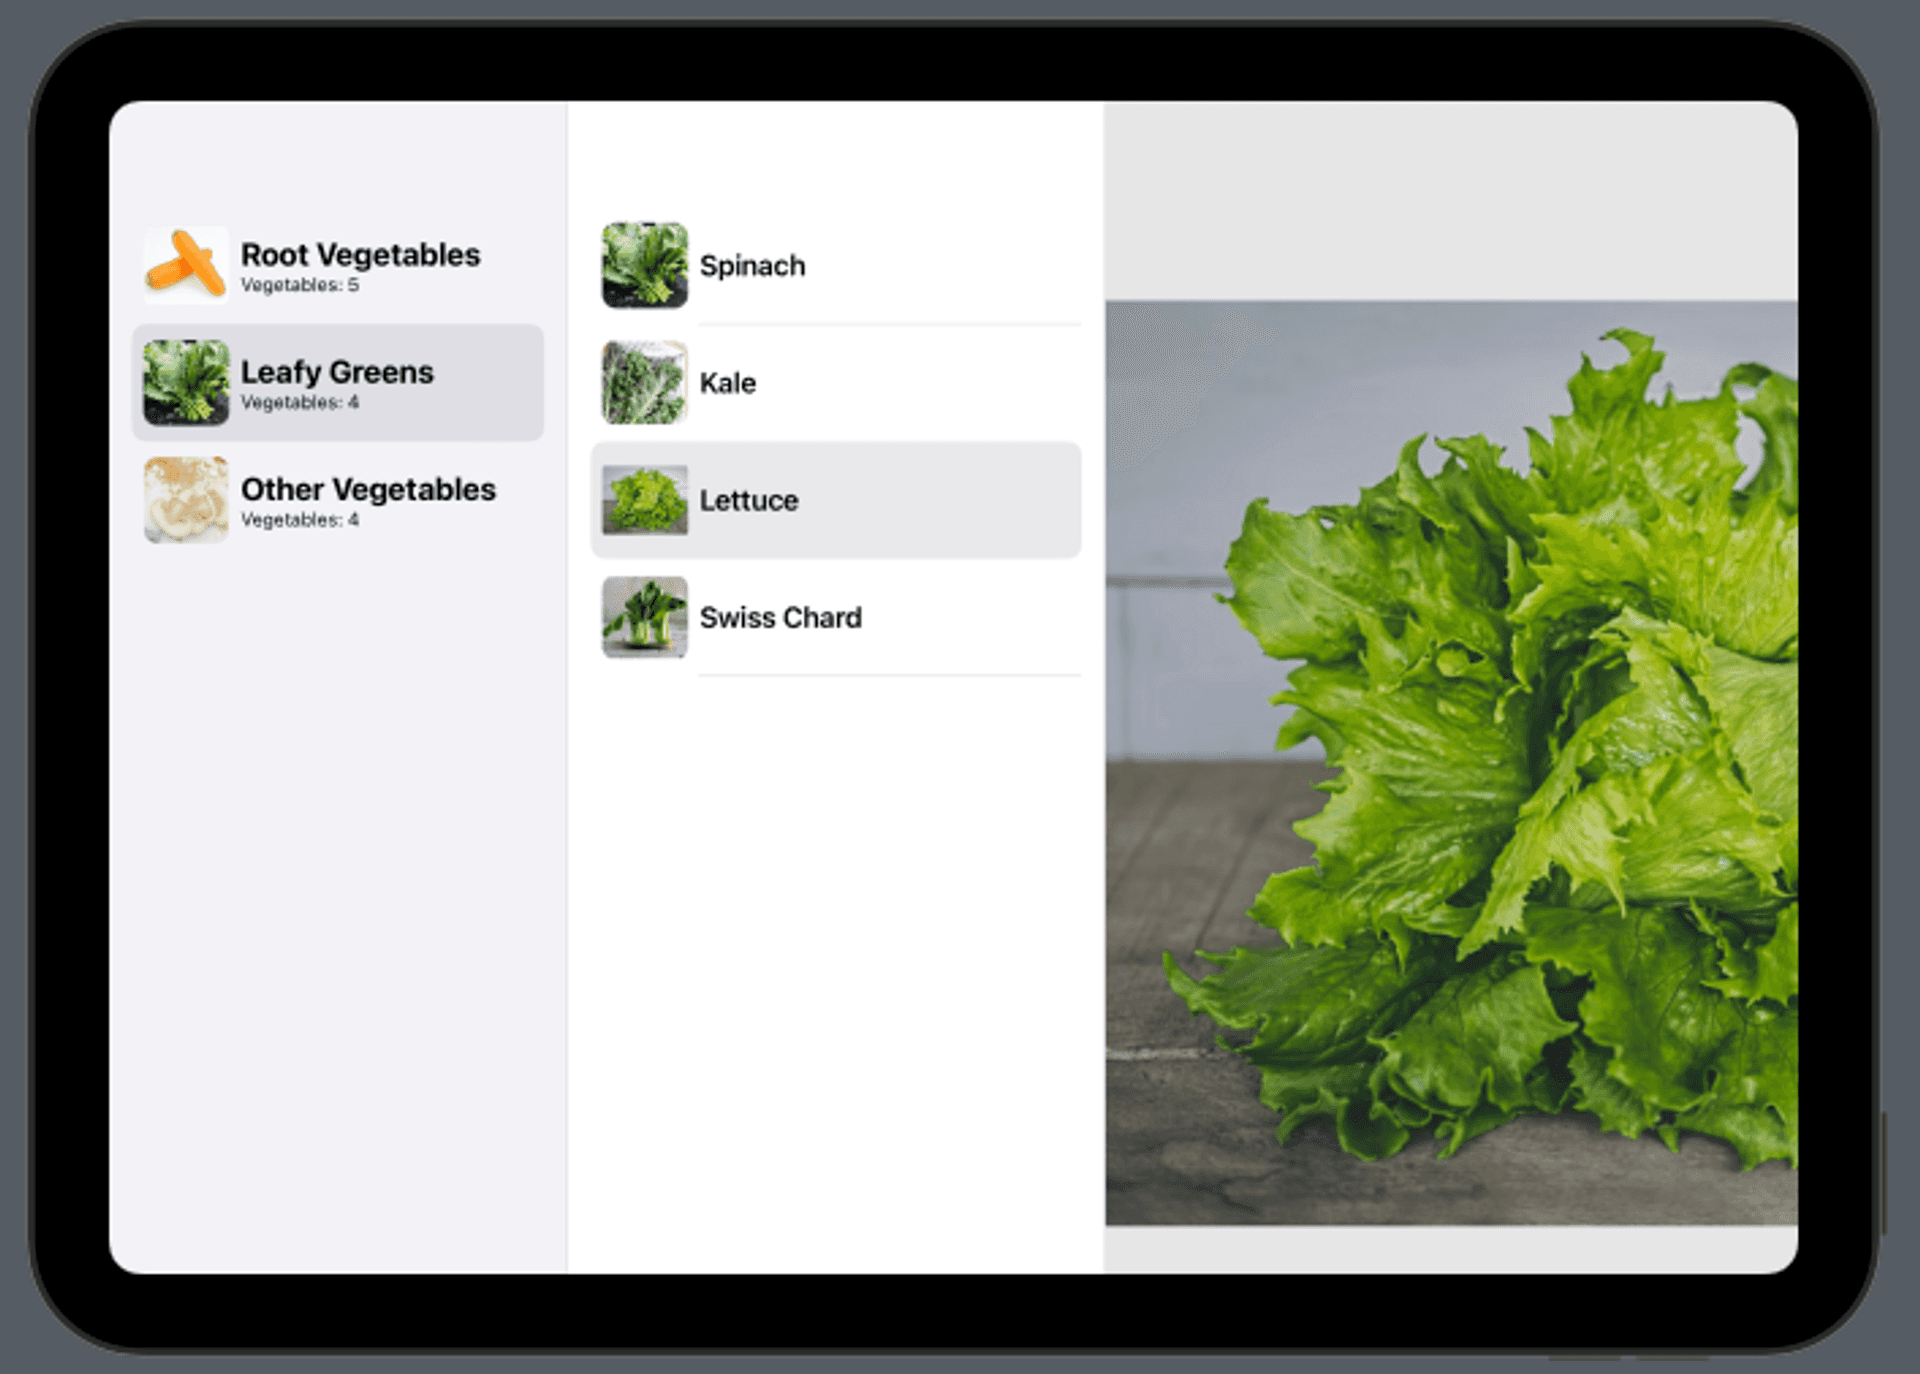
That is, in content we add a secondary menu that is displayed from the selection in the main menu. When we select a component from this secondary menu, its information will appear in the detail view.
NavigationSplitView 2 columns example
Now we will apply all this to an example in which we will create a main menu in which we will show types of vegetables and a detailed view that will contain lists with vegetables of the selected type.
Model definition
First, we define a model for our data. In this case, we define struct VegetableType that contains an id (based on the element’s UUID), the type of the vegetable, the name of the image (which we have previously saved in the Assets folder) and a vegetables parameter that will allow us to indicate which examples of vegetables are of that type. We also will define a struct Vegetable (with id, name and image parameters) for each vegetable:
struct VegetableType: Identifiable, Hashable {
    var id = UUID()
    var type: String
    var image: String
    var vegetables: [Vegetable]?
}

struct Vegetable: Identifiable, Hashable {
    var id = UUID()
    var name: String
    var image: String
}
With this structure created, we can create our VegetableModel data model:
struct VegetableModel {

    let data = [
        VegetableType(type: "Root Vegetables",
             image: "carrot",
                      vegetables: [Vegetable(name: "Carrots", image: "carrot"),
                                   Vegetable(name: "Potatoes", image: "potato"),
                                   Vegetable(name: "Beets", image: "beet"),
                                   Vegetable(name: "Sweet Potatoes", image: "sweet-potato"),
                                   Vegetable(name: "Turnips", image: "turnip")]),
        VegetableType(type: "Leafy Greens",
             image: "spinach",
                      vegetables: [Vegetable(name: "Spinach", image: "spinach"),
                                   Vegetable(name: "Kale", image: "kale"),
                                   Vegetable(name: "Lettuce", image: "lettuce"),
                                   Vegetable(name: "Swiss Chard", image: "swiss-chard")]),
        VegetableType(type: "Other Vegetables",
             image: "mushroom",
                      vegetables: [Vegetable(name: "Tomatoes", image: "tomato"),
                                   Vegetable(name: "Mushrooms", image: "mushroom"),
                                   Vegetable(name: "Zucchini", image: "zucchini"),
                                   Vegetable(name: "Bell Peppers", image: "bell-pepper")])
    ]
}
As you can see, we have struct VegetableModel that contains a parameter mainItems that contains all the information that we will display. For example, the first component refers to the type of vegetable Root Vegetables, illustrated with the image carrot and which has 5 sample vegetables as components (each with its name and image).
View development
The main menu view will be based on a List component that, for each item, will show the image on the left and, on the right of it, the name of the type of vegetable and the number of vegetables it contains. Also, taking into account that we have to know which element we select from the list to show its detail, we must first create a state variable (selectedTypeId), and also a variable that refers to our data model:
struct ContentView: View {

    @State private var selectedTypeId: VegetableType.ID?
...
The next step is to mount the view of our main menu:
struct ContentView: View {

    @State private var selectedTypeId: VegetableType.ID?

    private var model = VegetableModel()

    var body: some View {
        NavigationSplitView {
            List(model.data, selection: $selectedTypeId) { type in
                HStack {
                    Image(type.image)
                        .resizable()
                        .scaledToFit()
                        .frame(width: 60, height: 60)
                        .cornerRadius(10)
                    VStack(alignment: .leading) {
                        Text(type.type)
                            .font(.system(.title2))
                            .bold()
                        Text("Vegetables: \(type.vegetables?.count ?? 0)")
                            .font(.system(.footnote))
                    }
                }
            }
        } detail: {
            ...
        }
    }
}
The next step is to set up the view of our main menu. As we can see, we pass to the List component, on the one hand, the elements that we want it to show (model.data) and, on the other hand, the selectedTypeId variable to know at all times what item we select. Each list cell is an HStack containing an Image component and a VStack component (with two Text inside).
The last step to complete this example is to add the detail view:
struct ContentView: View {

    @State private var selectedTypeId: VegetableType.ID?

    private var model = VegetableModel()

    var body: some View {
        NavigationSplitView {
            List(model.data, selection: $selectedTypeId) { type in
                HStack {
                    Image(type.image)
                        .resizable()
                        .scaledToFit()
                        .frame(width: 60, height: 60)
                        .cornerRadius(10)
                    VStack(alignment: .leading) {
                        Text(type.type)
                            .font(.system(.title2))
                            .bold()
                        Text("Vegetables: \(type.vegetables?.count ?? 0)")
                            .font(.system(.footnote))
                    }
                }
            }
        } detail: {
            if let selectedTypeId,
               let selectedType = model.data.first(where: { $0.id == selectedTypeId }),
               let vegetables = selectedType.vegetables {
                List(vegetables) { vegetable in
                    HStack {
                        Image(vegetable.image)
                            .resizable()
                            .scaledToFit()
                            .frame(width: 60, height: 60)
                            .cornerRadius(10)
                        Text(vegetable.name)
                            .font(.system(.title3))
                            .bold()
                    }
                }
            } else {
                Text("Choose a vegetable type")
                    .font(.system(.title))
                    .bold()
            }
        }
    }
}
In this part, what we do is first check if a vegetable type has been selected (if let selectedTypeId), then filter that vegetable type based on its id, and finally get its vegetables (if any). We then pass these vegetables to a list for you to display. In this way, as we select items in the main menu, the list of vegetables of each type of vegetable type selected will appear in the secondary list.
NavigationSplitView 3 columns example
To add a third column to our NavigationSplitView, what we will do is add a new section called content before the detail one, as we have seen at the beginning of this post.
The content section will now contain, with some slight modifications, what was previously in the detail section:
struct ContentView: View {

    @State private var selectedTypeId: VegetableType.ID?
    @State private var selectedVegetable: Vegetable?

    private var model = VegetableModel()

    var body: some View {
        NavigationSplitView {
            ...
        } content: {
            if let selectedTypeId,
               let selectedType = model.data.first(where: { $0.id == selectedTypeId }) {
                let vegetables = selectedType.vegetables
                List(vegetables, selection: $selectedVegetable) { vegetable in
                    NavigationLink(value: vegetable) {
                        HStack {
                            Image(vegetable.image)
                                .resizable()
                                .scaledToFit()
                                .frame(width: 60, height: 60)
                                .cornerRadius(10)
                            Text(vegetable.name)
                                .font(.system(.title3))
                                .bold()
                        }
                    }
                }
            }
        } detail: {
            ...
        }
    }
}
What we have done is, first, add a new State variable (selectedVegetable) to control which vegetable we have selected and whose image we want to see zoomed in on. Later, we have added a NavigationLink with the HStack inside, so that when clicking on it, it selects said vegetable.
Now we only have to add new content to detail so that it shows the image of the selected vegetable, or a Te*xt with a call to action in case none is selected.
struct ContentView: View {

    @State private var selectedTypeId: VegetableType.ID?
    @State private var selectedVegetable: Vegetable?

    private var model = VegetableModel()

    var body: some View {
        NavigationSplitView {
            ...
        } content: {
            ...
        } detail: {
            if let selectedVegetable {
                Image(selectedVegetable.image)
                    .resizable()
                    .scaledToFit()
            } else {
                Text("Choose a vegetable")
                    .font(.system(.title2))
                    .bold()
            }
        }
    }
}
The complete code is the following:
import SwiftUI

struct VegetableType: Identifiable, Hashable {
    var id = UUID()
    var type: String
    var image: String
    var vegetables: [Vegetable]
}

struct Vegetable: Identifiable, Hashable {
    var id = UUID()
    var name: String
    var image: String
}

struct VegetableModel {
    let data = [
        VegetableType(type: "Root Vegetables",
                      image: "carrot",
                      vegetables: [Vegetable(name: "Carrots", image: "carrot"),
                                   Vegetable(name: "Potatoes", image: "potato"),
                                   Vegetable(name: "Beets", image: "beet"),
                                   Vegetable(name: "Sweet Potatoes", image: "sweet-potato"),
                                   Vegetable(name: "Turnips", image: "turnip")]),
        VegetableType(type: "Leafy Greens",
                      image: "spinach",
                      vegetables: [Vegetable(name: "Spinach", image: "spinach"),
                                   Vegetable(name: "Kale", image: "kale"),
                                   Vegetable(name: "Lettuce", image: "lettuce"),
                                   Vegetable(name: "Swiss Chard", image: "swiss-chard")]),
        VegetableType(type: "Other Vegetables",
                      image: "mushroom",
                      vegetables: [Vegetable(name: "Tomatoes", image: "tomato"),
                                   Vegetable(name: "Mushrooms", image: "mushroom"),
                                   Vegetable(name: "Zucchini", image: "zucchini"),
                                   Vegetable(name: "Bell Peppers", image: "bell-pepper")])
    ]
}

struct ContentView: View {

    @State private var selectedTypeId: VegetableType.ID?
    @State private var selectedVegetable: Vegetable?

    private var model = VegetableModel()

    var body: some View {
        NavigationSplitView {
            List(model.data, selection: $selectedTypeId) { type in
                HStack {
                    Image(type.image)
                        .resizable()
                        .scaledToFit()
                        .frame(width: 60, height: 60)
                        .cornerRadius(10)
                    VStack(alignment: .leading) {
                        Text(type.type)
                            .font(.system(.title2))
                            .bold()
                        Text("Vegetables: \(type.vegetables.count)")
                            .font(.system(.footnote))
                    }
                }
            }
        } content: {
            if let selectedTypeId,
               let selectedType = model.data.first(where: { $0.id == selectedTypeId }) {
                let vegetables = selectedType.vegetables
                List(vegetables, selection: $selectedVegetable) { vegetable in
                    NavigationLink(value: vegetable) {
                        HStack {
                            Image(vegetable.image)
                                .resizable()
                                .scaledToFit()
                                .frame(width: 60, height: 60)
                                .cornerRadius(10)
                            Text(vegetable.name)
                                .font(.system(.title3))
                                .bold()
                        }
                    }
                }
            }
        } detail: {
            if let selectedVegetable {
                Image(selectedVegetable.image)
                    .resizable()
                    .scaledToFit()
            } else {
                Text("Choose a vegetable")
                    .font(.system(.title2))
                    .bold()
            }
        }
    }
}
Conclusion
With this chapter you already have the minimum tools to apply navigation by columns using NavigationSplitView in your applications. You have seen how in a simple way you can build a navigation that is shown by different applications, such as Apple Mail.


